Declare Validation Rules
- 8 minutes to read
To apply restrictions to business classes and their properties, the eXpressApp Framework uses the concept of Validation Rules. There are several approaches to declaring Validation Rules. The most common approach is to decorate a business class with a Validation Rule attribute. You can also declare the Validation Rules in the Application Model. Finally, you can dynamically create Validation Rules in code. This topic describes the available approaches, and their pros and cons.
- Apply Rules using Rule Attributes in Code
- Apply Rules using the Model Editor
- Soft Validation
- Define a Custom Rule Source
To learn the basics of validation in XAF, refer to the Validation Rules topic.
Apply Validation Rules using Rule Attributes in Code
The validation functionality is provided by the Validation Module. Add this module to your MySolution.Module project. For this purpose, find the Module.cs (Module.vb) file in the MySolution.Module project displayed in the Solution Explorer. Double-click this file. The Module Designer will be invoked. In the Toolbox, navigate to the DX.19.1: XAF Modules tab. Drag the ValidationModule item from this tab to the Designer’s Required Modules section. Rebuild your solution.
You can also add the ValidationWindowsFormsModule and ValidationAspNetModule to your WinForms and ASP.NET applications. This module creates error messages, invoked after rules are broken, that are more informative and user friendly. To add this module, invoke the Application Designer and drag the ValidationWindowsFormsModule/ValidationAspNetModule from the Toolbox to the Modules panel.
Note
You can add modules to your application when you create a new XAF solution using the Solution Wizard. To do this, select modules in the Choose Extra Modules step.
- To add an extra module in code, add it to the XafApplication.Modules or ModuleBase.RequiredModuleTypes list (adding a reference to the module assembly is insufficient).
You can declare a Validation Rule directly in code with the help of an appropriate attribute. This is the recommended approach, if you can modify sources of the required business classes. To apply a particular Rule to a class or a property, use an attribute with the same name as the required Rule. The attribute’s parameters allow you to specify the Rule’s properties. For instance, the Contexts for a Rule can be specified using the attribute’s ContextIDs parameter.
Rule Attributes applied to business class’ members, are considered for public members only. In XPO persistent classes, attributes of protected members are additionally considered.
The code below applies the RuleCriteria Rule for the Incident persistent class, and the RuleRequiredField Rule for its Subject property. Both these Rules will be checked when saving this object. For the RuleCriteria Rule, a criteria is specified by the attribute’s parameter. Additionally, you can specify named parameters. In the code below, the SkipNullOrEmptyValues parameter is set to false, so that the rule is checked if the property is set to null (Nothing in VB).
Tip
A complete sample project is available in the DevExpress Code Examples database at How to Set Validation Rules in Code.
using System.ComponentModel;
//...
[DefaultClassOptions]
[DefaultProperty("Subject")]
[RuleCriteria("RuleCriteria for Incident", DefaultContexts.Save,
    "AssignedTo is not null", SkipNullOrEmptyValues = false)]
public class Incident : BaseObject {
    public Incident(Session session) : base(session) { }
    private Person assignedTo;
    private string subject;
    [RuleRequiredField("RuleRequiredField for Incident.Subject",
       DefaultContexts.Save)]
    public string Subject {
        get {
            return subject;
        }
        set {
            SetPropertyValue("Subject", ref subject, value);
        }
    }
    public Person AssignedTo {
        get {
            return assignedTo;
        }
        set {
            SetPropertyValue("AssignedTo ", ref assignedTo, value);
        }
    }
}
Note
A Validation Rule can also be applied to a non-persistent class. Refer to the Non-Persistent Objects Validation topic to see an example.
To adjust rules, use the PersistenceValidationController. An example of how to use this controller is available in its description.
If an executed operation does not satisfy a specified Rule, the editors with broken Rules are marked with the  sign, and a pop-up window is invoked. The images below illustrate a sample where the Rules defined in the code above were broken.
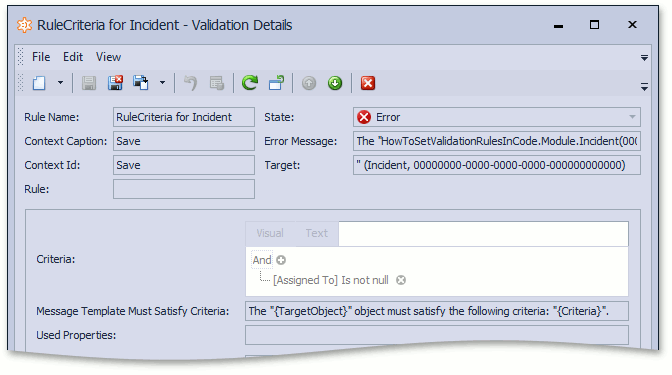
In a Windows Forms application, a pop-up window containing the RuleSetValidationResultItem_ByTarget List View is invoked if any broken validation rule is detected. All broken rules are detailed in this List View.
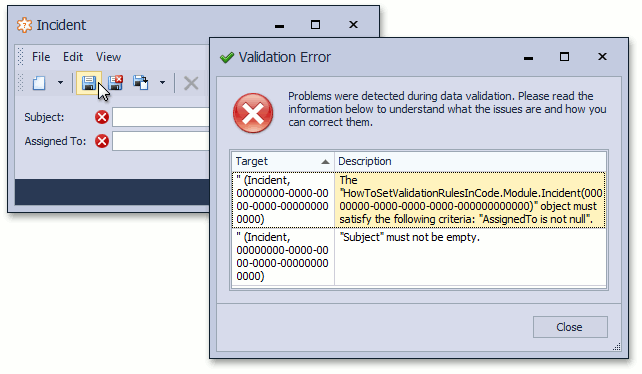
Each broken validation rule can be displayed using the DisplayableValidationResultItem Detail View, providing more details on validation results. This Detail View can be invoked by double-clicking a grid item.
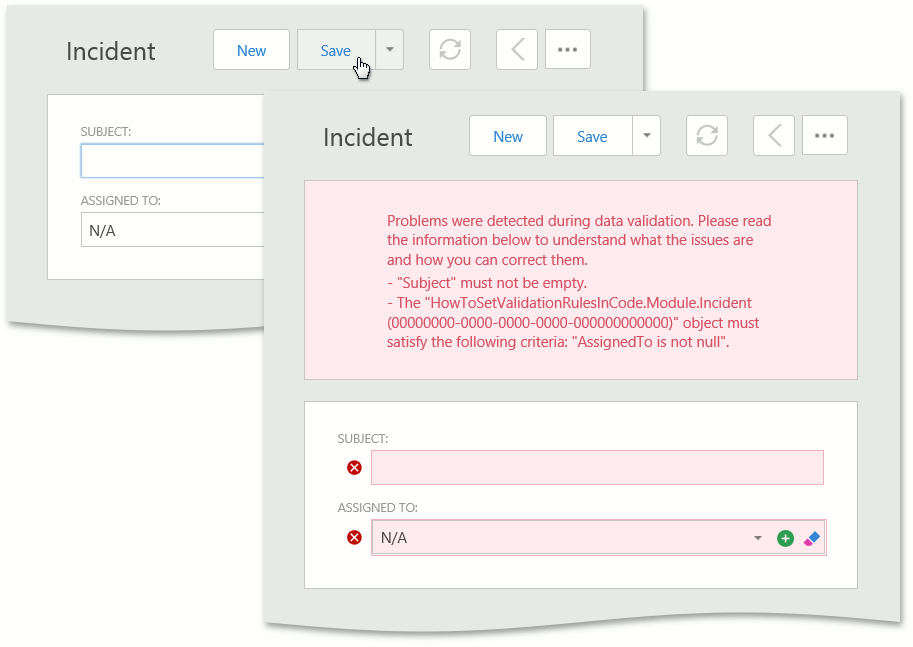
In an ASP.NET application, the details on the broken rules are displayed in the Detail View where the object was edited.
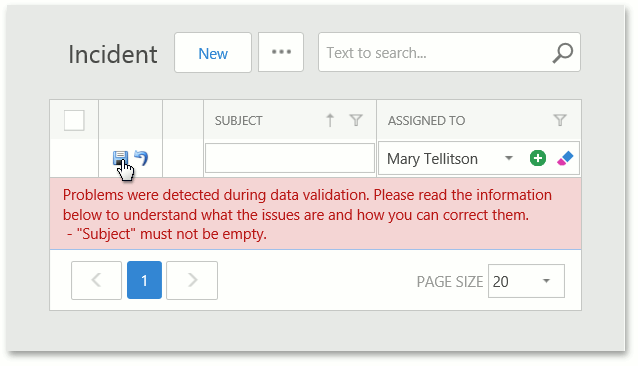
If a broken rule was detected when editing an object using the Editable List View, the details on the broken rule are displayed below the grid row.
As you can see in the images above, the message templates that are set by default are used to define the broken rules. If you have set a custom message template in code using the rule attribute’s CustomMessageTemplate parameter or in the Model Editor using the Rules | Rule node’s CustomMessageTemplate property, it is displayed in place of the default message.
Create Validation Rules in the Model Editor
A rule can be declared in the Application Model using the Model Editor. Use this approach to declare a Validation Rule for a business class, whose source code cannot be modified (a business class declared in a third-party module used in your application). The following Application Model nodes define Contexts and Rules:
The ActionDesign | Actions | <Action> node
Set the desired value to the IModelActionValidationContexts.ValidationContexts property of this node. This will allow you to use this Action as Contexts with specified IDs.
The Validation | Contexts node
Use this node to localize Context captions. Context captions are displayed in Views bound to Rules objects. These objects provide information on Rules and Contexts used in your application. You may need to make these objects available in your application for administrative purposes. To localize a particular Context, select the Add Context item in the context menu invoked for the Contexts node, and specify the ID and Caption properties.
The Validation | Rules node
You can define Rules using this node. By default, this node already contains several Rules from other modules. If Rules are specified in your code, they will also appear in this node. You can add a particular Rule (RuleRequiredField, RuleRange, etc.) from the corresponding Add… context menu item. You can then specify the new Rule’s properties. A Rule of any type has the ContextIDs property. To specify this property, use an Action’s ValidationContexts property value, or Contexts that you implement in code. You can also use the DefaultContexts.Save or DefaultContexts.Delete Contexts for Rules of any type.
The Validation | ErrorMessageTemplates node
Using this node, you can change a message template used for a particular rule type by default. The new text will be used in error messages when a rule of this type is broken. Note that this text can be overridden using the CustomMessageTemplate property in individual Rules | Rule nodes, or in code using a rule attribute’s CustomMessageTemplate parameter.
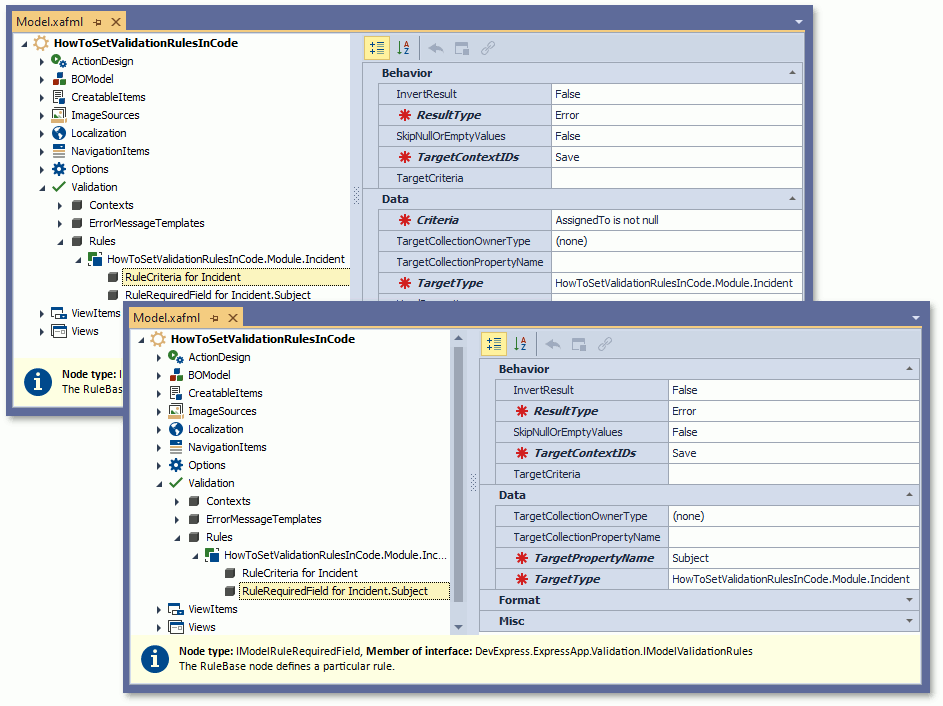
Information about Rules applied in code (using Rule attributes) is loaded into the Application Model in the projects that reference the Validation module, and the module where rules were applied. This allows a user who has access to the Model Editor (typically, a business application administrator) to add and edit Rules and Contexts using the Model Editor. The following image shows how Rules defined in the “Rule Attributes” section are represented in the Application Model.
Soft Validation
You can define validation rules that can be ignored by end users. This functionality is useful when you want to warn a user that the data is invalid, but allow the user to commit changes anyway. Set the IRuleBaseProperties.ResultType property to Warning or Information to define an ignorable rule in the Model Editor. To define this rule in code, pass the RuleBaseAttribute.ResultType parameter to the rule attribute and set this parameter to Warning or Information. For details on rule result types, see the descriptions of the ValidationResultType enumeration members. You can try Soft Validation in the Validation | Soft Validation section of the FeatureCenter demo. The Feature Center demo is installed in %PUBLIC%\Documents\DevExpress Demos 19.1\Components\eXpressApp Framework\FeatureCenter by default. The ASP.NET version of this demo is available online at https://demos.devexpress.com/XAF/FeatureCenter/.
Note
- Always define IRule.UsedProperties for warning and info rules.
- Soft Validation is not supported in List Views in ASP.NET applications.
- To disable Soft Validation, set the ValidationModule.IgnoreWarningAndInformationRules property to true.
Define a Custom Rule Source
The Validation Module allows you to define custom Validation Rule Sources. These are represented by classes implementing the IRuleSource interface. The interface’s IRuleSource.CreateRules method allows you to implement custom logic, to instantiate Validation Rules.
To see an implementation example of a custom Validation Rule Source, refer to the IRuleSource interface description.