Application Update
- 7 minutes to read
Generally, application development does not stop after deployment. End-users will likely require updates, causing you to release new versions of the application. In this lesson, you will learn how to update an application.
Let’s assume that you have just finished developing a new version of an application.
Update a Windows Forms Application
Update Application Files
The only difference between updating and deploying a Windows Forms application is that you overwrite existing application files instead of creating new ones. Deploy a new version of the application over a previous version to any End-User Workstation or to the Terminal Server. Use one of the methods you learned in Xcopy Method or Setup Project Method lessons. ClickOnce Windows Forms applications have their own internal update method. Refer to the Introducing Client Application Deployment with “ClickOnce” MSDN topic for details if you need to update a ClickOnce application.
Note
If end-users have custom MySolution.Win.exe.config files, do not overwrite them when updating. The same applies to custom Model.User.xafml files.
Update Database via the DBUpdater Tool
- Install the DBUpdater tool to a workstation or server being updated. Refer to the Set Up the Database Connection lesson for details.
Important
The DBUpdater tool does not support a scenario when multiple Object Space Providers are used (see How to: Use Both Entity Framework and XPO in a Single Application). Refer to the Updating the database when multiple persistent Object Space Providers are used ticket for possible workarounds.
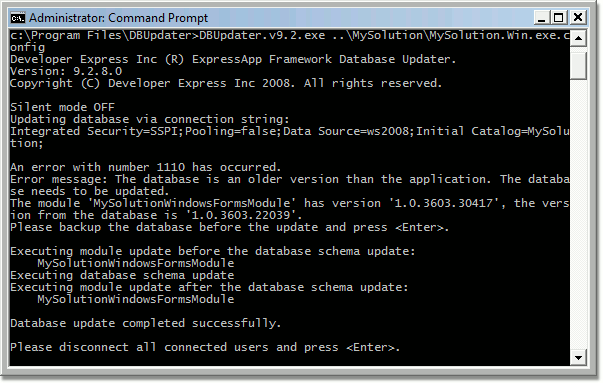
Launch the Command Prompt. Type “cd C:\Program Files\DBUpdater“ and press ENTER. Type “DBUpdater.exe ..\MySolution\MySolution.Win.exe.config“ and press ENTER. The DBUpdater will connect to the Database Server and determine if the application database has an older version than the application. Press ENTER and the DBUpdater will update the database.
Tip
To obtain DBUpdater logs, edit its configuration file (DBUpdater.v19.1.exe.config) and set the eXpressAppFramework switch value to 3 (Info):
<?xml version="1.0" encoding="utf-8"?>
<configuration>
  <startup>
    <supportedRuntime version="v4.0" sku=".NETFramework,Version=v4.0" />
  </startup>
  <system.diagnostics>
    <switches>
      <!-- Use one of the following predefined values: 0-Off, 1-Errors, 2-Warnings, 3-Info, 4-Verbose. The default value is 0. -->
      <add name="eXpressAppFramework" value="3" />
    </switches>
  </system.diagnostics>
</configuration>
Logs will be written to the eXpressAppFramework.log file.
- Run the Windows Forms application to ensure that it was updated.
Note
If you experience any problems while updating a Windows Forms application, refer to the Deployment Troubleshooting Guide topic.
Set up an Automatic Update of a Windows Forms Application via the Application Updater Utility
If you do not use the Terminal Server to provide access to the Windows Forms application, you will need to update the Windows Forms Application at all the End-User Workstations. The simplest way to do this is to overwrite application files with new ones at each workstation. However, there is another approach that allows you to save time in the future. Perform the following steps to automate the update process at multiple workstations.
Important
The automatic update mechanism relies on comparing versions stored in the ModulesInfo table with the actual modules’ versions. So, you should set the XafApplication.CheckCompatibilityType property to ModulesInfo before setting up the automatic update. Also, ensure that NonPersistentObjectSpaceProvider is not the first registered Provider in your application. XAF uses the first registered Object Space Provider while application update.
- Choose a file server in the end-users network. Create a shared folder readable by all the Windows Forms application users at this server. You can give it an arbitrary name. For instance, name it MySolutionUpdateSource. This folder will store newer application versions.
- Ensure that users do not have write permissions to MySolutionUpdateSource. However, you should have write access to it.
Go back to the previously updated End-User Workstation. Find the following line in the application configuration file.
<add key="NewVersionServer" value="" />Modify this line as shown below:
<add key="NewVersionServer" value="\\FILESERVER\MySolutionUpdateSource\" />Substitute “\FILESERVER\MySolutionUpdateSource\“ with a real Universal Naming Convention (UNC) path to the folder created in the previous step.
- Copy the Windows Forms application folder contents from the End-User Workstation to the MySolutionUpdateSource shared folder. The UNC path to the application executable should be “\FILESERVER\MySolutionUpdateSource\MySolition.Win.exe“.
- Copy the %PROGRAMFILES(x86)%\DevExpress 19.1\Components\Tools\eXpressAppFramework\Application Updater\DevExpress.ExpressApp.Updater.exe file from the Developer Workstation to the MySolutionUpdateSource shared folder. The UNC path to this file should be “\FILESERVER\MySolutionUpdateSource\DevExpress.ExpressApp.Updater.exe“.
- The application configuration file NewVersionServer key must point to the MySolutionUpdateSource shared folder at each End-User Workstation. Modify the configuration files manually or overwrite configuration files by the \FILESERVER\MySolutionUpdateSource\MySolution.Win.exe.config file.
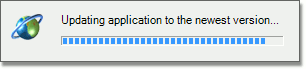
Run the Windows Forms application at an End-User Workstation that was not updated. You will see the Updater progress bar.
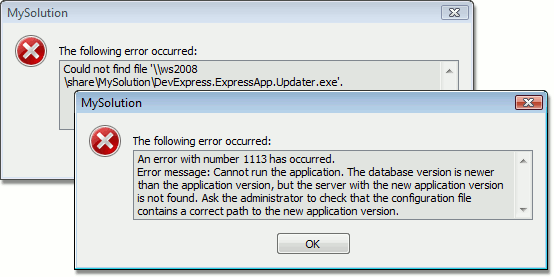
If one of the following error messages is displayed instead, check to make sure that the UNC path in the configuration file is not mistyped, and that the shared folder is readable and contains the DevExpress.ExpressApp.Updater.exe file.
After the update is finished, the application will be restarted automatically.
Now end-user applications are configured to be automatically updated when the database version changes. To deploy a new application version, perform the following steps.
- Replace the files located in the MySolutionUpdateSource shared folder with new application files.
- Update the database version as described above.
When an end-user launches the Windows Forms application, it will be instantly updated. The update process takes as much time as required to copy the MySolutionUpdateSource shared folder contents to the End-User Workstation. The update process will not be initiated if the database was not updated - the previous application version will be launched even if the MySolutionUpdateSource folder contains a new version of the application.
Note
- The MySolutionUpdateSource folder should only be used to store new application files. Do not store other files in this folder. Otherwise, they will be copied to each End-User Workstation when updating.
- You can change the Updater utility behavior by changing and recompiling its sources. The Updater tool sources are available in the %PROGRAMFILES(x86)%\DevExpress 19.1\Components\Sources\DevExpress.ExpressApp.Tools\DevExpress.ExpressApp.Updater folder by default. For instance, you can implement the downloading of a new version’s files from a remote web server instead of a local file share.
Update ASP.NET Application
Update Application Files
The only difference between updating and deploying an ASP.NET application is that you overwrite existing application files instead of creating new ones. Deploy a new version of the application over a previous version using one of the methods you learned in the Xcopy Method, Publish Web Method or Setup Project Method lessons.
Note
If you have a custom server-side Web.config file, do not overwrite it when updating.
Update Database via the DBUpdater Tool
- Install the DBUpdater tool to the workstation or server being updated. Refer to the Set Up the Database Connection lesson for details.
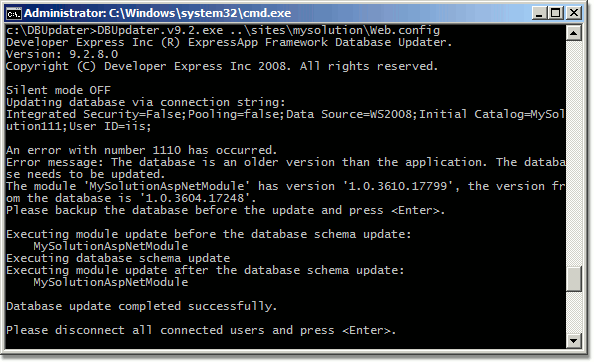
Launch the Command Prompt. Run the DBUpdater.exe with the path to Web.config as a command-line parameter. The DBUpdater will connect to the database server and determine if the application database has an older version than the application. Press ENTER and the DBUpdater will update the database.
- Run the ASP.NET application and ensure that it was updated.
Note
If you are having problems with updating the database for an ASP.NET application, before looking at the Deployment Troubleshooting Guide, try the following. Put all the application assemblies that have been built into a newly created folder. Make sure that the assembly containing your WebApplication descendant is located in this folder. Usually the name of this assembly will be the name of your application postfixed with .Web - e.g. MySolution.Web. Place the Web.config file into this folder. Run the DBUpdater.exe, specifying the fully-qualified path to the Web.config file.
Note
You can prevent a specific module from updating the database by specifying a fixed version of this module’s assembly (e.g., 1.0.0.0). For instance, it can be required to force version synchronization of your WinForms and ASP.NET modules. By default, the build and revision numbers are specified by using the asterisk (*), and Visual Studio auto-increments these numbers (see AssemblyVersionAttribute). This leads to a database version mismatch on each module update.