How to: Test an Action
- 8 minutes to read
This topic provides step-by step instructions on how to test an XAF application. A custom Controller that provides the Postpone Action is implemented in this example. Then, this Action’s functionality will be tested via the EasyTest functional testing and NUnit unit testing frameworks.
Note
Mobile applications do not support the EasyTest functional testing.
Implement a Custom Action
Create a new XAF application solution named PostponeControllerTest. The custom Controller will perform an Action over Task business objects. The sample Task business class exposes two properties - Description and DueDate.
[DefaultClassOptions]
public class Task : BaseObject {
    public Task(Session session) : base(session) { }
    public string Description {
        get { return GetPropertyValue<string>("Description"); }
        set { SetPropertyValue<string>("Description", value); }
    }
    public DateTime DueDate {
        get { return GetPropertyValue<DateTime>("DueDate"); }
        set { SetPropertyValue<DateTime>("DueDate", value); }
    }
}
The custom Controller is targeted for List Views and contains the Postpone Action. This Action processes the selected objects in a Task List View. The Action adds one day to the objects’ DueDate property values.
public class PostponeController : ViewController {
    private SimpleAction postpone;
    public PostponeController() {
        TargetObjectType = typeof(Task);
        postpone = new SimpleAction(this, "Postpone", "Edit");
        postpone.Execute += new SimpleActionExecuteEventHandler(Postpone_Execute);
    }
    void Postpone_Execute(object sender, SimpleActionExecuteEventArgs e) {
        foreach (object selectedObject in View.SelectedObjects) {
            Task selectedTask = (Task)selectedObject;
            if (selectedTask.DueDate == DateTime.MinValue) {
                selectedTask.DueDate = DateTime.Today;
            }
            selectedTask.DueDate = selectedTask.DueDate.AddDays(1);
        }
    }
    public SimpleAction Postpone {
        get { return postpone; }
    }
}
Functional Tests
This section describes a way of creating an EasyTest script that ensures that the implemented Postpone Action works as expected. The test will work for both Windows Forms and ASP.NET Web applications.
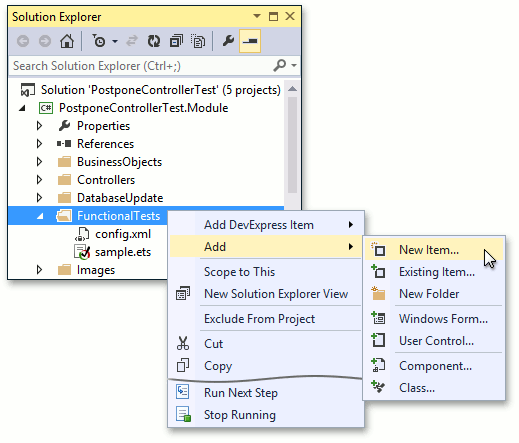
In Solution Explorer, navigate to the module project. Right-click the FunctionalTests folder and select Add | New Item.
In the Add New Item dialog, select Text File and enter “PostponeControllerTest.ets” as the new file’s name. When the Visual Studio text editor is invoked, enter the following code.
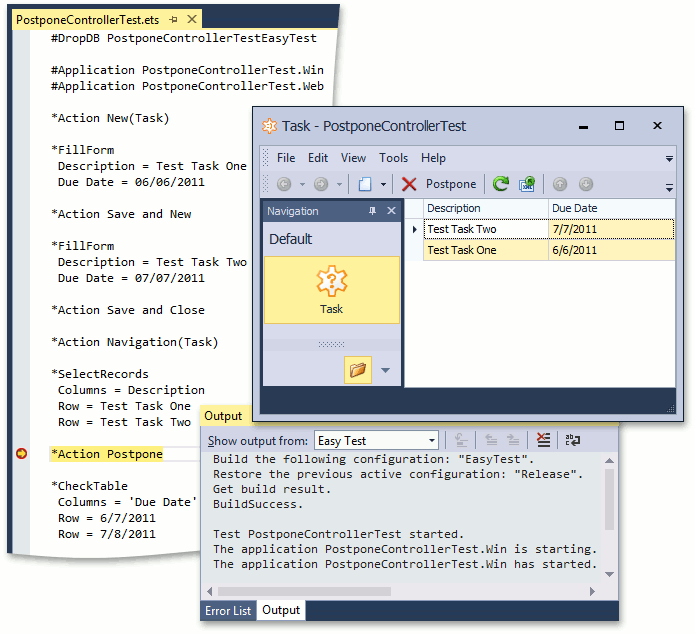
#DropDB PostponeControllerTestEasyTest

#Application PostponeControllerTest.Win
#Application PostponeControllerTest.Web

*Action New(Task)

*FillForm
 Description = Test Task One
 Due Date = 06/06/2011

*Action Save and New

*FillForm
 Description = Test Task Two
 Due Date = 07/07/2011

*Action Save and Close

*Action Navigation(Task)

*SelectRecords
 Columns = Description
 Row = Test Task One
 Row = Test Task Two

*Action Postpone

*CheckTable
 Columns = 'Due Date'
 Row = 6/7/2011
 Row = 7/8/2011
This script creates two Task objects, selects them in the List View and executes the Postpone Action. After that, the script ensures that the test objects’ DueDate property values change as expected. For detailed information on the EasyTest command syntax, refer to the EasyTest Script Reference topic.
Note
By default, the FunctionalTests folder contains the Sample.ets script. You can use it as a starting point when creating tests. If you do not need this file, you can delete it. Another file, initially located in the FunctionalTests folder, is Config.xml. This file specifies the EasyTest configuration settings and should not be deleted.
Save the test script. Right-click this file in Solution Explorer and select Run:

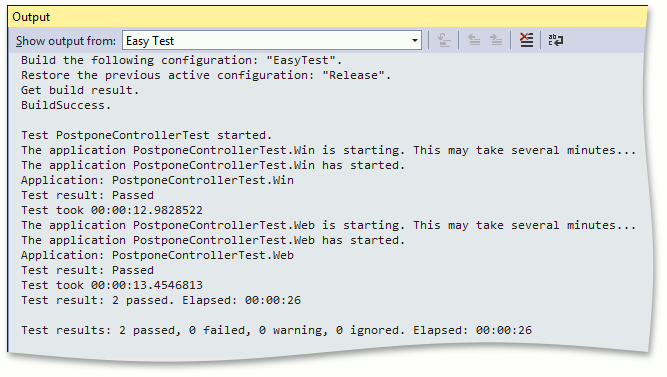
The test will first be executed in Windows Forms, and then in the ASP.NET application (this is specified by the second and third commands of the test script). You will then see the following output, indicating that all tests passed successfully.
Unit Tests
This section describes a way of creating a unit test that ensures that the implemented Postpone Action works as expected.
- In the module project, add a reference to the nunit.framework assembly.
Implement the following simple TestApplication class, since it is required by the test above.
using DevExpress.ExpressApp.Layout; // ... class TestApplication : XafApplication { protected override LayoutManager CreateLayoutManagerCore(bool simple) { return null; } }We cannot instantiate the XafApplication class itself, as it is abstract. So, we create a lightweight descendant. The use of a built-in XafApplication descendant (e.g., WinApplication) is possible, but not recommended in this scenario, as the test will take more time to start.
Add the following test class to the module project.
using NUnit.Framework; using DevExpress.ExpressApp; using DevExpress.ExpressApp.Xpo; // ... [TestFixture] public class PostponeControllerUnitTest { IObjectSpace objectSpace; PostponeController controller; TestApplication application; [SetUp] public void SetUp() { XPObjectSpaceProvider objectSpaceProvider = new XPObjectSpaceProvider(new MemoryDataStoreProvider()); application = new TestApplication(); ModuleBase testModule = new ModuleBase(); testModule.AdditionalExportedTypes.Add(typeof(Task)); application.Modules.Add(testModule); application.Setup("TestApplication", objectSpaceProvider); objectSpace = objectSpaceProvider.CreateObjectSpace(); controller = new PostponeController(); } [Test] public void TestPostponeActionDueDateUnspecified() { Task task = objectSpace.CreateObject<Task>(); controller.SetView(application.CreateDetailView(objectSpace, task)); controller.Postpone.DoExecute(); Assert.AreEqual(task.DueDate, DateTime.Today.AddDays(1)); } [Test] public void TestPostponeActionDueDateSpecified() { Task task = objectSpace.CreateObject<Task>(); task.DueDate = new DateTime(2011, 6, 6); controller.SetView(application.CreateDetailView(objectSpace, task)); controller.Postpone.DoExecute(); Assert.AreEqual(task.DueDate, new DateTime(2011, 6, 7)); } }In this test, we instantiate an application and ObjectSpaceProvider. Then, required modules and business objects are registered. After that, it is possible to create a Controller to be tested and set a View to it. To execute an Action in a test, the SimpleAction.DoExecute method is used. Note that the Postpone Action is exposed by the Controller’s public property to allow for accessing the Action externally.
Note
You can enclose the test fixture code in #ifdef DEBUG and #endif statements to exclude tests from the release version of your application.
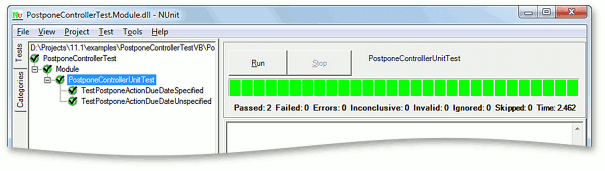
Build the module project, and open the output assembly in the NUnit GUI Runner (nunit.exe). Then, click Run to see the results.
If you want to test an action that is available in a List View, or in a Detail View containing nested List View, then you need a TestApplication class that implements the CreateListEditorCore virtual method. The reason is that when the XafApplication.CreateListView method is executed, the List Editor is instantiated. As there are no built-in platform-independent List Editors in XAF, you should implement the fake List Editor for testing purposes and return an instance of this List Editor in the overridden CreateListEditorCore method.
using DevExpress.ExpressApp.Layout;
using DevExpress.ExpressApp.Editors;
// ...
class TestApplication : XafApplication {
    protected override LayoutManager CreateLayoutManagerCore(bool simple) {
        return null;
    }
    protected override ListEditor CreateListEditorCore(
        IModelListView modelListView, CollectionSourceBase collectionSource) {
        return new TestListEditor(modelListView);
    }
}
internal class TestListEditor : ListEditor {
    public TestListEditor(IModelListView modelListView) {
        SetModel(modelListView);
    }
    protected override object CreateControlsCore() {
        throw new NotImplementedException();
    }
    protected override void AssignDataSourceToControl(object dataSource) { }
    public override void Refresh() { }
    public override System.Collections.IList GetSelectedObjects() {
        return new List<object>();
    }
    public override SelectionType SelectionType {
        get { return SelectionType.MultipleSelection; }
    }
    public override DevExpress.ExpressApp.Templates.IContextMenuTemplate ContextMenuTemplate {
        get { return null; }
    }
}
With the TestApplication implementation illustrated above, you can use the XafApplication.CreateListView method in your unit tests.