How to: Use Custom Logon Parameters and Authentication
- 16 minutes to read
The login form displays the User Name editor when the AuthenticationStandard authentication is enabled. This topic explains how to customize the login form editors. For example, show the Company and Employee lookup editors instead of User Name.
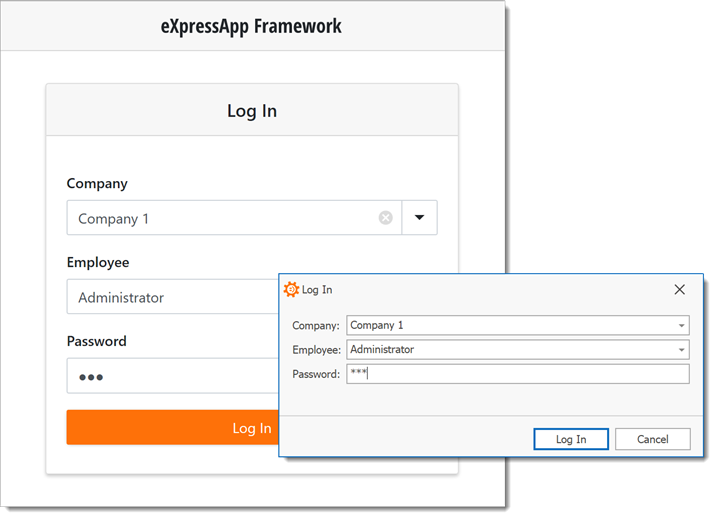
The login form displays an AuthenticationStandardLogonParameters Detail View. The AuthenticationStandardLogonParameters object has the UserName and Password string properties.
To use custom logon parameters, implement a custom logon parameters class. This class’s properties are displayed on the login form and are accessible using the SecuritySystem.LogonParameters property. To specify how your application authenticates users, inherit the AuthenticationBase class and implement a custom authentication strategy class.
Note
Alternatively, you can use the approach from the ICustomObjectSerialize topic - inherit the AuthenticationStandardLogonParameters class and implement additional properties. Then, you can use the LogonParameters property to access the specified logon parameters. The authentication process is still executed using the specified UserName and Password in this instance. To include the added properties in the authentication process, inherit the AuthenticationStandard class and override the Authenticate method. You should also specify your custom logon parameters class in the Application Designer using the AuthenticationStandard.LogonParametersType property.
Implement the Employee and Company Classes
The Employee class should be inherited from the PermissionPolicyUser class to support the Security System. Add the Company property, and make it a part of the “Company-Employees” association.
using System.ComponentModel;
using DevExpress.Persistent.Base;
using DevExpress.Persistent.BaseImpl.PermissionPolicy;
using DevExpress.Xpo;
// ...
[DefaultClassOptions, DefaultProperty(nameof(UserName))]
public class Employee : PermissionPolicyUser {
    public Employee(Session session) : base(session) {}
    private Company company;
    [Association("Company-Employees")]
    public Company Company {
        get { return company; }
        set { SetPropertyValue(nameof(Company), ref company, value);}
    }
}
The Company class should have the second part of the “Company-Employees” association.
using DevExpress.Persistent.Base;
using DevExpress.Persistent.BaseImpl;
using DevExpress.Xpo;
// ...
[DefaultClassOptions]
public class Company : BaseObject {
    public Company(Session session) : base(session) {}
    private string name;
    public string Name {
        get { return name; }
        set { SetPropertyValue(nameof(Name), ref name, value); }
    }
    [Association("Company-Employees")]
    public XPCollection<Employee> Employees {
        get { return GetCollection<Employee>(nameof(Employees)); }
    }
}
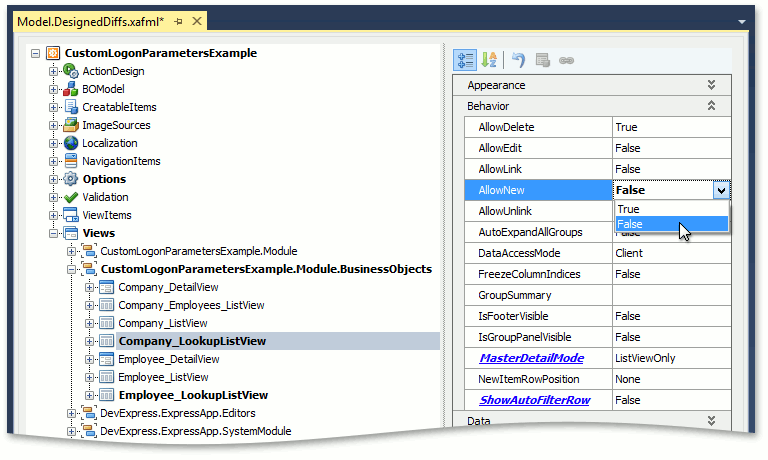
Next, invoke the Model Editor for the module project, expand the Views | CustomLogonParametersExample.Module.BusinessObjects node and find the Employee‘s and Company‘s Lookup List Views. To prevent the creation of new objects in these views, set the IModelView.AllowNew property to false for both Views.
Implement the CustomLogonParameters Class
The following snippet illustrates the CustomLogonParameters class implementation:
using System;
using System.ComponentModel;
using System.Runtime.Serialization;
using CustomLogonParametersExample.Module.BusinessObjects;
using DevExpress.Data.Filtering;
using DevExpress.ExpressApp.DC;
using DevExpress.Persistent.Base;

namespace CustomLogonParametersExample.Module {
    [DomainComponent, Serializable]
    [System.ComponentModel.DisplayName("Log In")]
    public class CustomLogonParameters : INotifyPropertyChanged, ISerializable {
        private Company company;
        private Employee employee;
        private string password;

        [ImmediatePostData]
        public Company Company {
            get { return company; }
            set {
                if (value == company) return;
                company = value;
                if (Employee?.Company != company) {
                    Employee = null;
                }
                OnPropertyChanged(nameof(Company));
            }
        }
        [DataSourceProperty("Company.Employees"), ImmediatePostData]
        public Employee Employee {
            get { return employee; }
            set {
                if (value == employee) return;
                employee = value;
                Company = employee?.Company;
                UserName = employee?.UserName;
                OnPropertyChanged(nameof(Employee));
            }
        }
        [Browsable(false)]
        public String UserName { get; set; }
        [PasswordPropertyText(true)]
        public string Password {
            get { return password; }
            set {
                if (password == value) return;
                password = value;
            }
        }
        public CustomLogonParameters() { }
        // ISerializable
        public CustomLogonParameters(SerializationInfo info, StreamingContext context) {
            if (info.MemberCount > 0) {
                UserName = info.GetString("UserName");
                Password = info.GetString("Password");
            }
        }
        private void OnPropertyChanged(string propertyName) {
            if (PropertyChanged != null) {
                PropertyChanged(this, new PropertyChangedEventArgs(propertyName));
            }
        }
        public event PropertyChangedEventHandler PropertyChanged;
        [System.Security.SecurityCritical]
        public void GetObjectData(SerializationInfo info, StreamingContext context) {
            info.AddValue("UserName", UserName);
            info.AddValue("Password", Password);
        }
        public void RefreshPersistentObjects(IObjectSpace objectSpace) {
            Employee = (UserName == null) ? null : objectSpace.FindObject<Employee>(new BinaryOperator("UserName", UserName));
        }
    }
}
The Employee, Company and Password properties are visible and can be edited in the login form. The DataSourcePropertyAttribute specifies the content of the Lookup Property Editor’s drop-down list. To show only employees that are related to the selected company, filter the drop-down’s collection, and refresh it each time the Company property changes.
Note
In the Middle Tier Security scenario, you are required to serialize logon parameters. However, reference properties cannot be serialized. That is why the hidden UserName property of the string type is required.
Tip
To access the custom logon parameters object in your code, cast the static SecuritySystem.LogonParameters property’s value to your CustomLogonParameters type or handle the XafApplication.LoggedOn event and use the LogonEventArgs.LogonParameters parameter value.
Allow Access to the Company and Employee Types in the Login Window
Add the Company and Employee types to the SecurityStrategy.AnonymousAllowedTypes collection in your applications.
In the WinForms application project, open the WinApplication.cs (WinApplication.vb) file and add the following code to the WinApplication descendant’s constructor:
using DevExpress.ExpressApp; using DevExpress.ExpressApp.Security; using DevExpress.ExpressApp.Win; // ... public partial class CustomLogonParametersExampleWindowsFormsApplication : WinApplication { // ... public CustomLogonParametersExampleWindowsFormsApplication() { // ... ((SecurityStrategy)Security).AnonymousAllowedTypes.Add(typeof(Company)); ((SecurityStrategy)Security).AnonymousAllowedTypes.Add(typeof(Employee)); } // ... }In the ASP.NET application project, open the WebApplication.cs (WebApplication.vb) file and add the following code to the WebApplication descendant’s constructor:
using DevExpress.ExpressApp; using DevExpress.ExpressApp.Security; using DevExpress.ExpressApp.Web; // ... public partial class CustomLogonParametersExampleAspNetApplication : WebApplication { // ... public CustomLogonParametersExampleAspNetApplication() { // ... ((SecurityStrategy)Security).AnonymousAllowedTypes.Add(typeof(Company)); ((SecurityStrategy)Security).AnonymousAllowedTypes.Add(typeof(Employee)); } // ... }In the Blazor application project, open the Startup.cs file and add the following code to the ConfigureServices method:
using DevExpress.ExpressApp.Security;
using Microsoft.Extensions.DependencyInjection;
// ...
public class Startup {
    // ...
    public void ConfigureServices(IServiceCollection services) {
        // ...
        services.AddXafSecurity(options => {
            // ...
            options.Events.OnSecurityStrategyCreated = securityStrategy => {
                // ...
                ((SecurityStrategy)securityStrategy).AnonymousAllowedTypes.Add(typeof(Company));
                ((SecurityStrategy)securityStrategy).AnonymousAllowedTypes.Add(typeof(Employee));
            };
        })
        // ...
    }
}
Provide an Object Space for the Login Window
Create an Object Space to display the Employee and Company properties in the XafApplication.CreateCustomLogonWindowObjectSpace event. Assign a CreateCustomLogonWindowObjectSpaceEventArgs.ObjectSpace parameter to the new Object Space created using the XafApplication.CreateObjectSpace method and add this new Object Space to the NonPersistentObjectSpace.AdditionalObjectSpaces list. Since the Logon Parameters Object might be reused for subsequent logons, persistent objects and collections linked to this object must be reloaded in the new object space. You can do this as demonstrated below.
In the WinForms application
Open the Program.cs (Program.vb) file in the WinForms application project, and subscribe to the CreateCustomLogonWindowObjectSpace event before the XafApplication.Setup method is called in your Program.Main method.
using CustomLogonParametersExample.Module; using CustomLogonParametersExample.Module.BusinessObjects; using DevExpress.ExpressApp; // ... static class Program { // ... static void Main() { // ... winApplication.CreateCustomLogonWindowObjectSpace += application_CreateCustomLogonWindowObjectSpace; winApplication.Setup(); // ... } private static void application_CreateCustomLogonWindowObjectSpace(object sender, CreateCustomLogonWindowObjectSpaceEventArgs e) { e.ObjectSpace = ((XafApplication)sender).CreateObjectSpace(typeof(CustomLogonParameters)); NonPersistentObjectSpace nonPersistentObjectSpace = e.ObjectSpace as NonPersistentObjectSpace; if(nonPersistentObjectSpace != null) { if(!nonPersistentObjectSpace.IsKnownType(typeof(Company), true)) { IObjectSpace additionalObjectSpace = ((XafApplication)sender).CreateObjectSpace(typeof(Company)); nonPersistentObjectSpace.AdditionalObjectSpaces.Add(additionalObjectSpace); nonPersistentObjectSpace.Disposed += (s2, e2) => { additionalObjectSpace.Dispose(); }; } } ((CustomLogonParameters)e.LogonParameters).RefreshPersistentObjects(e.ObjectSpace); } }In WinForms applications, you can customize the Object Space Provider in the WinApplication.CreateDefaultObjectSpaceProvider method. To create an Object Space Provider for the non-persistent types, open the WinApplication.cs (WinApplication.vb) file in the WinForms application project and override the CreateDefaultObjectSpaceProvider method as shown below.
using DevExpress.ExpressApp; using DevExpress.ExpressApp.Win; using DevExpress.ExpressApp.Xpo; // ... public partial class CustomLogonParametersExampleWindowsFormsApplication : WinApplication { // ... protected override void CreateDefaultObjectSpaceProvider(CreateCustomObjectSpaceProviderEventArgs args) { args.ObjectSpaceProviders.Add(new XPObjectSpaceProvider(args.ConnectionString, args.Connection, false)); args.ObjectSpaceProviders.Add(new NonPersistentObjectSpaceProvider(TypesInfo, null)); } }In the ASP.NET application
Open the Global.asax.cs (Global.asax.vb) file in the ASP.NET application project, and subscribe to the CreateCustomLogonWindowObjectSpace event before the XafApplication.Setup method is called in your Global.Session_Start method.
using CustomLogonParametersExample.Module; using CustomLogonParametersExample.Module.BusinessObjects; using DevExpress.ExpressApp; using DevExpress.ExpressApp.Web; // ... public class Global : System.Web.HttpApplication { // ... protected void Session_Start(Object sender, EventArgs e) { // ... WebApplication.Instance.CreateCustomLogonWindowObjectSpace += application_CreateCustomLogonWindowObjectSpace; WebApplication.Instance.Setup(); // ... } private static void application_CreateCustomLogonWindowObjectSpace(object sender, CreateCustomLogonWindowObjectSpaceEventArgs e) { e.ObjectSpace = ((XafApplication)sender).CreateObjectSpace(typeof(CustomLogonParameters)); NonPersistentObjectSpace nonPersistentObjectSpace = e.ObjectSpace as NonPersistentObjectSpace; if(nonPersistentObjectSpace != null) { if(!nonPersistentObjectSpace.IsKnownType(typeof(Company), true)) { IObjectSpace additionalObjectSpace = ((XafApplication)sender).CreateObjectSpace(typeof(Company)); nonPersistentObjectSpace.AdditionalObjectSpaces.Add(additionalObjectSpace); nonPersistentObjectSpace.Disposed += (s2, e2) => { additionalObjectSpace.Dispose(); }; } } ((CustomLogonParameters)e.LogonParameters).RefreshPersistentObjects(e.ObjectSpace); } }In ASP.NET applications, you can customize the Object Space Provider in the WebApplication.CreateDefaultObjectSpaceProvider method. To create the Object Space Provider for the non-persistent types, open the WebApplication.cs (WebApplication.vb) file in the ASP.NET application project and override the CreateDefaultObjectSpaceProvider method as shown below.
using System; using System.Collections.Generic; using CustomLogonParametersExample.Module; using DevExpress.ExpressApp; using DevExpress.ExpressApp.DC; using DevExpress.ExpressApp.Xpo; using DevExpress.ExpressApp.Web; // ... public partial class CustomLogonParametersExampleAspNetApplication : WebApplication { // ... protected override void CreateDefaultObjectSpaceProvider(CreateCustomObjectSpaceProviderEventArgs args) { args.ObjectSpaceProvider = new XPObjectSpaceProvider(GetDataStoreProvider(args.ConnectionString, args.Connection), true); args.ObjectSpaceProviders.Add(new NonPersistentObjectSpaceProvider(TypesInfo, null)); } }In the Blazor application
Open the BlazorApplication.cs file in the Blazor application project, and subscribe to the CreateCustomLogonWindowObjectSpace event in the application constructor.
using CustomLogonParametersExample.Module;
using CustomLogonParametersExample.Module.BusinessObjects;
using DevExpress.ExpressApp;
// ...
public partial class CustomLogonParametersExampleBlazorApplication : BlazorApplication {
    public CustomLogonParametersExampleBlazorApplication() {
        this.CreateCustomLogonWindowObjectSpace += application_CreateCustomLogonWindowObjectSpace;
        // ...
    }
    private static void application_CreateCustomLogonWindowObjectSpace(object sender, CreateCustomLogonWindowObjectSpaceEventArgs e) {
        e.ObjectSpace = ((XafApplication)sender).CreateObjectSpace(typeof(CustomLogonParameters));
        NonPersistentObjectSpace nonPersistentObjectSpace = e.ObjectSpace as NonPersistentObjectSpace;
        if(nonPersistentObjectSpace != null) {
            if(!nonPersistentObjectSpace.IsKnownType(typeof(Company), true)) {
                IObjectSpace additionalObjectSpace = ((XafApplication)sender).CreateObjectSpace(typeof(Company));
                nonPersistentObjectSpace.AdditionalObjectSpaces.Add(additionalObjectSpace);
                nonPersistentObjectSpace.Disposed += (s2, e2) => {
                    additionalObjectSpace.Dispose();
                };
            }
        }
        ((CustomLogonParameters)e.LogonParameters).RefreshPersistentObjects(e.ObjectSpace);
    }
}
Implement the CustomAuthentication Class
To implement custom authentication, inherit the AuthenticationBase class.
using System;
using System.Collections.Generic;
using CustomLogonParametersExample.Module.BusinessObjects;
using DevExpress.Data.Filtering;
using DevExpress.ExpressApp;
using DevExpress.ExpressApp.Security;

namespace CustomLogonParametersExample.Module {
    public class CustomAuthentication : AuthenticationBase, IAuthenticationStandard {
        private CustomLogonParameters customLogonParameters;
        public CustomAuthentication() {
            customLogonParameters = new CustomLogonParameters();
        }
        public override void Logoff() {
            base.Logoff();
            customLogonParameters = new CustomLogonParameters();
        }
        public override void ClearSecuredLogonParameters() {
            customLogonParameters.Password = "";
            base.ClearSecuredLogonParameters();
        }
        public override object Authenticate(IObjectSpace objectSpace) {

            Employee employee = objectSpace.FindObject<Employee>(
                new BinaryOperator("UserName", customLogonParameters.UserName));

            if (employee == null)
                throw new ArgumentNullException("Employee");

            if (!employee.ComparePassword(customLogonParameters.Password))
                throw new AuthenticationException(
                    employee.UserName, "Password mismatch.");

            return employee;
        }

        public override void SetLogonParameters(object logonParameters) {
            this.customLogonParameters = (CustomLogonParameters)logonParameters;
        }

        public override IList<Type> GetBusinessClasses() {
            return new Type[] { typeof(CustomLogonParameters) };
        }
        public override bool AskLogonParametersViaUI {
            get { return true; }
        }
        public override object LogonParameters {
            get { return customLogonParameters; }
        }
        public override bool IsLogoffEnabled {
            get { return true; }
        }
    }
}
Refer to the base class description for information on methods and properties that are overridden in the code above.
Note
In the client-server security configuration, you are additionally required to:
- override the AuthenticationBase.SetLogonParameters method to initialize the AuthenticationBase.LogonParameters property;
- register the type of custom logon parameters using the static WcfDataServerHelper.AddKnownType method before the data server is initialized.
Implement the Custom Authentication Provider (for Blazor Applications Only)
In the Blazor application project, create the AuthenticationStandardProviderV2 descendant. Override its CreateAuthentication method and return the CustomAuthentication instance.
using DevExpress.ExpressApp.Security;
using Microsoft.Extensions.Options;
using System;
// ...
public class CustomAuthenticationStandardProvider : AuthenticationStandardProviderV2 {
    public CustomAuthenticationStandardProvider(IOptions<AuthenticationStandardProviderOptions> options,
    IOptions<SecurityOptions> securityOptions) :
        base(options, securityOptions) { }
    protected override AuthenticationBase CreateAuthentication(Type userType, Type logonParametersType) {
        return new CustomAuthentication();
    }
}
Pass the Custom Classes to the Security System
In the WinForms and ASP.NET applications
In the WinApplication.Designer.cs (WinApplication.Designer.vb) and WebApplication.cs (WebApplication.cs) files, set the SecurityStrategyConplex‘s Authentication property to the new CustomAuthentication instance and change UserType to Employee.
partial class CustomLogonParametersExampleWindowsFormsApplication { private void InitializeComponent() { // ... this.securityStrategyComplex1.Authentication = new CustomAuthentication(); this.securityStrategyComplex1.RoleType = typeof(DevExpress.Persistent.BaseImpl.PermissionPolicy.PermissionPolicyRole); this.securityStrategyComplex1.UserType = typeof(Employee); } // ... }In the Blazor application
In the Startup.cs file, set the UserType property to Employee, replace the standard authentication provider with the custom one, and set its LogonParametersType to CustomLogonParameters.
using DevExpress.ExpressApp.Security;
using Microsoft.Extensions.DependencyInjection;
// ...
public class Startup {
    // ...
    public void ConfigureServices(IServiceCollection services) {
        // ...
        services.AddXafSecurity(options => {
            // ...
            options.UserType = typeof(Employee);
        }).AddExternalAuthentication<HttpContextPrincipalProvider>()
        .AddAuthenticationProvider<AuthenticationStandardProviderOptions, CustomAuthenticationStandardProvider>(options => {
            options.IsSupportChangePassword = true;
            options.LogonParametersType = typeof(CustomLogonParameters);
        });
    }
}
Create Demo Data (Companies, Employees and Security Roles)
Override the ModuleUpdater.UpdateDatabaseAfterUpdateSchema method. Create Companies, Employees and Roles within this method.
using DevExpress.ExpressApp.Security;
using DevExpress.ExpressApp.Security.Strategy;
// ...
public class Updater : ModuleUpdater {
    public Updater(IObjectSpace objectSpace, Version currentDBVersion) : base(objectSpace, currentDBVersion) { }
    public override void UpdateDatabaseAfterUpdateSchema() {
        base.UpdateDatabaseAfterUpdateSchema();
        PermissionPolicyRole administrativeRole = ObjectSpace.FindObject<PermissionPolicyRole>(
            new BinaryOperator("Name", SecurityStrategy.AdministratorRoleName));
        if (administrativeRole == null) {
            administrativeRole = ObjectSpace.CreateObject<PermissionPolicyRole>();
            administrativeRole.Name = SecurityStrategy.AdministratorRoleName;
            administrativeRole.IsAdministrative = true;
        }
        const string adminName = "Administrator";
        Employee administratorUser = ObjectSpace.FindObject<Employee>(
            new BinaryOperator("UserName", adminName));
        if (administratorUser == null) {
            administratorUser = ObjectSpace.CreateObject<Employee>();
            administratorUser.UserName = adminName;
            administratorUser.IsActive = true;
            administratorUser.SetPassword("");
            administratorUser.Roles.Add(administrativeRole);
        }
        PermissionPolicyRole userRole = ObjectSpace.FindObject<PermissionPolicyRole>(
            new BinaryOperator("Name", "User"));
        if (userRole == null) {
            userRole = ObjectSpace.CreateObject<PermissionPolicyRole>();
            userRole.Name = "User";
            userRole.AddTypePermission<Employee>(
                SecurityOperations.ReadOnlyAccess, SecurityPermissionState.Allow);
            userRole.AddTypePermission<Company>(
                SecurityOperations.ReadOnlyAccess, SecurityPermissionState.Allow);
        }
        if (ObjectSpace.FindObject<Company>(null) == null) {
            Company company1 = ObjectSpace.CreateObject<Company>();
            company1.Name = "Company 1";
            company1.Employees.Add(administratorUser);
            Employee user1 = ObjectSpace.CreateObject<Employee>();
            user1.UserName = "Sam";
            user1.SetPassword("");
            user1.Roles.Add(userRole);
            Employee user2 = ObjectSpace.CreateObject<Employee>();
            user2.UserName = "John";
            user2.SetPassword("");
            user2.Roles.Add(userRole);
            Company company2 = ObjectSpace.CreateObject<Company>();
            company2.Name = "Company 2";
            company2.Employees.Add(user1);
            company2.Employees.Add(user2);
        }
        ObjectSpace.CommitChanges();
    }
}
You can now run the application to see the custom logon parameters on the login form.