Highlight List View Objects
- 4 minutes to read
In this lesson, you will learn how to format data that satisfies the specified criteria. For this purpose, the Conditional Appearance module will be added to the application. You will highlight the DemoTask objects whose Status property is not set to Completed. In addition, you will highlight the Priority property when it contains the High value.
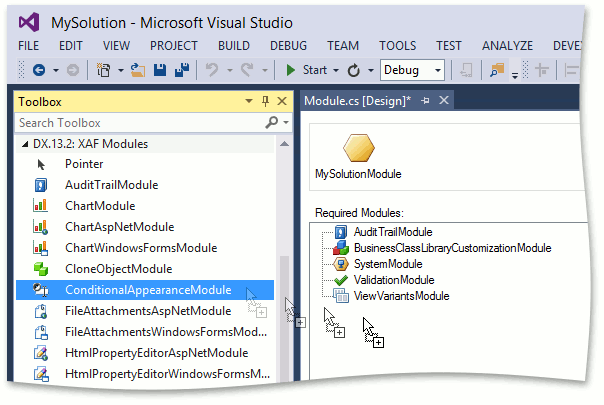
Add the Conditional Appearance module to your MySolution.Module project. For this purpose, double-click the Module.cs (Module.vb) file, located in the MySolution.Module project. The Module Designer will be invoked. In the Toolbox, navigate to the DX.18.2: XAF Modules tab, and drag the ConditionalAppearanceModule item from this tab to the Designer’s Required Modules section, as shown below.
- Rebuild your solution after you have made changes in the Module Designer.
To declare a conditional appearance rule for the DemoTask class, apply the AppearanceAttribute attribute to this class. As the first parameter, specify the Appearance Rule identifier (e.g., “FontColorRed”). Then, specify the following parameters.
Parameter Settings Target UI elements to be affected by the rule. Set the AppearanceAttribute.AppearanceItemType parameter to “ViewItem” and the AppearanceAttribute.TargetItems parameter to “*“. This means that the rule generated from the attribute will affect all DemoTask properties displayed in the current View. Conditions under which the rule must be in effect. Set the AppearanceAttribute.Context parameter to “ListView” and the AppearanceAttribute.Criteria parameter to “Status!=’Completed’”. In this instance, the rule generated from the attribute will be in effect in a DemoTask List View for the object whose Status property is not set to Completed. Conditional appearance applied by the rule. Set the AppearanceAttribute.FontColor named parameter to “Red”. The following code demonstrates the applied attribute and its parameters to the DemoTask class, that was declared in BusinessObjects\DemoTask.cs (DemoTask.vb) file.
using DevExpress.ExpressApp.ConditionalAppearance; // ... [Appearance("FontColorRed", AppearanceItemType = "ViewItem", TargetItems = "*", Context = "ListView", Criteria = "Status!='Completed'", FontColor = "Red")] public class DemoTask : Task { // ... }Note
The Criteria value must be specified using the Criteria Language Syntax.
Apply the AppearanceAttribute attribute to the DemoTask class’ Priority property. As the first positional parameter, specify the Appearance Rule identifier (e.g., “PriorityBackColorPink”). Then, specify the following parameters.
Specify the target UI elements to be affected by the rule
Set the AppearanceAttribute.AppearanceItemType parameter to “ViewItem”. This means that the rule generated from the attribute will affect the Priority property displayed in the current View.
Specify the conditions under which the rule must be in effect
Set the AppearanceAttribute.Context parameter to “Any” and the AppearanceAttribute.Criteria parameter to “Priority=2”. In this instance, the rule generated from the attribute will affect the Priority property when it is set to 2 (High) in any DemoTask View.
Specify the conditional appearance applied by the rule
Set the AppearanceAttribute.BackColor parameter to “255, 240, 240”.
The following code demonstrates the applied attribute and its parameters.
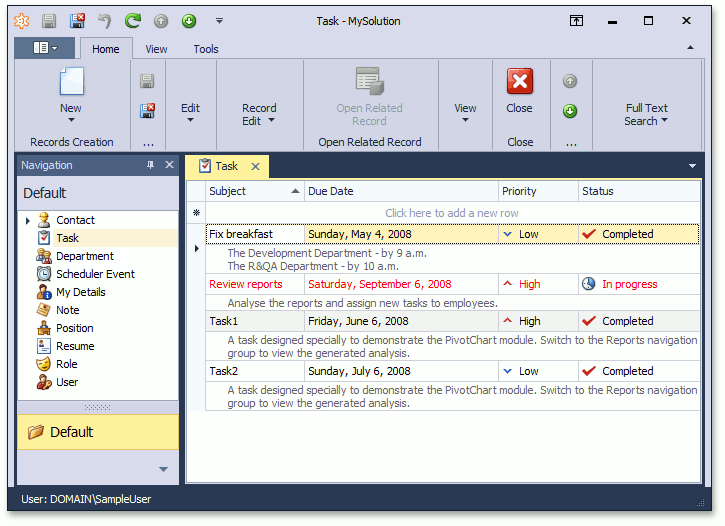
Run the WinForms or ASP.NET application. The DemoTask List View and Detail View data will be highlighted, as demonstrated in the following image.
Note
Appearence Rules that are declared in code are available in the Model Editor. To access them, you can run the Model Editor for the MySolution.Module project. Navigate to the BOModel | DemoTask | AppearanceRules node. This node has two child nodes (FontColorRed and PriorityBackColorPink) that are generated automatically from Appearance attributes applied to the DemoTask class and the DemoTask.Priority property. You can create new Appearance Rules directly in the Model Editor by adding child nodes to the AppearanceRules node.
You can see the changes made in the lesson in the DemoTask.cs (DemoTask.vb) file located in the MainDemo.Module project of the MainDemo solution. The MainDemo application is installed in %PUBLIC%\Documents\DevExpress Demos 18.2\Components\eXpressApp Framework\MainDemo by default. The ASP.NET version of this demo is available online at https://demos.devexpress.com/XAF/MainDemo.
Next Lesson: Analyze Data