Detail View Layout Customization
- 13 minutes to read
XAF allows you to customize the generated application layout using one of the following methods.
Design-Time Customization
You can customize View layout in the Model Editor. The DashboardView and DetailView nodes have a Layout child node, which allows you to access to the layout settings.
When the Layout node is selected, the Model Designer displays a design surface that imitates the current View. This design surface allows you to see how the View will be displayed at runtime. The Layout node exposes a tree of nodes that comprises groups, tabbed groups, layout items, labels, separators, etc.
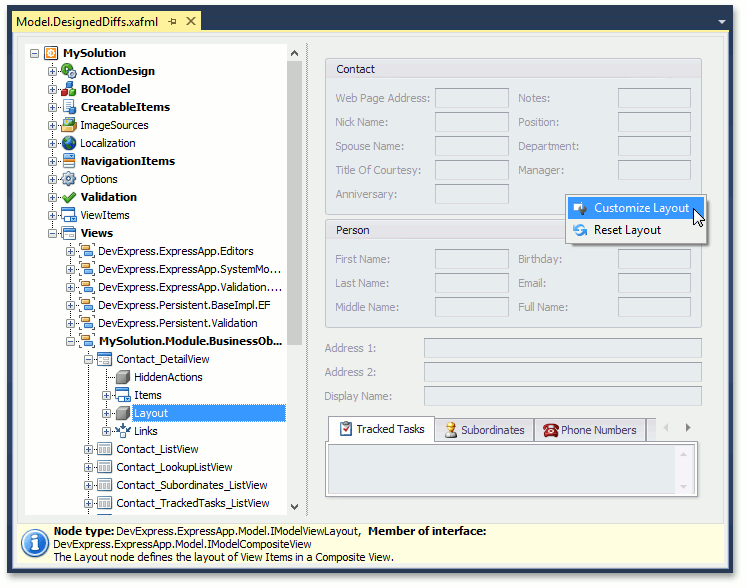
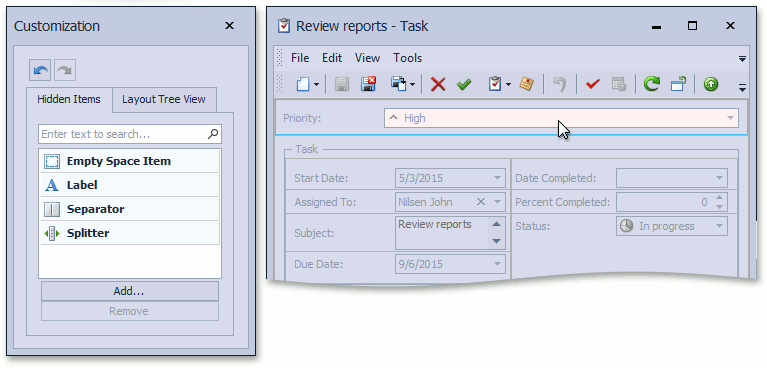
To modify a default View Items layout, right-click on an empty space and choose Customize Layout. This will invoke the Customization form allowing you to drag View Items where required. The graphical prompts will display the item’s target position.
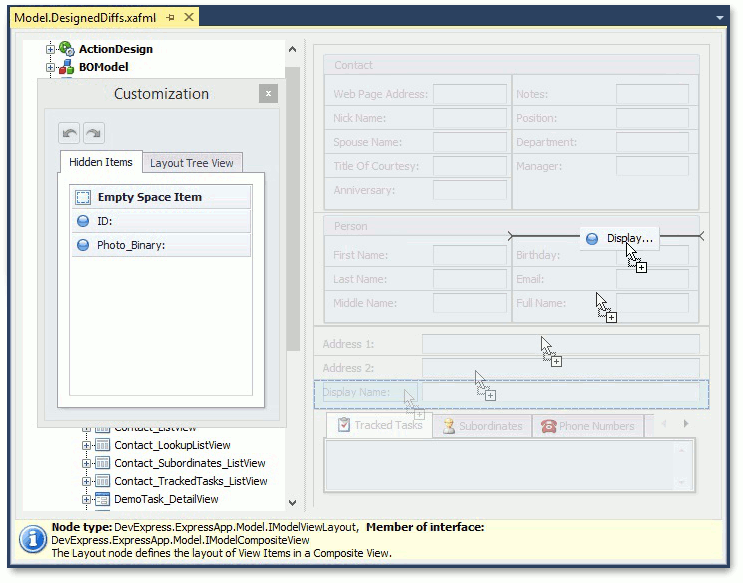
In the Model Designer, you can remove and restore View Items by dragging the required items from the View to the Customization form, and vice versa.
To see the View Items layout tree, use the Layout Tree View tab on the Customization form. Invoke the context menu for additional customization options.

For more information about the Customization form, the Layout Tree View tab, and its context menu, refer to the following article: Default Runtime Customization.
In the Layout node’s child nodes, you can find the following customization options:
Reorder Layout Groups and Layout Items
The LayoutGroup, TabbedGroup and LayoutItem nodes have the Index property. Use this property to set the order within specific levels, Layout Groups or Layout Items.
Modify a Caption
Specify whether a caption is displayed for a Layout Group, Tabbed Group or Layout Item using the ShowCaption property.
Specify a Caption for a group or item if you have made it visible. To do this, use the Caption property.
Specify the location of a group or item caption using the CaptionLocation property.
Specify the direction of nested Layout Groups or Layout Items
Specify whether the groups (or items) within one level are arranged consecutively from left to right or from top to bottom. To do that, use the Layout Group’s Direction property.
Move a Layout Item to another Layout Group
Use the drag-and-drop operation to move a Layout Item to the desired Layout Group.
You can add new items to a Detail View. Right-click the DetailView | Items node, navigate to the Add… group, choose the required View Item type and customize the newly added item as needed.
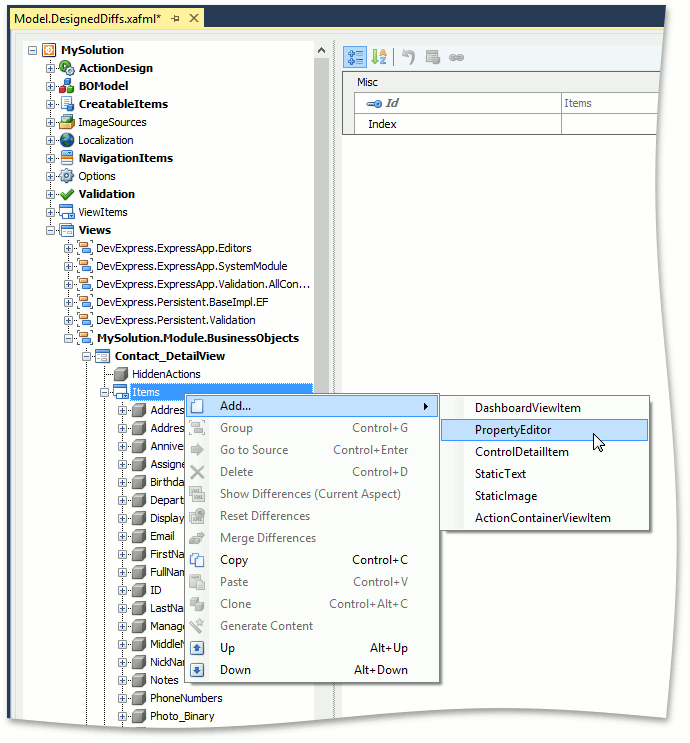
After the new item is added, put it on the Detail View as described above.
If you require layout customizations to affect all the application platforms (WinForms, Blazor, and ASP.NET Web Forms), perform these customizations at the Module Project level. To customize a WinForms application only, perform these customizations at the WinForms Module Project level. To customize an ASP.NET Web Forms application only, do so at the ASP.NET Web Forms Module Project level.
Note
- The Splitter, Separator and Label items are specific to a WinForms XtraLayoutControl. These items are not available in the Model Editor invoked for an ASP.NET Web Forms or platform-independent project, nor are they available in the Customization form or in the LayoutGroup node’s Add… context menu. This behavior protects you from errors during layout customization. Add and customize these items (splitter, separator, label) at the WinForms project level.
There are several WinForms specific properties that are not available in the Model Editor invoked for an ASP.NET Web Forms or platform-independent project.
- LayoutGroup node’s IModelWinLayoutGroup.TextAlignMode property
- LayoutItem node’s IModelWinLayoutItem.TextAlignMode property
- LayoutItem node’s IModelLayoutItem.SizeConstraintsType property
Perform the customization of these properties at the WinForms project level. To learn more about the size constraints for WinForms controls, refer to the Size and Alignment topic.
The changes that you perform in the Model Editor invoked for a module (application project) are saved to the Model.DesignedDiffs.xafml (Model.xafml) file located in this module project. These changes will rewrite previous values when you run the application. It is important for you to ensure that values from other *.xafml files will not rewrite your values. To do this, review the *.xafml files that are loaded after your *.xafml file, including the Model.User.xafml generated at runtime. For details on the layer structure of the Application Model, refer to the Application Model Basics topic.
General Layout Settings
A number of layout options that affect all Views are available in the Model Editor’s Options | LayoutManagerOptions node. For example, you can disable the colon sign that is added to item captions using the IModelLayoutManagerOptions.EnableCaptionColon property, or use a custom separator instead of a colon (see IModelLayoutManagerOptions.CaptionColon.)
DetailViewLayout Attribute
You can customize the Detail View’s default layout in a business class code using the DetailViewLayoutAttribute applied to required properties.
[DetailViewLayoutAttribute("NotesAndRemarks", LayoutGroupType.TabbedGroup, 100)]
public string Notes { get; set; }
Refer to this attribute description to see more examples.
Runtime Customization
You can customize the layout by using the Model Editor at run time or design time (see above). To invoke the Model Editor, use the EditModel Action located in the root window’s Tools main menu. Note that the EditModel Action is available when the user logged on to the application has permission to customize the Application Model. For details, refer to the Security System section.
In WinForms applications, you can customize the View Items layout by using the Customization form invoked at runtime. To display this form, right-click on an empty space in the Detail View and select Customize Layout in the invoked context menu.
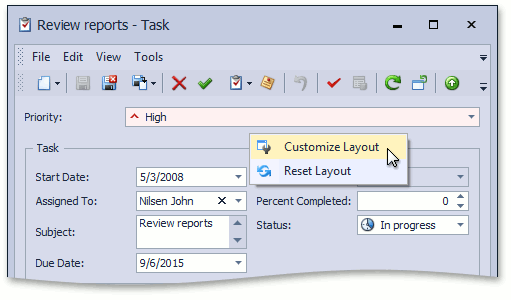
The actions that can be performed when the Customization form is invoked are identical to those available when it is invoked at design time in the Model Editor (see above).
Note
You can merge run time customizations into a module of the application solution. See the How to: Merge End-User Customizations into the XAF Solution topic for details.
The changes that you perform at runtime are saved to the Model.User.xafml. This means that the next time you invoke the customized View, its items will be arranged according to the most recent changes you made. If, however, you need to invoke the View in its pre-customization state, right-click on an empty space in the View at run-time, and select Reset Layout in the invoked context menu. Alternatively, you can use the ResetViewSettings Action.
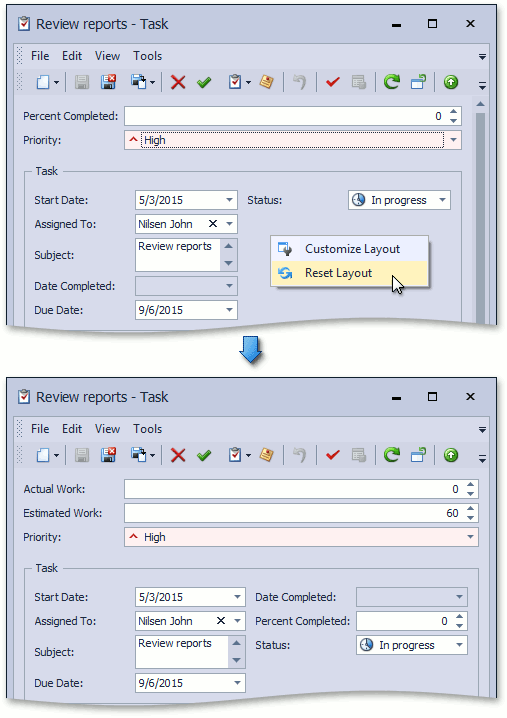
As a result, all changes made at run time to the corresponding Views | DashboardView or DetailView | Layout node will be reverted.
Note
In ASP.NET Web Forms applications, the View Items layout cannot be customized at runtime.
Access the Layout Control
Use the Layout Control to arrange View Items (from the CompositeView.Items collection). With the Layout Control, a new Layout Item is created for every View Item. Layout Item settings allow you to modify the caption, caption visibility and alignment, set Item size and size constraints, indents and appearance settings, etc. In addition, a Layout Item contains the View Item’s control (animation). However, you cannot specify this control’s size, docking style and position. All these settings are entirely managed by the Layout Item. You can set the Layout Item’s size to a specific value (using the BaseLayoutItem.Size property). A portion of the Layout Item’s area will be occupied by the Item’s caption, indents and borders, while the Layout Item’s control will occupy the remaining region. Note that some controls do not support resizing - for example, a text box or check box. So, setting a size for a Layout Item with these controls will have no effect, because the control has a fixed size, despite the fact that the Layout Item allows resizing.
To access the Layout Control and its Layout Items, do the following.
- Create a new View Controller in your WinForms module.
- Invoke the Designer for the new Controller. Since this Controller must be activated for Dashboard Views or Detail Views, set the Controller’s ViewController.TypeOfView property to the required value.
- Subscribe to the Controller.Activated event using the Properties window.
Replace the automatically generated Activated event handler with the following.
private void LayoutController_Activated(object sender, EventArgs e) { View.ControlsCreated += View_ControlsCreated; }Since the goal is to customize the Layout Control, you need to access it directly after it is created. The best way is to subscribe to the current View’s View.ControlsCreated event.
Implement the View.ControlsCreated event handler, as shown below.
void View_ControlsCreated(object sender, EventArgs e) { // Access the current Detail View DetailView view = (DetailView)View; // Access the Detail View's Control as a Layout Control DevExpress.XtraLayout.LayoutControl layoutControl = ((DevExpress.XtraLayout.LayoutControl)view.Control); //Customize the LayoutControl's settings as required //Access the Layout Control's Layout Items foreach (object obj in layoutControl.Items) { if (obj is DevExpress.XtraLayout.LayoutControlItem) { DevExpress.XtraLayout.LayoutControlItem layoutControlItem = (DevExpress.XtraLayout.LayoutControlItem)obj; //Customize the current LayoutItem's settings } } }To compile this code, add a reference to the DevExpress.XtraLayout.v21.2 assembly in your WinForms module.
Alternatively, you can override the CreateLayoutManagerCore virtual metod of the XafApplication class in the WinApplication.cs (WinApplication.vb) file. For instance, you can use the following code to enable the OptionsView.DrawAdornerLayer option
using DevExpress.ExpressApp.Layout;
// ...
protected override LayoutManager CreateLayoutManagerCore(bool simple) {
    LayoutManager layoutManager = base.CreateLayoutManagerCore(simple);
    LayoutControl layoutControl = layoutManager.Container as LayoutControl;
    if(layoutControl != null) {
        layoutControl.OptionsView.DrawAdornerLayer = DevExpress.Utils.DefaultBoolean.True;
    }
    return layoutManager;
}
Note
In ASP.NET Web Forms and ASP.NET Core Blazor applications, you cannot access the layout control in code. All editors are placed on a page as specified by the Application Model‘s Views | DashboardView or DetailView | Layout node. However, you can access certain editor controls to customize them. Refer to the following tutorials for details:
Important Notes
The following are important notes concerning Layout Items.
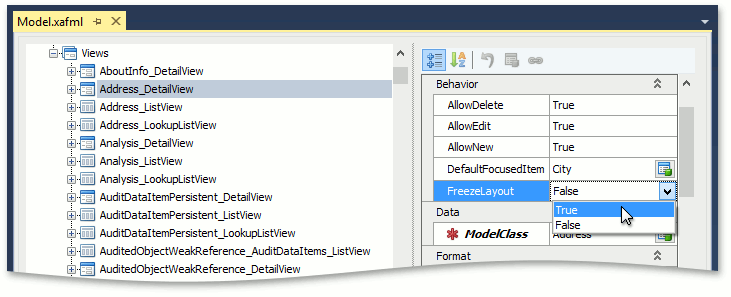
When you add a new property and thus make a change to the business class structure you created at the very beginning of this XAF application, the Detail View layout of the business class is programed to automatically regenerate. If this occurs, all your manually applied customizations to the Detail View layout will disappear. To prevent this from happening, set the IModelDetailView.FreezeLayout property to true. This will allow you to freeze the Detail View layout according to the very last saved changes, thus prohibiting regeneration. Make a note, however, that if you use this property, then you are responsible for manually adding new layout items to your Detail View layout.
If you set the IModelDetailView.FreezeLayout property to true, then the Model Editor copies the current state of the layout to the currently edited Application Model layer. Note that you can still remove a child node from the Items child node of the DetailView node. In this instance, however, it will be impossible to retain a frozen layout. Thus, the View Item corresponding to the removed node will be replaced by an empty space item in the Detail View. Setting the FreezeLayout property to false is analogous to executing the Model Editor‘s “Reset Differences” command, which will revert all customizations to their original default state.
Note
After manually customizing the layout of a business class View, you must set the FreezeLayout property to true if you plan to introduce additional properties to the business class later. If you do not set the property to true, the layout may become corrupted after introducing new business class properties. In this scenario, based on the layout rules, the layout generator may create a default layout that differs greatly from the original default layout. After applying your manual layout customizations stored in the Application Model differences file, the resulting layout will also be completely different from the original layout. The resulting layout may even become corrupted. To prevent this, always set the FreezeLayout property to true before introducing new business class properties if you have previously customized the default layout. Generally, any changes to the BO class may affect the layout generation - the FieldSizeAttribute attribute on string type properties, the Aggreagted attribute on reference type properties, the ExpandObjectMembersAttribute attribute, etc.
By default, the width of Layout Items is not locked and is calculated according to the width of the Layout Group it belongs to. Thus, Layout Items belonging to different Layout Groups will have different alignments.
Place Items in the same Group to keep them aligned.
When you rearrange a layout by moving a Layout Item to a higher-level group, additional spacing between the Item moved and the next Item appears, as illustrated by the image below
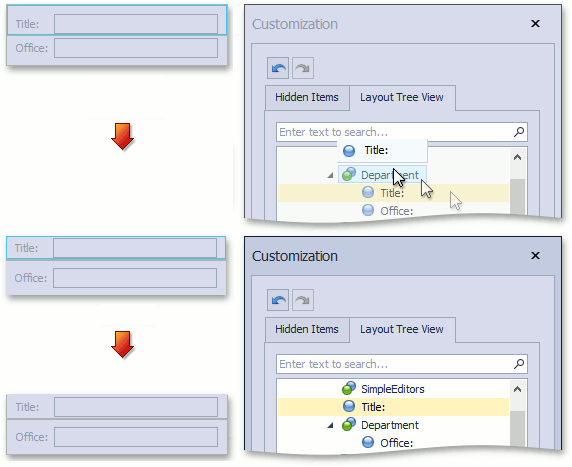
If you wish to keep equal spacing between Items, keep them in the same Group.
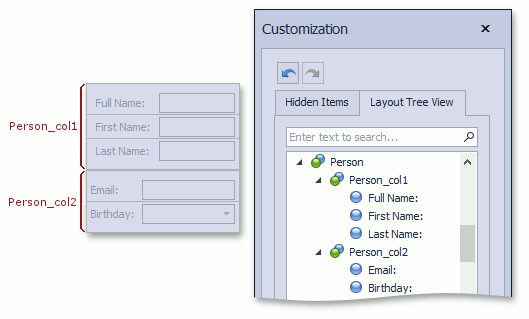
Items and nested Groups inside each Group can be arranged either vertically or horizontally (see IModelLayoutGroup.Direction). The following image illustrates a layout fragment with complex nesting.

All components within the same group have the same orientation, as shown by dual arrows. In order to arrange two groups horizontally, thus forming two columns of Items, you must put these two groups into another group. This process is called wrapping. You should note that extra wrapping groups can be created automatically when you drag items on the Layout design surface.
When you move or hide a Layout Item, its Layout Group stays on the form. In the image below, the “Notes” Item is moved from the “Notes” Group to the “Photo” Group.
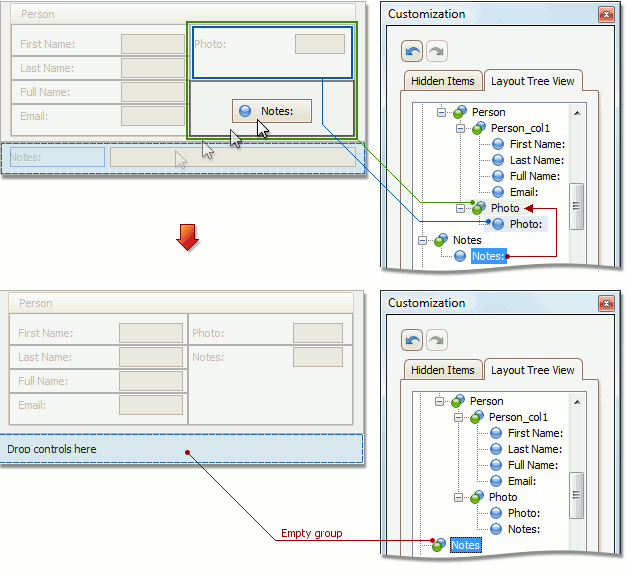
The “Notes” Group becomes empty. This empty Layout Group may interfere with your layout. So, you may need to remove the empty Layout Group. You can also use the IModelWinLayoutManagerOptions.InvisibleGroupVerticalDistance property to specify how the empty group affects the vertical space between visible items.
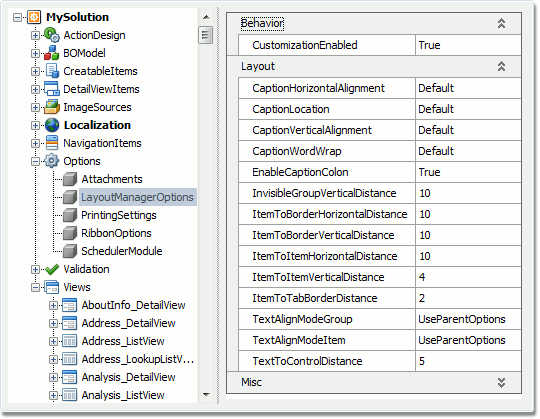
The Application Model’s Options node contains the LayoutManagerOptions child node. As the name implies, this node’s properties allow you to customize certain settings concerning layout generation.
Note
The LayoutManagerOptions node exposes several WinForms specific properties (see the IModelWinLayoutManagerOptions interface’s members list). Perform the customizations of these properties at the WinForms project level.
To learn more about the Layout Control and Layout Items, refer to Layout Manager documentation.