Implement Property Value Validation in the Application Model
- 3 minutes to read
In this lesson, you will learn how to check whether or not a property value satisfies a particular rule. For this purpose, the DemoTask.Status property and the MarkCompleted Action will be used. This action should not be executed if the current task status is “NotStarted”. Thus, the rule will be checked when executing the MarkCompleted Action.
Note
Before proceeding, take a moment to review the following lessons.
- Implement Property Value Validation in Code (XPO/EF)
- Place an Action in a Different Location
The validation functionality is provided by the Validation Module that was added in the Implement Property Value Validation in Code (XPO) lesson. When this module is added to the MySolution.Module project, the Validation node is available in the Application Model. This node defines the validation Contexts and Rules used in your application. You can use the Model Editor to add Rules and specify Contexts.
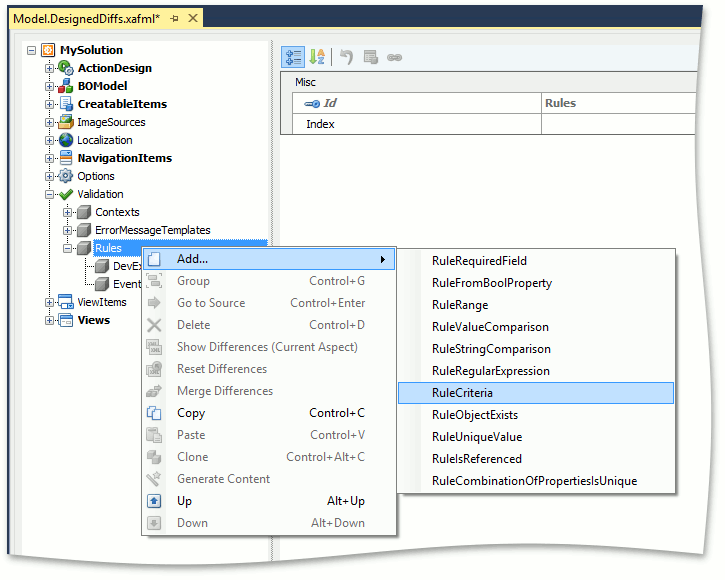
Invoke the Model Editor for the MySolution.Module project. Navigate to the Validation | Rules node. It already contains child nodes that define the rules to be checked. For example, it may contain the “RuleRequiredField for Position.Title“ rule that was implemented in the Implement Property Value Validation in Code (XPO) lesson. To add a new rule that checks specific criteria, right-click the Rules node and select Add… | RuleCriteria.
Note
The descriptions of all available rule types are available in the Validation Rules topic.
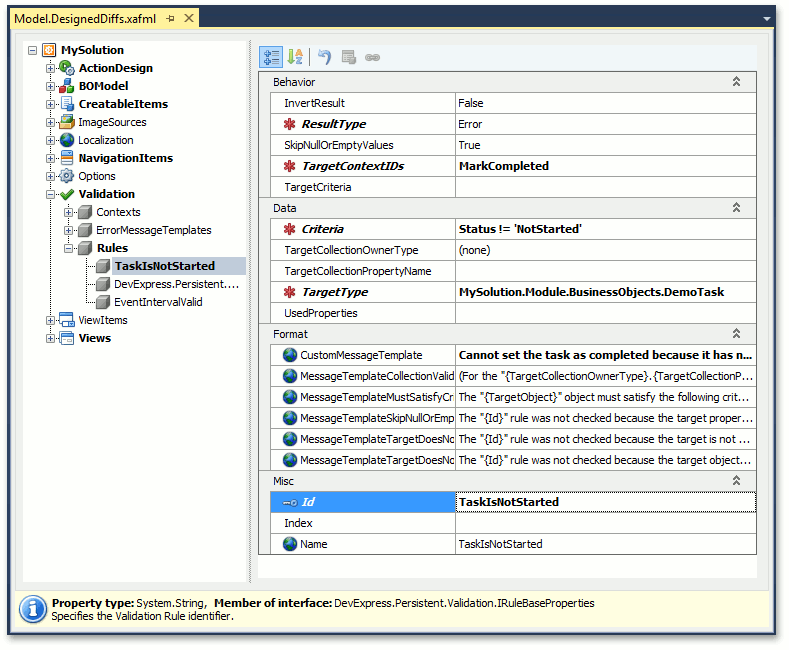
For the newly created node, set the TargetType to “MySolution.Module.BusinessObjects.DemoTask”, and set the Criteria property to “Status != ‘NotStarted’”. Set the ID property to “TaskIsNotStarted”, TargetContextIDs to “MarkCompleted” and CustomMessageTemplate to “Cannot set the task as completed because it has not started”.
Note
The Criteria property value must be specified using the Criteria Language Syntax. To simplify this task, you can invoke the Filter Builder dialog by clicking the ellipsis button (
 ) to the right of the Criteria value. Within this dialog, you can visually design a criteria expression.
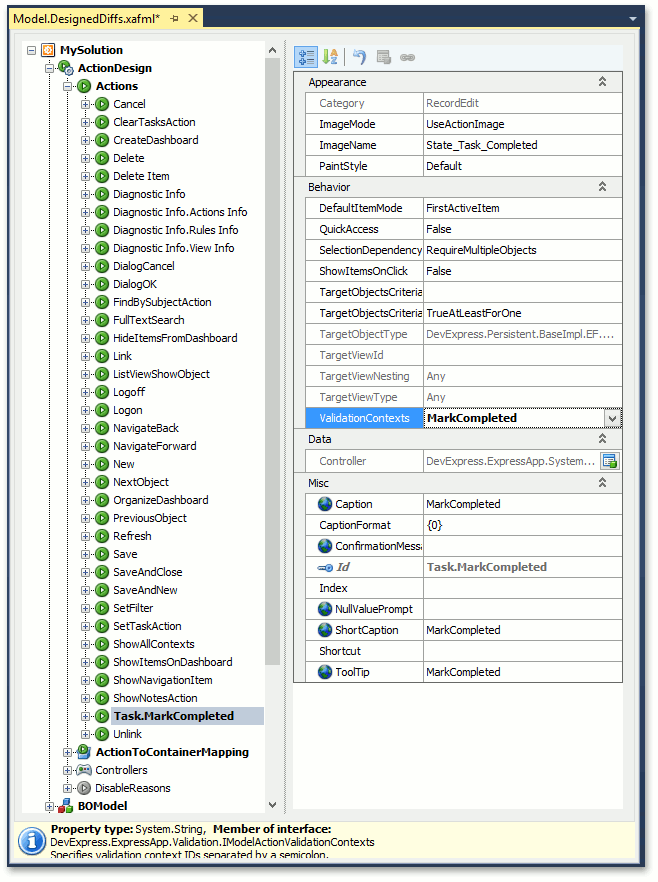
The TargetContextIDs property is set to “MarkCompleted”. This means that the rule will be checked when executing the Action whose ValidationContexts property is set to “MarkCompleted”. So, set the Mark Completed Action’s ValidationContexts property (in the ActionDesign | Actions | Task.MarkCompleted node) to “MarkCompleted”.
Note
You can also use the Save or Delete contexts, which are available by default. Rules with these contexts are validated when an object is saved or deleted, respectively (see Validation Rules).
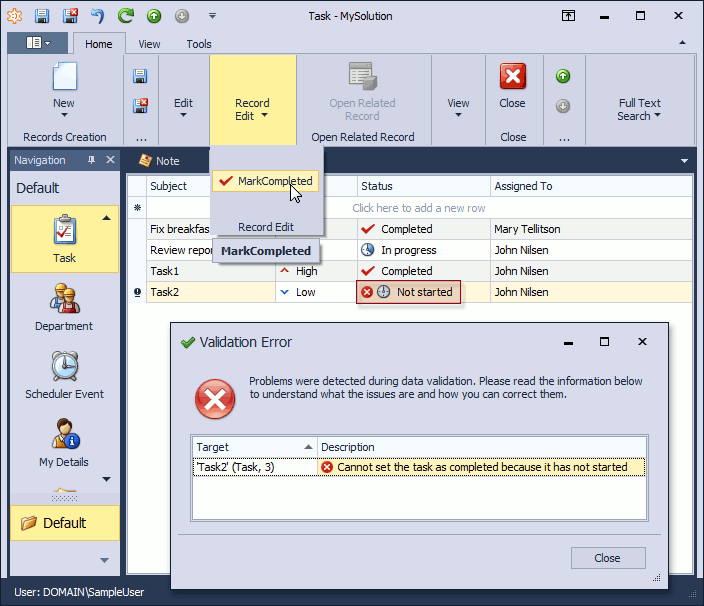
Run the WinForms or ASP.NET application. Assign the “Not Started” value to the Status property of one of the existing DemoTask objects. Click the MarkCompleted button. The following Validation Error dialog will be displayed.
Note
Generally, you can add the required rule to a class or property in code (see Implement Property Value Validation in Code (EF \ XPO)). The approach defined above is useful when the class sources are inaccessible.
You can see the changes made in this lesson in the Model Editor invoked for the Model.DesignedDiffs.xafml file located in the Main Demo | MainDemo.Module project. The MainDemo application is installed in %PUBLIC%\Documents\DevExpress Demos 18.2\Components\eXpressApp Framework\MainDemo by default. The ASP.NET version of this demo is available online at https://demos.devexpress.com/XAF/MainDemo.
Next Lesson: Customize the View Items Layout