Localize UI Elements
- 3 minutes to read
In this lesson, you will learn the basics of localizing visible UI elements. By default, the application uses the invariant language (English). You will translate your application into German, and create a multi-language application. To illustrate different localization scenarios, the lesson is divided into two sections. They should be performed in order. You will translate several captions for training purposes. To learn how to fully localize an XAF application, first review the Localization section, then follow the How to: Localize an XAF Application topic.
Note
Before proceeding, take a moment to review the Place an Action in a Different Location lesson.
Translate Your Application into an Additional Language
Follow the steps below to study the basic concepts of translating your application.
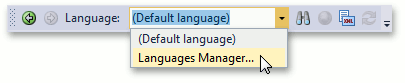
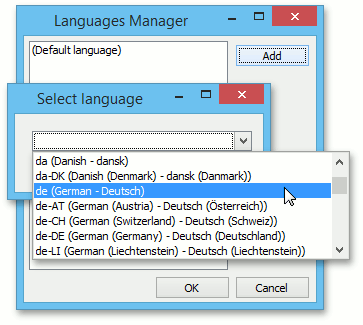
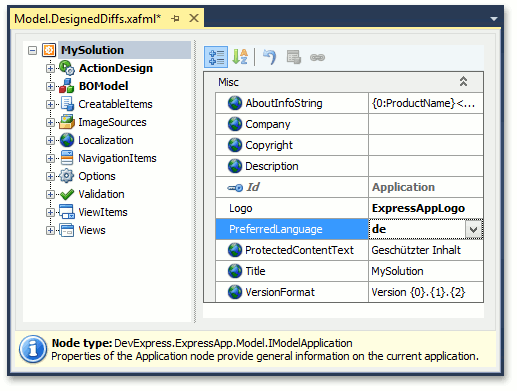
Invoke the Model Editor for the MySolution.Module project. Find the Model Editor’s toolbar. If it is hidden, check the View | Toolbars | XAF Model Editor menu item. In the toolbar’s Language combo box (located on the Model Editor’s toolbar), select de. If it is not there, click the Language Manager… item. In the invoked dialog, click the Add button and select de (German - Deutsch).
- After adding the language, you should restart Visual Studio.
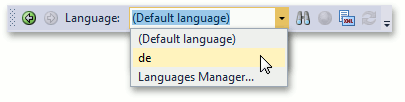
Select the newly added language in the Language combo box.
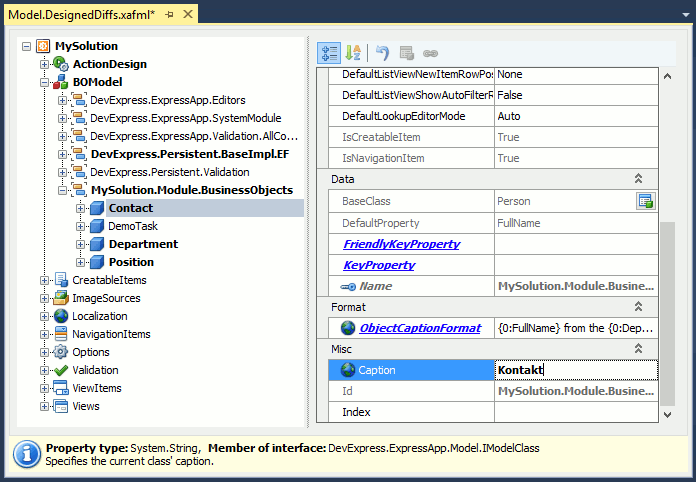
To fully localize your application, you should look through all the nodes and their child nodes to set German values for the properties denoted by the “globe” glyph. The Localization Tool simplifies this task. For training purposes, translate a few values to see how this affects your application. Esentially, the Caption properties can be localized.
Note
The How to: Localize an XAF Application topic explains how to localize an XAF application.
In the Model Editor invoked for a WinForms project and/or an ASP.NET application project, navigate to the Application node. In the PreferredLanguage property’s dropdown list, select “de”. If you need to use the German language in both the WinForms and ASP.NET applications, you can specify the PreferredLanguage property value in the Model Editor invoked for the application module.
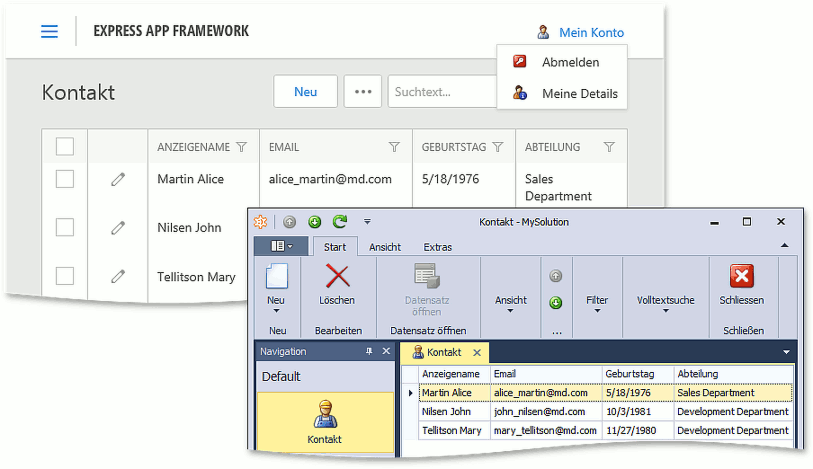
- Run the WinForms or ASP.NET application. Check to see that the properties that you translated via the Model Editor are displayed in German.
Make a User-Language Application
Perform the steps below if your application needs to be in the user’s language (the user’s operating system language or the language passed by the user’s Internet browser).
- Translate your application into the required languages. For this purpose, invoke the Model Editor, set the required language in the Model Editor’s Language toolbar item and translate all localizable property values (as detailed in the previous section). Do this for each required language.
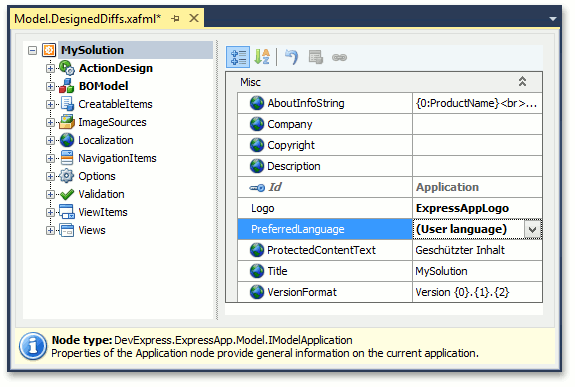
In the Model Editor invoked for the WinForms and/or ASP.NET application project, navigate to the Application node. In the PreferredLanguage property’s dropdown list, select the (User language) item.
Alternatively, you can specify the PreferredLanguage property value in the Model Editor invoked for the application module. In this instance, the user language will be used in both the WinForms and ASP.NET applications.
Run the WinForms or ASP.NET application. Check to see if the language corresponds to your system’s current language.
If you did not localize the application to your system’s current language, the default language (English) will be used.
You can see a sample application localized into German in the Main Demo. The MainDemo application is installed in %PUBLIC%\Documents\DevExpress Demos 18.2\Components\eXpressApp Framework\MainDemo by default. The ASP.NET version of this demo is available online at https://demos.devexpress.com/XAF/MainDemo.
Next Lesson: Add an Item to the New Action