Add an Action with Option Selection
- 8 minutes to read
In this lesson, you will learn how to create an Action with support for option selection. A new View Controller will be implemented and a SingleChoiceAction will be added to it. Via this Action, the Task.Priority and Task.Status properties will be set to the value selected by an end-user.
Note
Before proceeding, take a moment to review the following lessons.
- Add a new View Controller to the MySolution.Module project, as described in the Add a Simple Action lesson. Name it TaskActionsController.
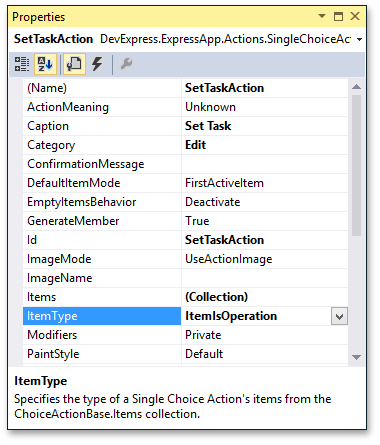
Right-click the MySolution.Module | Controllers | TaskActionsController.cs (TaskActionsController.vb) file and choose View Designer to invoke the Designer. Within the DX.18.2: XAF Actions Toolbox tab, navigate to SingleChoiceAction and drag it to the Designer. In the SingleChoiceAction‘s Properties window, set the Name and ID properties to “SetTaskAction”, the Caption property to “Set Task” and the Category property to “Edit”. Set the ItemType property to “ItemIsOperation”.
Note
- The ActionBase.Category property specifies the Action group to which the current Action belongs. All Actions within a single group are displayed together in a UI.
- The SingleChoiceAction.ItemType property specifies a display mode for the Action’s items. With the “ItemIsOperation” value set to this property, the Action’s items will not be displayed by check box items, as they would be if you set the “ItemIsMode” value.
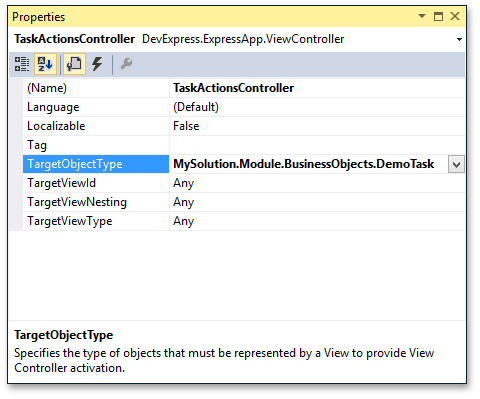
To activate the TaskActionsController for DemoTask objects only, set the Controller’s ViewController.TargetObjectType property to MySolution.Module.BusinessObjects.DemoTask.
To populate the Action with items, fill the Action’s ChoiceActionBase.Items collection in the Controller’s constructor.
using DevExpress.ExpressApp.Utils; using DevExpress.Persistent.Base.General; using MySolution.Module.BusinessObjects; //... public partial class TaskActionsController : ViewController { private ChoiceActionItem setPriorityItem; private ChoiceActionItem setStatusItem; public TaskActionsController() { InitializeComponent(); SetTaskAction.Items.Clear(); setPriorityItem = new ChoiceActionItem(CaptionHelper.GetMemberCaption(typeof(DemoTask), "Priority"), null); SetTaskAction.Items.Add(setPriorityItem); FillItemWithEnumValues(setPriorityItem, typeof(Priority)); setStatusItem = new ChoiceActionItem(CaptionHelper.GetMemberCaption(typeof(DemoTask), "Status"), null); SetTaskAction.Items.Add(setStatusItem); FillItemWithEnumValues(setStatusItem, typeof(TaskStatus)); } private void FillItemWithEnumValues(ChoiceActionItem parentItem, Type enumType) { foreach(object current in Enum.GetValues(enumType)) { EnumDescriptor ed = new EnumDescriptor(enumType); ChoiceActionItem item = new ChoiceActionItem(ed.GetCaption(current), current); item.ImageName = ImageLoader.Instance.GetEnumValueImageName(current); parentItem.Items.Add(item); } } }The code above organizes items from the Action’s Items collection as a tree. The first level is formed from the items whose captions correspond to the DemoTask.Priority and DemoTask.Status property names. The second level is formed from the Priority and Status enumeration values. The first-level item captions are returned by the CaptionHelper object; and the second-level item captions are returned by an EnumDescriptor object. This is useful when the Priority and Status properties and corresponding enumeration values are localized via the Application Model.
Note
If you create an Action’s Items in the controller’s constructor, they will be created once for each Window. This may be advantageous, for example, if the window’s View is often changed (e.g., if this is the main window and the Multiple Document Interface (MDI) mode is not turned on). Alternatively, you can add Items in the overridden OnActivated method. In this instance, Items will not be created until the required View is shown, but will be created each time this View is displayed.
The code snippet below sets the images associated with the Priority and TaskStatus enumeration values for the SetTask Action‘s items. Note that the TaskStatus enumeration is declared in the Business Class Library, and already has images assigned to its values. To assign images to the Priority enumeration values you declared in the DemoTask.cs (DemoTask.vb) file, decorate them with the ImageNameAttribute attribute.
public enum Priority { [ImageName("State_Priority_Low")] Low = 0, [ImageName("State_Priority_Normal")] Normal = 1, [ImageName("State_Priority_High")] High = 2 }Note
The State_Priority_Low, State_Priority_Normal and State_Priority_High images are included in the standard image library supplied with XAF. To learn how to use custom images, see the Assign a Custom Image lesson.
When you populate the ChoiceActionBase.Items collection in a Controller’s constructor as shown in the code above, you can set an image name, shortcut and a localized caption for the added items using the Model Editor‘s ActionDesign | Actions | <Action> | ChoiceActionItems node. To learn how to invoke and use the Model Editor, refer to the first lesson in the UI Customization section. However, you may have to populate the Items collection in a Controller’s Controller.Activated event handler, where you can access the current Application, View, etc. In this instance, the items added to the collection will not be loaded into the Model Editor.
To implement the code that must be executed when an end-user chooses the Action’s item, handle the SingleChoiceAction.Execute event as shown below.
using DevExpress.ExpressApp.Editors; using System.Collections; using MySolution.Module.BusinessObjects; //... private void SetTaskAction_Execute(object sender, SingleChoiceActionExecuteEventArgs e) { IObjectSpace objectSpace = View is ListView ? Application.CreateObjectSpace(typeof(DemoTask)) : View.ObjectSpace; ArrayList objectsToProcess = new ArrayList(e.SelectedObjects); if(e.SelectedChoiceActionItem.ParentItem == setPriorityItem) { foreach(Object obj in objectsToProcess) { DemoTask objInNewObjectSpace = (DemoTask)objectSpace.GetObject(obj); objInNewObjectSpace.Priority = (Priority)e.SelectedChoiceActionItem.Data; } } else if(e.SelectedChoiceActionItem.ParentItem == setStatusItem) { foreach(Object obj in objectsToProcess) { DemoTask objInNewObjectSpace = (DemoTask)objectSpace.GetObject(obj); objInNewObjectSpace.Status = (TaskStatus)e.SelectedChoiceActionItem.Data; } } if(View is DetailView && ((DetailView)View).ViewEditMode == ViewEditMode.View) { objectSpace.CommitChanges(); } if(View is ListView) { objectSpace.CommitChanges(); View.ObjectSpace.Refresh(); } }As you can see in the code above, the item currently selected in the drop-down list of the SetTaskAction is accessed via the event handler’s SingleChoiceActionExecuteEventArgs.SelectedChoiceActionItem parameter. To assign a chosen value to a property of an object selected in the current View, you can use an Object Space. When the SetTaskAction is used in a Detail View, the View’s Object Space is used to manipulate the current object. When the Action is used in a List View, a new ObjectSpace is created via the XafApplication.CreateObjectSpace method. This ObjectSpace helps manipulate the View’s selected objects.
Note
Create a separate Object Space when you are going to modify multiple objects that are currently displayed. This approach improves performance, as the grid control’s events do not trigger on each object change. In the code above, a new Object Space is created when the current View is the List View.
In ASP.NET Web applications, Detail Views are displayed in View and Edit modes. When SetTaskAction is activated for a DemoTask Detail View in View mode, the changes made to the DemoTask.Priority property should be saved to the database. For this purpose, the BaseObjectSpace.CommitChanges method of the current View’s View.ObjectSpace is called. The same technique is used when the SetTaskAction is activated for a DemoTask List View. However, when you use the SetTaskAction in a DemoTask Detail View in Edit mode, the changes can be saved or rolled back via corresponding built-in Actions.
- The Priority or Status property will be changed for the currently selected objects. However, the grid editor used in ASP.NET Web applications does not have selected objects until an end-user selects an object manually. So, disable the Action when no objects are selected. To do this, set the Action’s ActionBase.SelectionDependencyType property to RequireMultipleObjects. The Action will be available only when one or more objects are selected. To specify this property, use the Properties window.
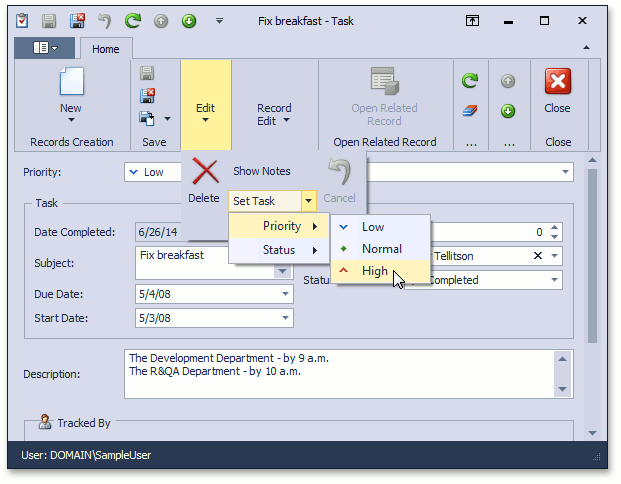
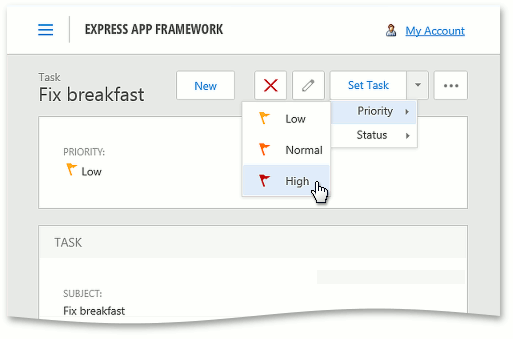
Run the Windows Forms or ASP.NET application. Select the Task item in the navigation control. The Set Task Action will be displayed. Select one or more Task objects in the Task List View and select an item in the Action’s drop-down list. The Priority or Status property of the selected Task objects will be modified.
You can see the code demonstrated here in the MySolution.Module | Controllers | TaskActionsController.cs (TaskActionsController.vb) file of the Main Demo installed with XAF. The MainDemo application is installed in %PUBLIC%\Documents\DevExpress Demos 18.2\Components\eXpressApp Framework\MainDemo by default. The ASP.NET version of this demo is available online at https://demos.devexpress.com/XAF/MainDemo.
Next Lesson: Add a Simple Action using an Attribute