Add a Simple Action
- 6 minutes to read
In this lesson, you will learn how to create a Simple Action. For this purpose, a new View Controller will be implemented and a new Simple Action will be added to it. This Action will clear all Tracked Tasks of a specific Contact.
Note
Before proceeding, take a moment to review the following lessons.
The View Controller is a descendant of the ViewController class. To add a View Controller that provides a Simple Action, follow the steps described below.
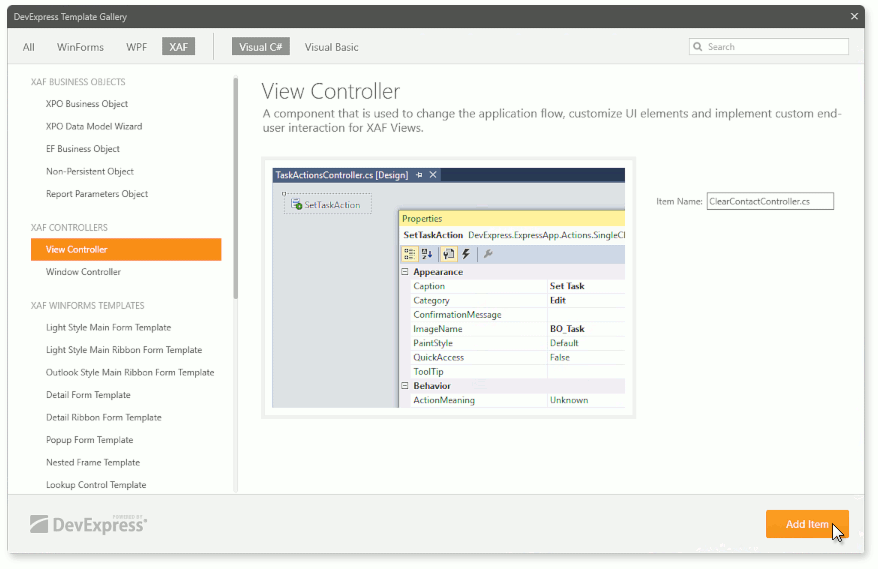
The XAF Controllers | View Controller Visual Studio template makes it easier to add a View Controller to your application. In the Solution Explorer, right-click the Controllers folder in the MySolution.Module project, and choose Add DevExpress Item | New Item… to invoke Template Gallery. Then select View Controller, specify ClearContactTasksController as the new item’s name and click Add Item. As a result, you will get an automatically generated ClearContactTasksController.cs (ClearContactTasksController.vb) file with a single View Controller declaration.
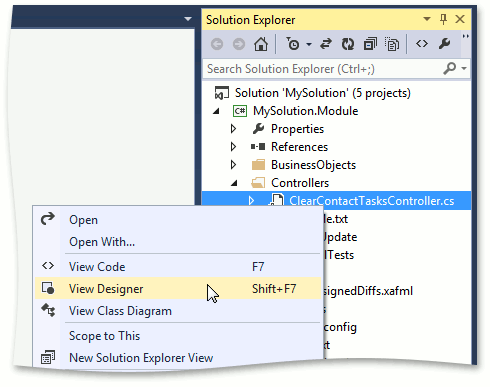
The new Controller will be activated within any type of View by default. Because the task of this lesson is to clear Tracked Tasks in a Detail View, the default behavior should be changed. Right-click the MySolution.Module | Controllers | ClearContactTasksController.cs (ClearContactTasksController.vb) file, and choose View Designer to invoke the Designer.
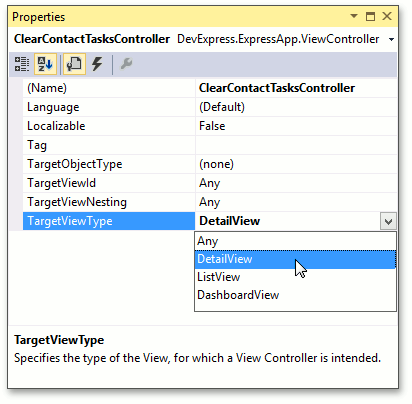
In the Properties window for the controller, set the TargetViewType property to the DetailView. As a result, the controller will only be activated in detail forms.
Note
The same customization can be done in code, by setting the ViewController.TargetViewType property to ViewType.DetailView in the controller’s constructor. If the property value is set after invoking the InitializeComponent method, the Designer setting will be overridden.
Alternatively, you can implement the generic ViewController<ViewType> Controller instead of the ViewController and specify the View’s type, for which this Controller should be activated, in the ViewType generic parameter.
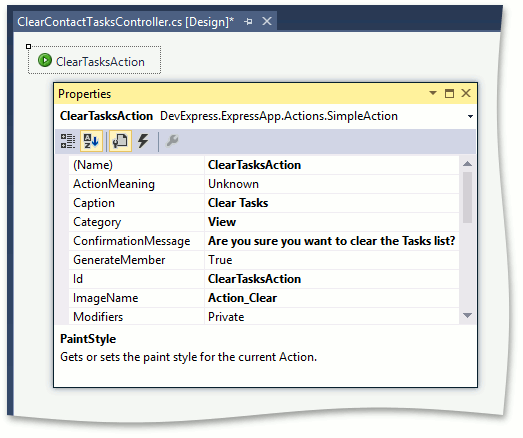
Next, add SimpleAction to the ClearContactTasksController. In the DX.19.1: XAF Actions section in the Toolbox, drag SimpleAction to the Designer.

In the Properties window for SimpleAction, set the Name and ID properties to “ClearTasksAction”, the Category property to “View”, the ImageName property to “Action_Clear” and the Caption property to “Clear Tasks”. Set the ConfirmationMessage property to “Are you sure you want to clear the Tasks list?”.
Note
The Category property specifies the Action group to which the current Action belongs. All Actions within one group are displayed sequentially in a UI.
The ImageName property specifies the icon of the Action’s button in the interface. You can use one of the standard images or import your own
A SimpleAction is designed to execute specific code when an end-user clicks it. To clear the Tasks collection of the current Person and refresh the view, implement the action’s Execute event handler. Switch to the Events view in the Properties window, double-click the Execute event and add the following code to the auto-generated event handler.
Entity Framework
using MySolution.Module.BusinessObjects; //... private void ClearTasksAction_Execute(Object sender, SimpleActionExecuteEventArgs e) { ((Contact)View.CurrentObject).Tasks.Clear(); ((DetailView)View).FindItem("Tasks").Refresh(); ObjectSpace.SetModified(View.CurrentObject); }eXpress Persistent Objects
using MySolution.Module.BusinessObjects; //... private void ClearTasksAction_Execute(Object sender, SimpleActionExecuteEventArgs e) { while(((Contact)View.CurrentObject).Tasks.Count > 0) { ((Contact)View.CurrentObject).Tasks.Remove(((Contact)View.CurrentObject).Tasks[0]); } ObjectSpace.SetModified(View.CurrentObject); }In ASP.NET Web applications, there are two modes for displaying Detail Views - View mode and Edit mode. The ClearTasks Action should only be available when a Detail View is displayed in Edit mode, so check to see if the edit mode for the current Detail View has changed. If it has changed to View mode, the Action should be disabled. To implement this, you should review the following concepts.
- The Detail View exposes the DetailView.ViewEditModeChanged event, which is fired when the edit mode is changed.
- The Action exposes the ActionBase.Enabled property, which is not a simple Boolean property, but a key/value pair collection used to determine the Action’s enabled state. This kind of collection is used because there can be many factors that influence the Action’s state, and an XAF application should take them all into account.
Thus, handle the ViewEditModeChanged event and modify the Action’s Enabled collection based on the current edit mode. To do this, return to the Controller’s Designer and double-click the Activated event in the Events view of the Properties window. Replace the automatically generated event handler with the following code.
private void ClearContactTasksController_Activated(object sender, EventArgs e) {
    // Enables the ClearTasks Action if the current Detail View's ViewEditMode property
    // is set to ViewEditMode.Edit.
    ClearTasksAction.Enabled.SetItemValue("EditMode",
        ((DetailView)View).ViewEditMode == ViewEditMode.Edit);
    ((DetailView)View).ViewEditModeChanged +=
        new EventHandler<EventArgs>(ClearContactTasksController_ViewEditModeChanged);
}
// Manages the ClearTasks Action enabled state.
void ClearContactTasksController_ViewEditModeChanged(object sender, EventArgs e) {
    ClearTasksAction.Enabled.SetItemValue("EditMode",
        ((DetailView)View).ViewEditMode == ViewEditMode.Edit);
}
To see the result, run the WinForms or ASP.NET application and do the following.
- Open a detail form for any object.
Click the Clear Tasks button, which represents the Action you have implemented. A confirmation message will appear as shown in the image below.
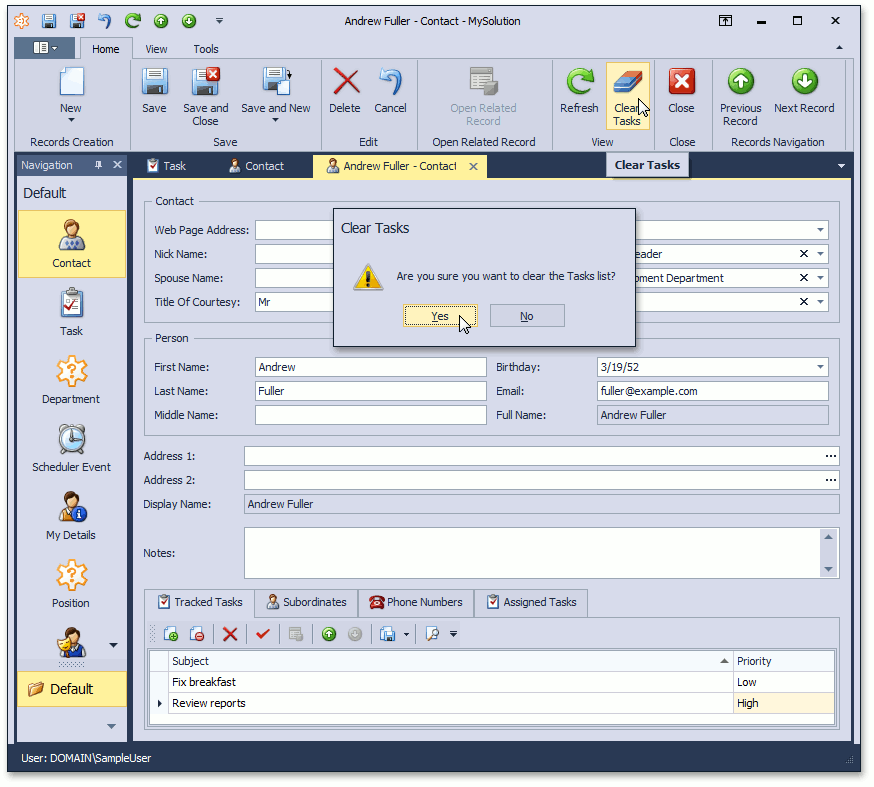
Click Yes (in a WinForms application) or OK (in an ASP.NET application). All Tracked Tasks of the Contact will be emptied.
Note
Although this topic explains how to create a controller using the Designer, a controller is a class that can also be written manually, as shown in the Customize the Application UI and Behavior topic of the Basic Tutorial (SimpleProjectManager Application).
If you need to place an action inside the Detail View, refer to the How to: Include an Action to a Detail View Layout topic.
You can view the code used in this lesson in the MySolution.Module | Controllers | ClearContactTasksController.cs (ClearContactTasksController.vb) file of the Main Demo installed with XAF. The MainDemo application is installed in %PUBLIC%\Documents\DevExpress Demos 19.1\Components\eXpressApp Framework\MainDemo by default. The ASP.NET version of this demo is available online at https://demos.devexpress.com/XAF/MainDemo.
Next Lesson: Add a Parametrized Action