Add an Action that Displays a Pop-up Window
- 6 minutes to read
In this lesson, you will learn how to create an Action that shows a pop-up window. This type of Action is useful when you want a user to input several parameters in a pop-up dialog before an Action is executed.
Note
Before proceeding, take a moment to review the following lessons.
- Set a Many-to-Many Relationship (XPO/EF)
- Add a Simple Action
Create a Controller and a PopupWindowShowAction
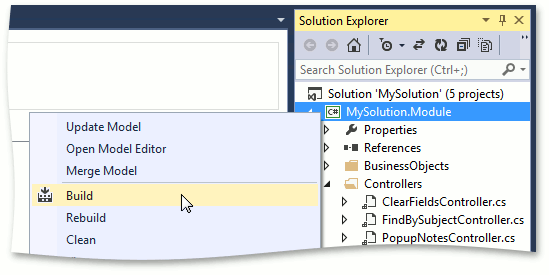
- Add a new View Controller to the MySolution.Module project, as described in the Add a Simple Action lesson. Name it PopupNotesController.
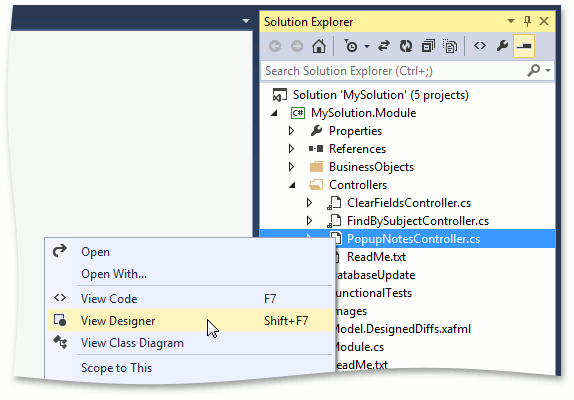
Right-click the MySolution.Module | Controllers | PopupNotesController.cs (PopupNotesController.vb) file, and choose View Designer to invoke the Designer.
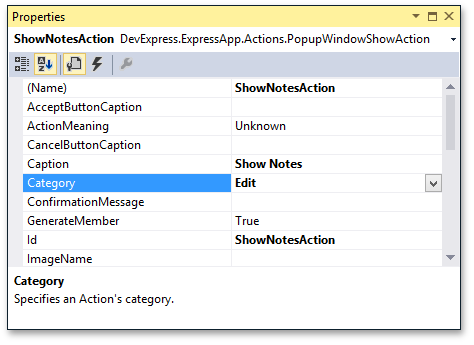
Drag the PopupWindowShowAction component from the DX.20.2: XAF Actions tab to the Designer. In the popupWindowShowAction1 “Properties” window, set the Name and Id properties to “ShowNotesAction”, and set the Caption property to “Show Notes”. Set the Category property to “Edit”. This property specifies the Action group to which the current Action belongs. All Actions within a single group are displayed together sequentially in a UI.
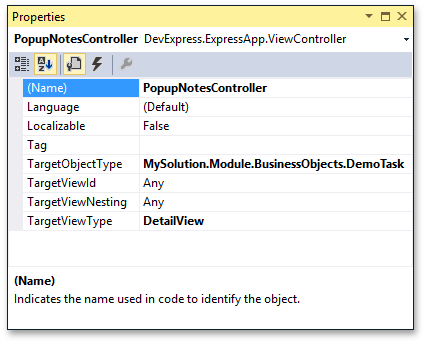
To activate the PopupNotesController for DemoTask Detail Views only, set the Controller’s ViewController.TargetObjectType property to MySolution.Module.DemoTask, and set the ViewController.TargetViewType to DetailView.
Specify the Popup List View
Focus the ShowNotesAction component. In the Properties window, switch to the Events view. Double-click the CustomizePopupWindowParams event, add the “using“ (“Imports“ in VB) directive according to your ORM, and replace the auto-generated event handler code with the following code.
using DevExpress.Persistent.BaseImpl; //For XPO
using DevExpress.Persistent.BaseImpl.EF; //For EF
// ...
private void ShowNotesAction_CustomizePopupWindowParams(object sender, CustomizePopupWindowParamsEventArgs e) {
    IObjectSpace objectSpace = Application.CreateObjectSpace(typeof(Note));
    string noteListViewId = Application.FindLookupListViewId(typeof(Note));
    CollectionSourceBase collectionSource = Application.CreateCollectionSource(objectSpace, typeof(Note), noteListViewId);
    e.View = Application.CreateListView(noteListViewId, collectionSource, true);
    //Optionally customize the window display settings.
    //e.Size = new System.Drawing.Size(600, 400);
    //e.Maximized = true;
    //e.IsSizeable = false;
}
For details on this event, refer to the PopupWindowShowAction.CustomizePopupWindowParams topic. The code above will create the Notes List View when generating the pop-up window.
To create a List View, use the XafApplication object again (as you did in the previous lesson). In the code above, the XafApplication helps you find the ID of the required List View in the Application Model. Note that a collection source for the List View is created in a separate Object Space. To create the Object Space, use XafApplication again.
Handle the Execute Event
In the Controller’s Designer, switch to the Events view in the Properties window with the Action’s properties. Double-click the Execute event, add the “using“ (“Imports“ in VB) directive and replace the auto-generated event handler code with the following code.
using MySolution.Module.BusinessObjects;
// ...
private void ShowNotesAction_Execute(object sender, PopupWindowShowActionExecuteEventArgs e) {
    DemoTask task = (DemoTask)View.CurrentObject;
    foreach(Note note in e.PopupWindowViewSelectedObjects) {
        if(!string.IsNullOrEmpty(task.Description)) {
            task.Description += Environment.NewLine;
        }
        task.Description += note.Text;
    }
    if(((DetailView)View).ViewEditMode == ViewEditMode.View) {
        View.ObjectSpace.CommitChanges();
    }
}
The Execute event is raised when clicking the OK button in the pop-up window. When the handler above is executed, the Text property value of the selected Note object will be appended to the Task.Description property value.
In this code, access the object selected in the pop-up window by using the event handler’s PopupWindowShowActionExecuteEventArgs.PopupWindowViewSelectedObjects parameter.
To refresh the editor representing the modified Description property, first find its PropertyEditor in the current View’s CompositeView.Items collection using the CompositeView.FindItem method. To update the value displayed by the Property Editor’s editor, call the PropertyEditor.ReadValue method.
In ASP.NET Web applications, Detail Views are displayed in View and Edit modes. When the ShowNotes Action is activated for a DemoTask Detail View that is in View mode, the changes made to the DemoTask.Description property should be saved to the database. For this purpose, the CommitChanges method of the current View’s ObjectSpace is called. When you use the ShowNotes Action in a DemoTask Detail View that is in Edit mode, the changes can be saved or rolled back via the corresponding built-in Actions.
Add Notes to the UI
- To add the Note business class to the UI construction process, add it to the Application Model.
If your ORM is Entity Framework, you should register the Note type in DbContext before proceeding to the next step. Edit the BusinessObjects\MySolutionDbContext.cs file as shown below.
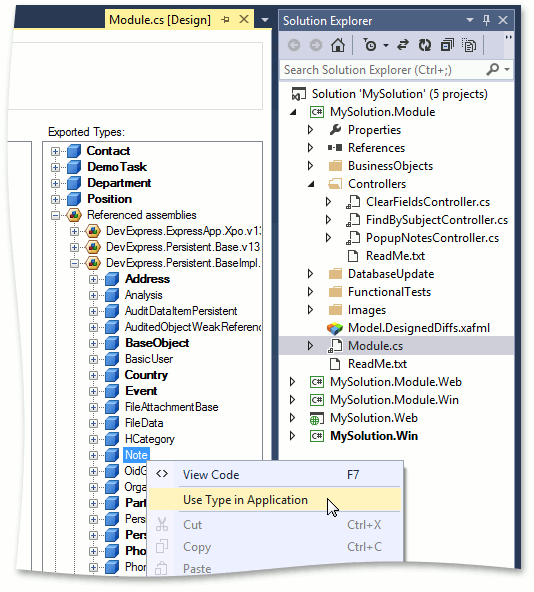
To add the Note business class from the Business Class Library use the Module Designer. Double-click the Module.cs (Module.vb) file within the MySolution.Module project. The Exported Types section of the designer lists the business classes that can be added.
If you are using XPO:
Locate the Referenced Assemblies | DevExpress.Persistent.BaseImpl.v20.2 | Note node.
If you are using Entity Framework:
Locate the Referenced Assemblies | DevExpress.Persistent.BaseImpl.EF.v20.2 | Note node.
Select this node and press the SPACEBAR, or right-click it and choose Use Type in Application in the invoked context menu.
Build the project.
Note
To create Note objects, you should add the Note item to the New Action’s items. To do this, perform the steps demonstrated in the Add an Item to the New Action lesson.
To access the existing Note objects, add the Note item to the ShowNavigationItem Action’s items (displayed by the navigation control). To do this, perform the steps demonstrated in the Add an Item to the Navigation Control lesson.
Result
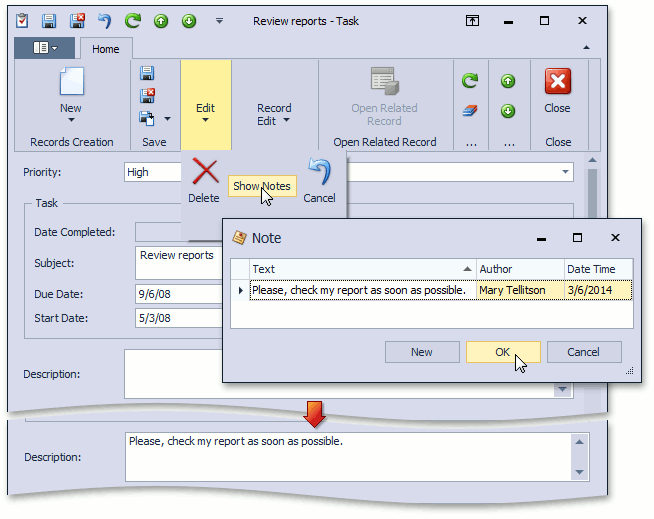
Run the WinForms or ASP.NET application. Create several Note objects via the New Action. Select the Task item in the navigation control. Double-click one of the listed Task objects. In the invoked detail form, find the Show Notes toolbar button that represents the implemented Action. Click this button, which will invoke a pop-up window. Select a Note object in the list and click OK. Check to see that the Task.Description property value has been changed.
Tip
For an example of how to create and show a Detail View, refer to the How to: Create and Show a Detail View of the Selected Object in a Popup Window topic.
You can view the code demonstrated in this tutorial in the MySolution.Module | Controllers | PopupNotesController.cs (PopupNotesController.vb) file of the Main Demo installed with XAF. The MainDemo application is installed in %PUBLIC%\Documents\DevExpress Demos 20.2\Components.NET Core Desktop Libraries\eXpressApp Framework\MainDemo by default. The ASP.NET Web Forms version is available online at https://demos.devexpress.com/XAF/MainDemo.
Next Lesson: Add an Action with Option Selection