Application Model Basics
- 7 minutes to read
Business applications are complex projects. To build an application from scratch, you have to implement data storage, data visualization, business logic, etc. With the eXpressApp Framework, only the business model has to be implemented. The default UI is generated automatically. For this purpose, the eXpressApp Framework uses a special data store with structured information about the UI - Application Model. It is generated based on class declarations in the application code and referenced modules. This topic details how the Application Model information is collected, and how you can use it to customize the default UI.
Application Model Overview
When you run a WinForms, ASP.NET Web Forms, or ASP.NET Core Blazor application, the Application Model is used to create UI elements. For instance, when the framework creates a grid editor that displays a list of Contact objects, information for each column’s visibility, location, caption and other settings is taken from the Application Model. The Application Model provides details on business classes, Controllers, Actions, Property Editors and other elements that provide or influence application functionality.
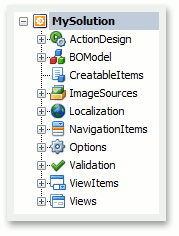
The Application Model information is generally represented by a tree. Tree nodes normally have a set of properties that actually specify the Application Model data. By default, the Application Model is organized in the following way: the root node (Application) and several child nodes (ActionDesign, BOModel, CreatableItems, ImageSources, NavigationItems, ViewItems, Views, etc.).
Application Model Customization
To view or customize the Application Model’s data, use one of the following approaches.
- In code. Via an appropriate Controller, you can access the required Application Model node. For details, see the Access the Application Model in Code topic.
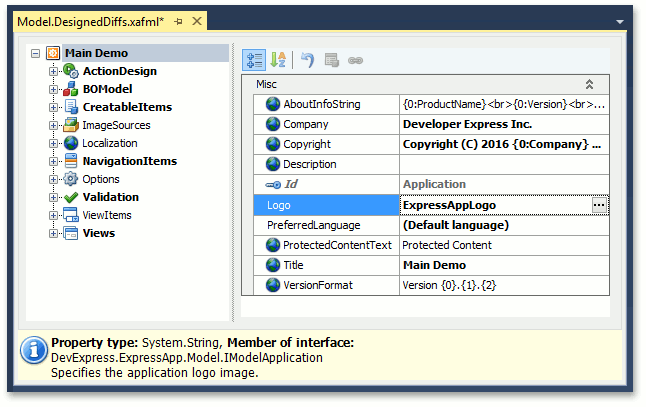
At design time. You can run the Model Editor from any project of your application. Looking through the nodes (to the left) and their properties (to the right), you can see that most data has already been generated. For instance, the BOModel node provides information on all the business classes that are declared in your application and referenced modules. To learn more about the Model Editor, refer to the Model Editor help section.
You can customize any data that is not read-only. There are many examples of the Application Model customization in the Tutorial’s UI Customization section.
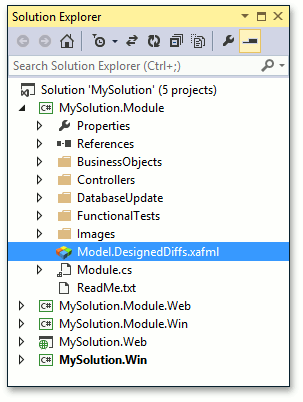
The changes you make in the Model Editor are saved to the Model.DesignedDiffs.xafml or the Model.xafml file, depending on the project where you have opened the Model Editor.
To remove changes made in the Model Editor, remove the corresponding XAFML file. Of course, you can also remove only specific changes in a Model Editor (via the Reset Differences context menu) or by editing XAFML files. To open an XAFML file in MS Visual Studio, right-click it and select View Code in the invoked window. The changes are presented in an XML format. You can easily find the required node or property to be removed or modified. However, we recommend that you use the Model Editor when possible, rather than edit XAFML files manually.
Note
Using the Application Model to change settings that can be changed in code (see Data Annotations in Data Model) is not recommended. For instance, if you rename a class, all changes you made to it in the Application Model will be lost. It is also recommended that you make changes to the model for the module project. If you customize a model for an application project, changes will not be applied to another application based on the same logic.
- At runtime. End-users can customize the Application Model, either directly via the Model Editor invoked at run-time or indirectly - by modifying the layout, changing the skin, etc. End-user customizations are stored in the Model.User.xafml file (in WinForms applications), in session (in the ASP.NET Web Forms application) or in a database. You can also implement a custom storage (see How to: Store the Application Model Differences in the Database).
The Application Model’s node structure is customizable as well. You can add custom nodes and properties to custom and default nodes. To learn how to do this, refer to the Extend and Customize the Application Model in Code topic.
Application Model’s Layered Structure
While customizing the Application Model in different places of your application, you should be aware of the order in which the Model is generated. Internally, the Application Model has a layered structure.
- At its base, there is the zero layer. The generation of this layer is based on the code of the application’s referenced modules.
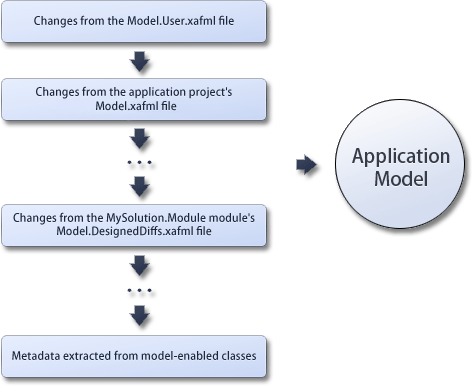
- Higher, there are layers for each module of the application, represented by the modules’ XAFML files. Additionally, if there are XAFML files in the application’s referenced modules, they form layers as well. The sequence of these layers is detailed in the picture below.
- Then, there is a layer for the application project’s XAFML file.
- At the top is the layer with end-user customizations, stored in the Model.User.xafml file (in WinForms applications), in session (in the ASP.NET Web Forms application) or in a database.
Finally, there is the master layer. It does not contain any information itself. It serves as a proxy to all other layers. Usually, when you access the Application Model, you deal with the master layer.
The Application Model is not fully generated at once. Each section is generated on demand, when required. When getting information from a certain node is required, the request is addressed to the master layer. The master checks if the required information is already generated at the zero level. If not, the required piece of the Model is generated there. Then, the master checks all other layers, superimposes them with the information generated at the zero level, and returns the requested information. If the layers contain various data, the topmost layer is taken into consideration. The information on the intermediate layers is not modified.
When changing data is required, the master creates the corresponding piece of the model (the node to be modified and its parents) in the top layer and then saves the changes there.
To collect information for the Application Model’s nodes, all the modules that are used by the project for which the Model is generated are scanned. In each module, the information from the code is collected and the referenced modules are scanned. The order in which the modules are scanned is demonstrated in the following picture.
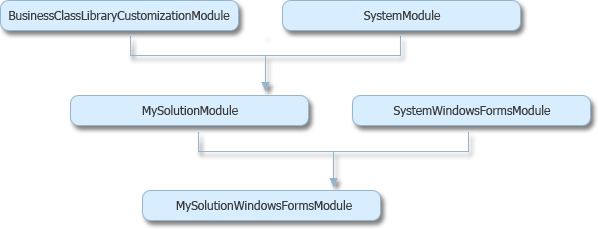
This image illustrates a simple “MySolution” XAF WinForms application. The BusinessClassLibraryCustomizationModule and SystemModule are the modules required by the MySolution module. The MySolutionModule and SystemWindowsFormsModule are the modules required by the MySolutionWindowsFormsModule. When generating the Application Model, the BusinessClassLibraryCustomizationModule and SystemModule are scanned first. Since these modules reside at the same level on the dependency tree, there is no guaranteed order. The SystemModule may come first or last. Then, the MySolutionModule and SystemWindowsFormsModule are scanned. And again, since these modules reside at the same level on the dependency tree, there is no guaranteed order between them. Finally, the MySolutionWindowsFormsModule is scanned.
You can learn which modules take part in the Application Model generation by using the Application Designer‘s Modules section. It lists all the modules that are added to the application project, the modules that are used by the added modules, and so on. In addition to the Application and Module Designers, there are alternative approaches to adding a module. For instance, you can list the required modules in the application project’s configuration file. For details on these approaches, refer to the Ways to Register a Module topic. The list of the modules used to generate the Application Model includes the ones that are added, using all the possible approaches.