# AI Chat Control | WPF Controls | DevExpress Documentation
Note
The DevExpress AI Chat Control (`AIChatControl`) can only be used in WPF applications that target .NET 8+ and newer frameworks.
The AI Chat Control allows you to embed an interactive, Copilot-inspired chat interface in your WPF application. The control uses `BlazorWebView` to host the DevExpress Blazor AI Chat component ([DxAIChat](/Blazor/DevExpress.AIIntegration.Blazor.Chat.DxAIChat)).
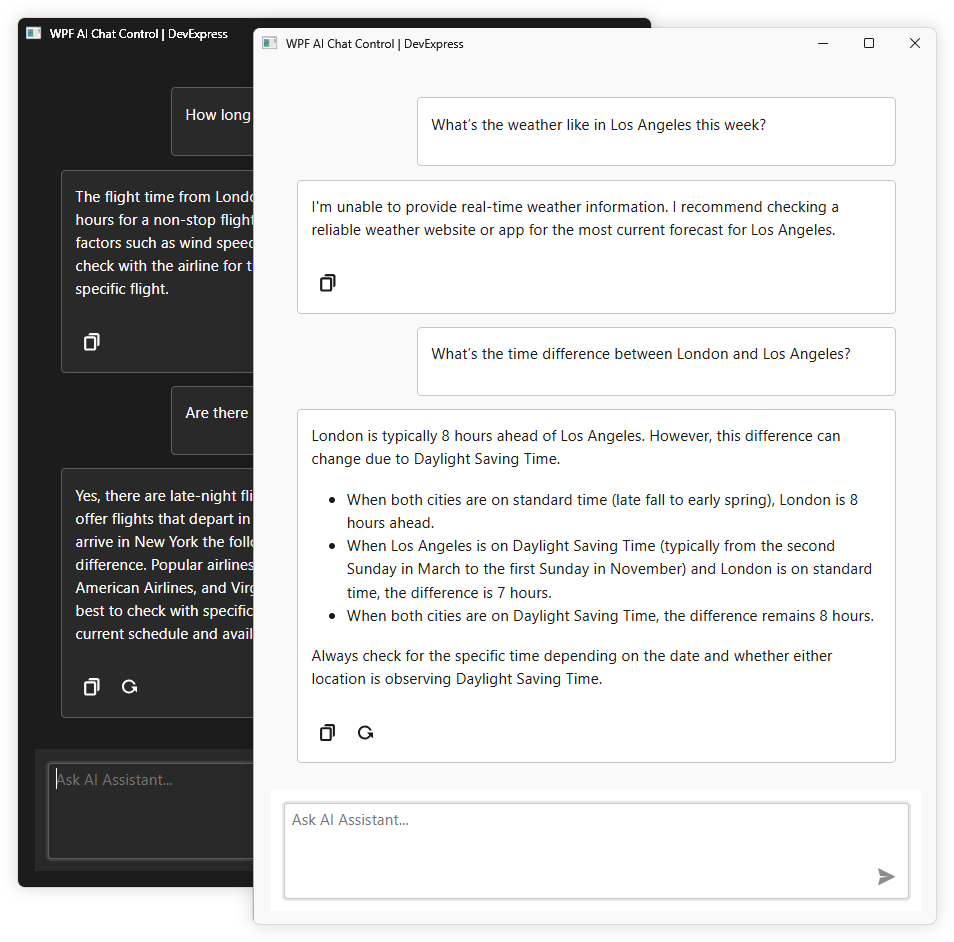
[Run Demo: AI Chat Control](dxdemo://Wpf/DXAI/MainDemo/AIChatPromptSuggestionsModule) [View Example: AI Chat](https://github.com/DevExpress-Examples/devexpress-ai-chat-samples)
## Getting Started
To use the `AIChatControl`:
- Install `DevExpress.AIIntegration.Wpf.Chat`.
- Refer to the following help topics for more information:
- [How to Install DevExpress Products](/GeneralInformation/116042/installation/install-products)
- [Install Packages from NuGet.org: Visual Studio, VS Code, and JetBrains Rider](https://go.devexpress.com/DevExpress_NuGet_Documentation.aspx)
- Change Project SDK
- Update the project SDK to `Microsoft.NET.Sdk.Razor`:
- .csproj
<Project Sdk="Microsoft.NET.Sdk.Razor">
- Register the AI Client
- See the following help topic for information on required NuGet packages and system requirements: [Register an AI Client](/WPF/405223/ai-powered-extensions).
The following code snippet registers an Azure OpenAI client at application startup within the [AIExtensionsContainerDesktop](/CoreLibraries/DevExpress.AIIntegration.AIExtensionsContainerDesktop) container:
- C#
- VB.NET
using Azure.AI.OpenAI;
using DevExpress.AIIntegration;
using DevExpress.Xpf.Core;
using Microsoft.Extensions.AI;
using System;
using System.Windows;

namespace AIAssistantApp {
    public partial class App : Application {
        static App() {
            CompatibilitySettings.UseLightweightThemes = true;
        }

        protected override void OnStartup(StartupEventArgs e) {
            base.OnStartup(e);
            ApplicationThemeHelper.ApplicationThemeName = "Win11Light";

            // For example, ModelId = "gpt-4o-mini"
            IChatClient azureChatClient = new Azure.AI.OpenAI.AzureOpenAIClient(new Uri(AzureOpenAIEndpoint),
                new System.ClientModel.ApiKeyCredential(AzureOpenAIKey)).GetChatClient(ModelId).AsIChatClient();
            AIExtensionsContainerDesktop.Default.RegisterChatClient(azureChatClient);
        }
    }
}
Imports Azure.AI.OpenAI
Imports DevExpress.AIIntegration
Imports DevExpress.Xpf.Core
Imports Microsoft.Extensions.AI
Imports System
Imports System.Windows

Namespace AIAssistantApp
    Partial Public Class App
        Inherits Application

        Shared Sub New()
            CompatibilitySettings.UseLightweightThemes = True
        End Sub

        Protected Overrides Sub OnStartup(ByVal e As StartupEventArgs)
            MyBase.OnStartup(e)
            ApplicationThemeHelper.ApplicationThemeName = "Win11Light"

            ' For example, ModelId = "gpt-4o-mini"
            Dim azureChatClient As IChatClient = New AzureOpenAIClient(New Uri(AzureOpenAIEndpoint),
                New System.ClientModel.ApiKeyCredential(AzureOpenAIKey)).GetChatClient(ModelId).AsIChatClient()
            AIExtensionsContainerDesktop.Default.RegisterChatClient(azureChatClient)
        End Sub
    End Class
End Namespace
## Create the AI Chat Control
Note
The AI Chat Control does not support design-time rendering.
The following code snippet creates the `AIChatControl` with default settings:
- XAML
<dx:ThemedWindow
    x:Class="DXApplication3.MainWindow"
    xmlns="http://schemas.microsoft.com/winfx/2006/xaml/presentation"
    xmlns:x="http://schemas.microsoft.com/winfx/2006/xaml"
    xmlns:dx="http://schemas.devexpress.com/winfx/2008/xaml/core"
    xmlns:dxaichat="http://schemas.devexpress.com/winfx/2008/xaml/aichat"
    Title="MainWindow" Height="800" Width="1000">
    <Grid>
        <dxaichat:AIChatControl
            x:Name="aiChatControl"
            HorizontalAlignment="Stretch"
            VerticalAlignment="Stretch"
            Margin="10">
        </dxaichat:AIChatControl>
    </Grid>
</dx:ThemedWindow>
### CLI Project Templates
Use AI Chat Application and AI Chat (RAG) Application [CLI project templates](/WPF/405220/dotnet-core-support/project-template-kit#cli-templates) to create a chat application that integrates the AI Chat Control. Both templates support .NET 8 / .NET 9 / .NET10 and integrate the **DevExpress MCP Server** for DevExpress-specific guidance.
#### AI Chat Application
- The **AI Chat Application** template creates a WPF chat app that integrates the AI Chat Control.
- `dx.wpf.aichat`
**Parameter**: `--ai-provider` | **Values**: `azureopenai`, `openai`, `ollama`
Creates a WPF chat app that uses the DevExpress AI Chat Control.
If you plan to use an AI coding assistant in your IDE, we recommend that you setup the **DevExpress MCP Server** (adds DevExpress-specific guidance to assistant responses). Create a configuration file (*mcp.json*) and specify server settings.
Supported AI providers:
- Azure OpenAI
- OpenAI
- Ollama
#### AI Chat (RAG) Application
- The **AI Chat (RAG) Application** template creates a desktop WPF application with the AI Chat Control and built-in Retrieval-Augmented Generation (RAG) for document-grounded conversations.
- `dx.wpf.aichatrag`
**Parameter**: `--ai-provider` | **Values**: `azureopenai`, `openai`, `ollama`
**Parameter**: `--vectorstore` | **Values**: `sqlite`, `inmemory`
Creates a desktop WPF application with the DevExpress AI Chat Control and built-in Retrieval-Augmented Generation (RAG) for document-grounded conversations:
- Uses local document data for context-aware answers.
- Scans user Documents folders and indexes PDF, DOCX, TXT, RTF, and HTML files.
- Extracts, embeds, and semantically searches document text.
- Stores vectors in In-Memory (rebuilds each run) or SQLite (persistent database).
- Merges retrieved content with user prompts to improve accuracy.
- Optionally integrates the **DevExpress MCP Server** for DevExpress-specific guidance.
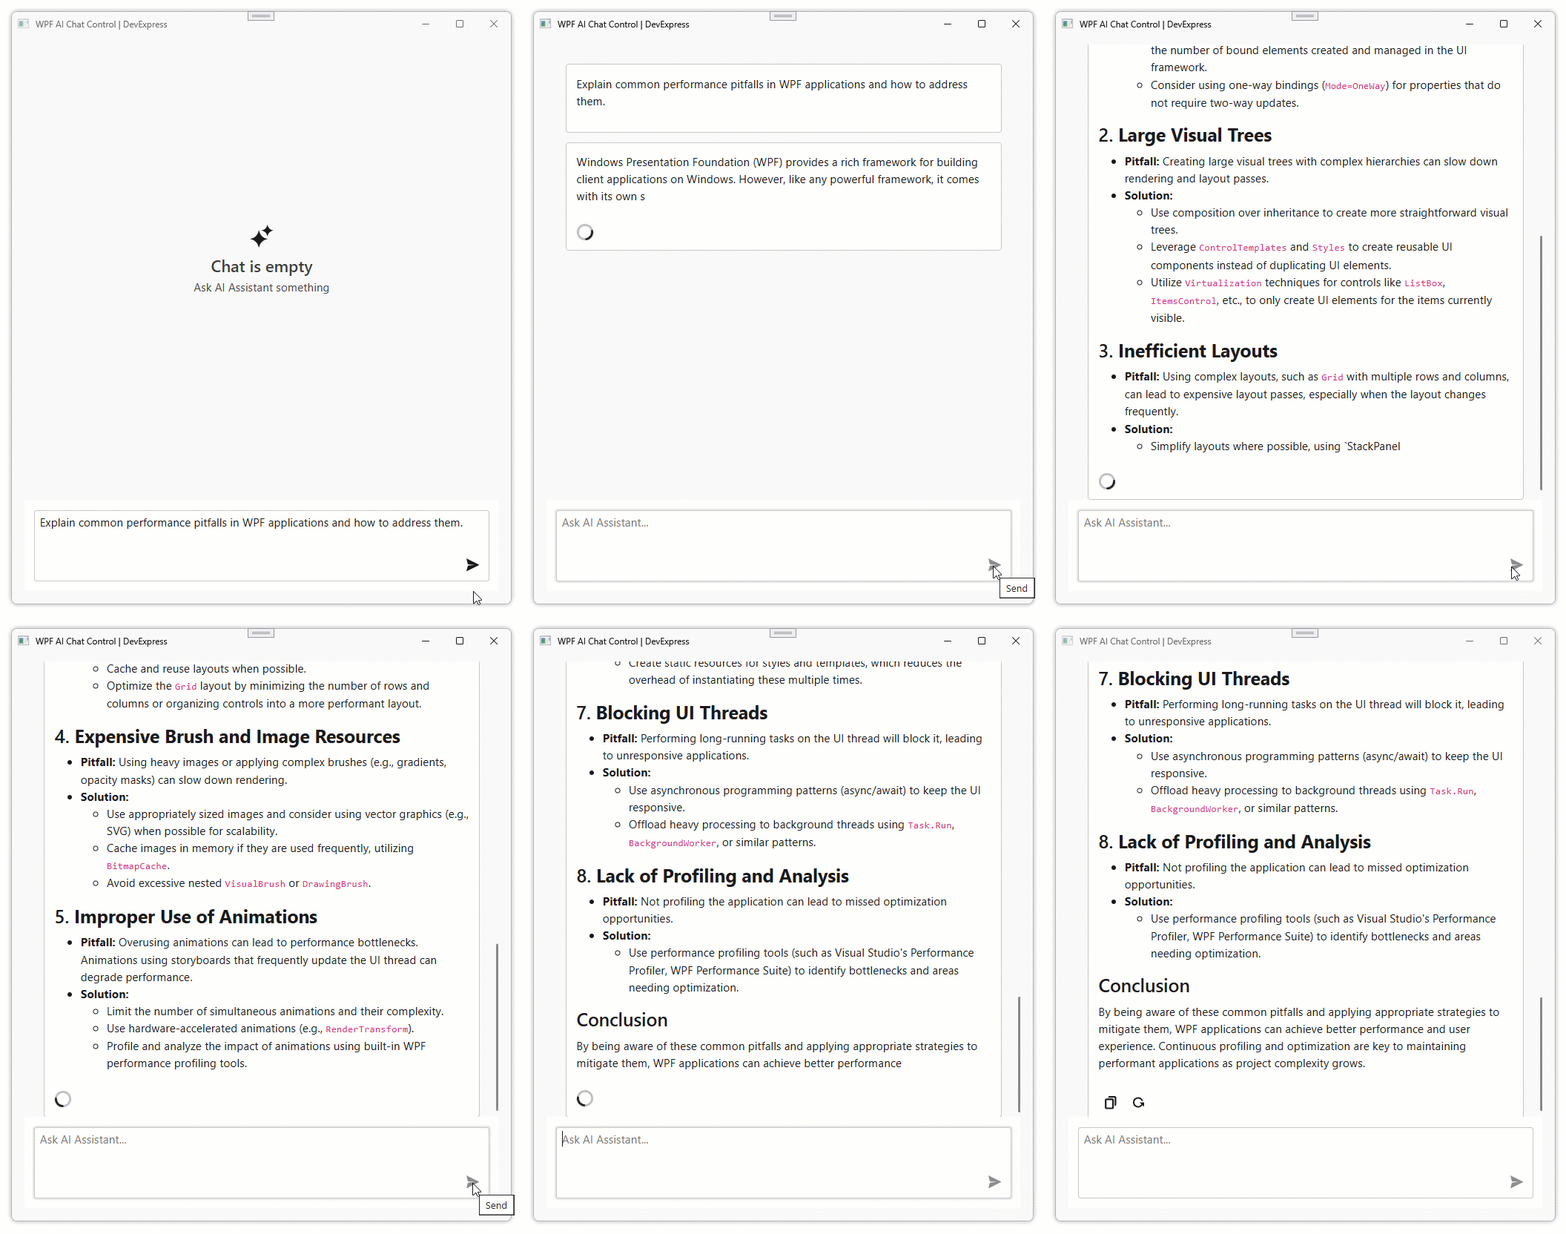
## Streaming
The AI Chat Control can display responses from the AI assistant as they are generated in a natural, conversational flow (rather than waiting for the entire message to complete before showing it to the user). Enable the [UseStreaming](/WPF/DevExpress.AIIntegration.Wpf.Chat.AIChatControl.UseStreaming) setting to activate this feature:
- XAML
<dxaichat:AIChatControl
    x:Name="aiChatControl"
    UseStreaming="True"
    HorizontalAlignment="Stretch"
    VerticalAlignment="Stretch"
    Margin="10">
</dxaichat:AIChatControl>
Play the following animation to see the result:
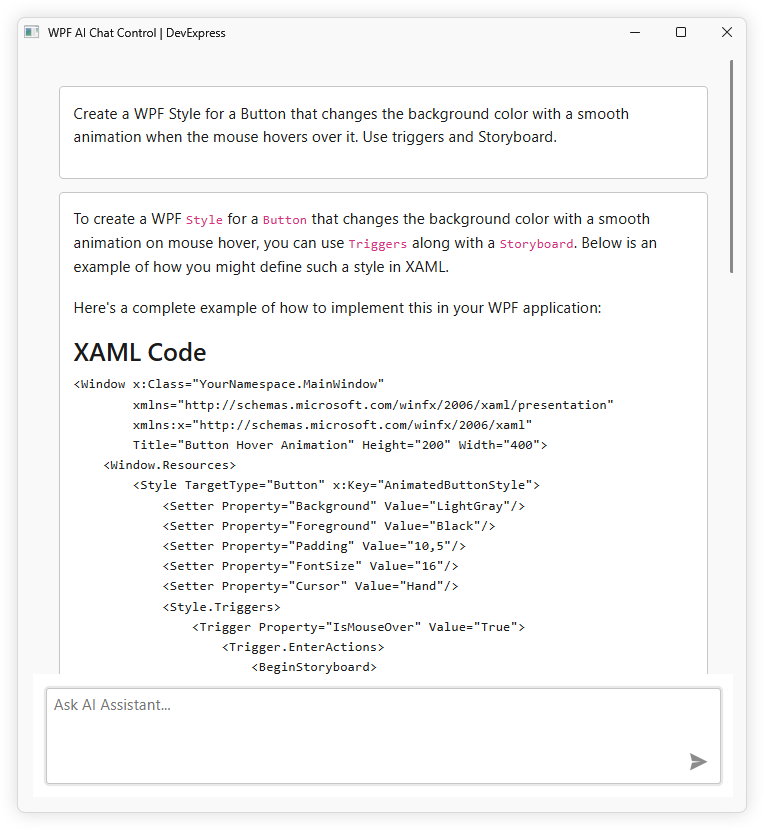
## Markdown Message Rendering
To enable Markdown message rendering:
1. Set the [ContentFormat](/WPF/DevExpress.AIIntegration.Wpf.Chat.AIChatControl.ContentFormat) property to `Markdown` to receive responses formatted using Markdown.
2. Handle the [MarkdownConvert](/WPF/DevExpress.AIIntegration.Wpf.Chat.AIChatControl.MarkdownConvert) event to convert markdown text into HTML and make responses more readable, structured, and visually appealing.
Warning
Always sanitize AI-generated content before rendering it in the UI.
The following example enables Markdown message rendering. The example uses the [Markdig](https://www.nuget.org/packages/Markdig/) Markdown processing library to convert Markdown text into HTML.
- XAML
<dxaichat:AIChatControl
    x:Name="aiChatControl"
    UseStreaming="True"
    ContentFormat="Markdown"
    MarkdownConvert="AiChatControl_MarkdownConvert"
    HorizontalAlignment="Stretch"
    VerticalAlignment="Stretch"
    Margin="10">
</dxaichat:AIChatControl>
- C#
using DevExpress.Xpf.Core;
using DevExpress.AIIntegration.Blazor.Chat.WebView;
using Microsoft.AspNetCore.Components;
using Ganss.Xss;
using Markdig;

namespace DXApplication {
    var sanitizer;

    public partial class MainWindow : ThemedWindow {
        public MainWindow() {
            InitializeComponent();
            sanitizer = new HtmlSanitizer();
        }

        void AiChatControl_MarkdownConvert(object sender, AIChatControlMarkdownConvertEventArgs e) {
            // Convert Markdown to HTML.
            string html = Markdown.ToHtml(e.MarkdownText);

            // WARNING: The AI agent's content may be untrusted.
            // Developers must sanitize all HTML before rendering to prevent XSS attacks.
            string safeHtml = sanitizer.Sanitize(html);

            // Assign sanitized HTML for rendering.
            e.HtmlText = (MarkupString)safeHtml;
        }
    }
}
The following screenshot demonstrates the result:
## File Attachments
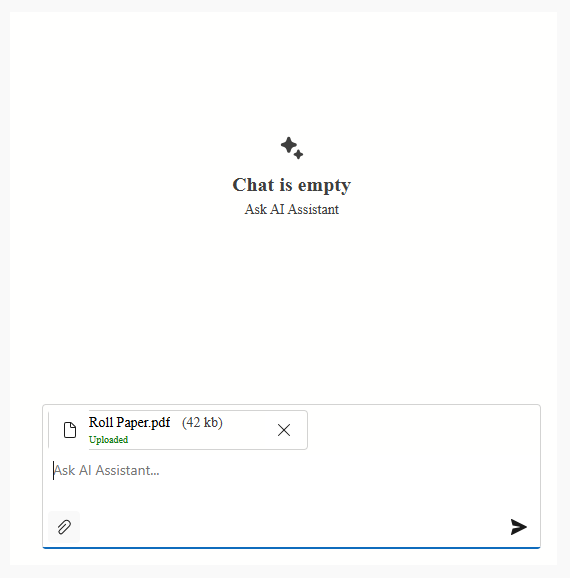
Users can now attach files directly to their chat messages. AI analyzes document content (such as text files, PDFs, images) and delivers more context-aware responses.
[Run Demo: File Attachments — AI Chat](dxdemo://Wpf/DXAI/MainDemo/AIChatFileAttachmentsModule)
To activate file upload:
1. Enable the [FileUploadEnabled](/WPF/DevExpress.AIIntegration.Wpf.Chat.AIChatControl.FileUploadEnabled) property to allow users to attach files.
2. Configure additional settings based on your project requirements (maximum file size, allowed file types/extensions, maximum number of files that users can attach to a message).
- XAML
xmlns:dxaichat="http://schemas.devexpress.com/winfx/2008/xaml/aichat"
xmlns:chat="clr-namespace:DevExpress.AIIntegration.Blazor.Chat;assembly=DevExpress.AIIntegration.Blazor.Chat.v25.1"
xmlns:system="clr-namespace:System;assembly=mscorlib"

<dxaichat:AIChatControl
    x:Name="aiChatControl"
    FileUploadEnabled="True"
    UseStreaming="True"
    HorizontalAlignment="Stretch"
    VerticalAlignment="Stretch"
    Margin="10">
    <dxaichat:AIChatControl.FileUploadSettings>
        <chat:DxAIChatFileUploadSettings MaxFileSize="5000000" MaxFileCount="5">
            <chat:DxAIChatFileUploadSettings.AllowedFileExtensions>
                <system:String>.png</system:String>
                <system:String>.pdf</system:String>
                <system:String>.txt</system:String>
            </chat:DxAIChatFileUploadSettings.AllowedFileExtensions>
            <chat:DxAIChatFileUploadSettings.FileTypeFilter>
                <system:String>image/png</system:String>
                <system:String>application/pdf</system:String>
                <system:String>text/plain</system:String>
            </chat:DxAIChatFileUploadSettings.FileTypeFilter>
        </chat:DxAIChatFileUploadSettings>
    </dxaichat:AIChatControl.FileUploadSettings>
</dxaichat:AIChatControl>
Tip
See the following article for more information on MIME types (`FileTypeFilter`): [Common Media Types](https://developer.mozilla.org/en-US/docs/Web/HTTP/Guides/MIME_types/Common_types).
## Prompt Suggestions
To help users get started or explore new possibilities, the AI Chat Control can display prompt suggestions.
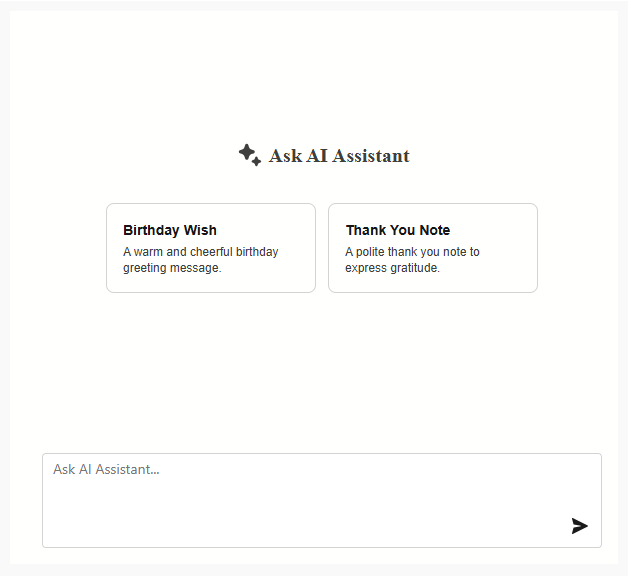
[Run Demo: Prompt Suggestions — AI Chat](dxdemo://Wpf/DXAI/MainDemo/AIChatPromptSuggestionsModule)
Use the [PromptSuggestions](/WPF/DevExpress.AIIntegration.Wpf.Chat.AIChatControl.PromptSuggestions) property to supply intelligent suggestions:
- XAML
<dxaichat:AIChatControl>
    <dxaichat:AIChatControl.PromptSuggestions>
        <chat:DxAIChatPromptSuggestion
            Title="Birthday Wish"
            Text="A warm and cheerful birthday greeting message."
            PromptMessage="Write a heartfelt birthday message for a close friend." />
        <chat:DxAIChatPromptSuggestion
            Title="Thank You Note"
            Text="A polite thank you note to express gratitude."
            PromptMessage="Compose a short thank you note to a colleague who helped with a project." />
    </dxaichat:AIChatControl.PromptSuggestions>
</dxaichat:AIChatControl>
## Handle Chat Messages
To manually process messages sent to an AI service, handle the [MessageSending](/WPF/DevExpress.AIIntegration.Wpf.Chat.AIChatControl.MessageSending) event. For example, you can manually call the AI client or service of choice, and return its responses to the chat. The following example adds responses to user questions:
- XAML
<dxaichat:AIChatControl x:Name="aiChatControl"
                MessageSending="AiChatControl_MessageSending"
                HorizontalAlignment="Stretch"
                VerticalAlignment="Stretch"
                Margin="10">
</dxaichat:AIChatControl>
- C#
async void AiChatControl_MessageSending(object sender, AIChatControlMessageSendingEventArgs e) {
    e.Cancel = true;
    await e.Chat.SendMessageAsync($"Processed: {e.Content}", ChatRole.User);
}
Note
Set the `e.Cancel` event parameter to `true` to block automatic message delivery and use the [AIChatControl.SendMessageAsync](/WPF/DevExpress.AIIntegration.Wpf.Chat.AIChatControl.SendMessageAsync.overloads) method to send the message to the AI service manually.
## Conversation History
### Stateless and Stateful Chat Services
The AI Chat Control supports both stateless and stateful AI services. This distinction affects how conversation history is managed and how the control behaves when users clear chat content.
- Stateless Services
- Stateless services do not retain conversation context between requests. To preserve context, the AI Chat Control sends the full message history with each user request. In this mode:
- The service does not store conversation state.
- The AI Chat Control maintains conversation history.
- Clearing chat content removes all context.
- Stateful Services
- Stateful services maintain conversation history on the server. These services return a `ConversationId` value that identifies the current conversation session. When the AI Chat Control detects `ConversationId`, it automatically switches to stateful mode behavior:
- The AI Chat Control stores the conversation identifier.
- Subsequent requests send only new messages instead of the entire chat history.
- The AI service reconstructs conversation context automatically.
### Clear Chat Behavior for Stateful Services
For stateful services, clearing messages in the user interface does not automatically remove the server-side conversation state. To ensure that the **Clear** button starts a completely new conversation, the AI Chat Control reinitializes `IChatResponseProvider`.
Register `IChatResponseProvider` as a transient dependency. This ensures that the AI Chat Control creates a new provider instance when chat content is cleared.
```
serviceCollection.AddTransient(
new AzureOpenAIClient("endpoint", "apiKey")
.GetResponsesClient()
.AsIChatClient("modelId")
.AsIChatResponseProvider());
```
### Append Message in Chat History
Call the [AppendMessageAsync](/WPF/DevExpress.AIIntegration.Wpf.Chat.AIChatControl.AppendMessageAsync%28String--ChatRole--List-IAIChatMessageContextItem-%29) method to add a message to chat history without sending it to the AI service. Use this method in the `MessageSending` event to append a system prompt or supplemental context.
The following code snippet adds a system instruction to the chat:
- C#
async void AiChatControl_MessageSending(object sender,  AIChatControlMessageSendingEventArgs e)
{
    await e.Chat.AppendMessageAsync("Translate message to Spanish", ChatRole.System);
}
### Save and Load Chat History
Use the following methods to manage chat history:
- [SaveMessages](/WPF/DevExpress.AIIntegration.Wpf.Chat.AIChatControl.SaveMessages) – Returns an `IEnumerable` collection of messages.
- [LoadMessages](/WPF/DevExpress.AIIntegration.Wpf.Chat.AIChatControl.LoadMessages%28System.Collections.Generic.IEnumerable-DevExpress.AIIntegration.Blazor.Chat.BlazorChatMessage-%29) – Loads messages from the specified `IEnumerable` collection to the AI Chat Control and refreshes the control.
The following example saves/loads chat history when the user clicks the Save/Load button:
- C#
public partial class MainWindow : ThemedWindow {
    List<BlazorChatMessage> chatHistory;

    public MainWindow() {
        InitializeComponent();
    }

    void ButtonSave_Click(object sender, EventArgs e) {
        chatHistory = (List<BlazorChatMessage>)aiChatControl.SaveMessages();
    }

    void ButtonLoad_Click(object sender, EventArgs e) {
        if(chatHistory != null)
            aiChatControl.LoadMessages(chatHistory);
    }
}
## Display and Hide the Loading Indicator
Use the following methods to display a loading indicator while the application performs a long-running operation, such as preparing additional context before sending a request to the AI service:
- [ShowLoadingIndicatorAsync(string)](/WPF/DevExpress.AIIntegration.Wpf.Chat.AIChatControl.ShowLoadingIndicatorAsync%28System.String%29) – Displays the loading indicator with an optional caption.
- [HideLoadingIndicatorAsync()](/WPF/DevExpress.AIIntegration.Wpf.Chat.AIChatControl.HideLoadingIndicatorAsync) – Hides the loading indicator.
The following example displays the indicator with a custom caption when the user sends a message and hides it after the operation completes:
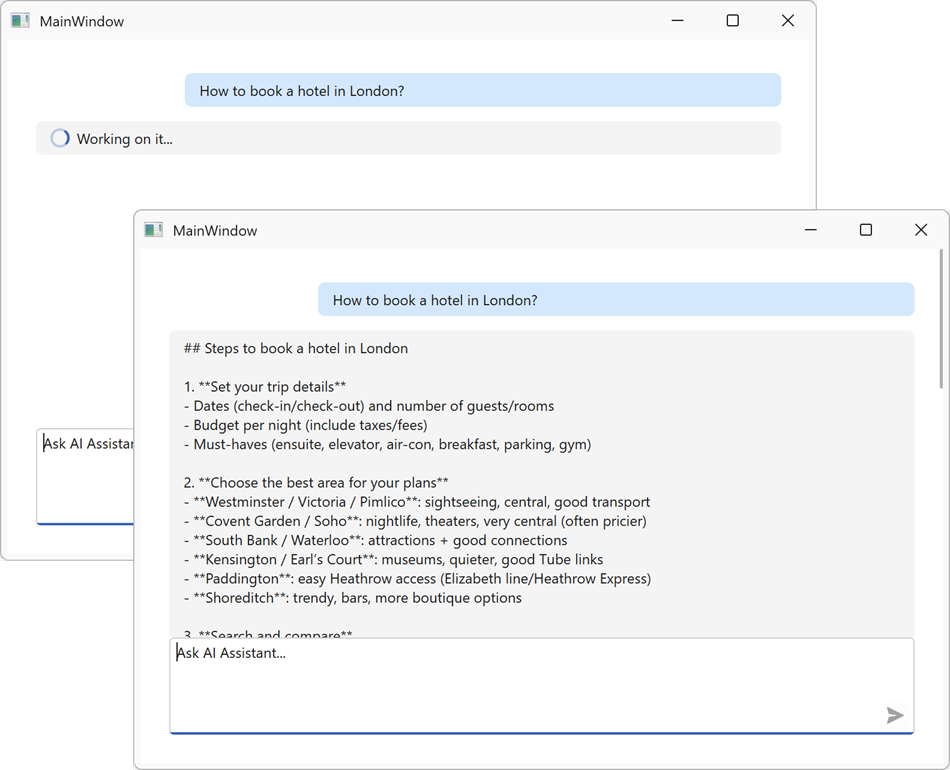
- C#
async void AiChatControl_MessageSending(object sender, AIChatControlMessageSendingEventArgs e)
{
    await aiChatControl.ShowLoadingIndicatorAsync("Working on it...");
    // Perform a long-running operation (load data, call an external API, etc.).
    await PrepareContextAsync();
    await aiChatControl.HideLoadingIndicatorAsync();
}
## Customize Chat UI and Appearance
The `AIChatControl` supports appearance customization through Razor-based templates. You can customize chat messages, errors, the empty message area, and text displayed when the chat has no message history.
### Message Templates
Use the following properties to customize the chat message container (including paddings and inner content alignment) or message content:
- [AIChatControl.MessageTemplate](/WPF/DevExpress.AIIntegration.Wpf.Chat.AIChatControl.MessageTemplate)
- [AIChatControl.MessageContentTemplate](/WPF/DevExpress.AIIntegration.Wpf.Chat.AIChatControl.MessageContentTemplate)
Note
- The [AIChatControl.MessageTemplate](/WPF/DevExpress.AIIntegration.Wpf.Chat.AIChatControl.MessageTemplate) property takes priority over the [AIChatControl.MessageContentTemplate](/WPF/DevExpress.AIIntegration.Wpf.Chat.AIChatControl.MessageContentTemplate) property if both templates are specified.
- The [MessageContentTemplate](/WPF/DevExpress.AIIntegration.Wpf.Chat.AIChatControl.MessageContentTemplate) does not support messages when [ContentFormat](/WPF/DevExpress.AIIntegration.Wpf.Chat.AIChatControl.ContentFormat) is set to `Markdown`. When using [MessageContentTemplate](/WPF/DevExpress.AIIntegration.Wpf.Chat.AIChatControl.MessageContentTemplate), implement markdown rendering logic within your custom template.
The following example displays a copy icon within chat messages. When a user clicks the icon, the message text is copied to the Clipboard, and a confirmation toast notification is displayed.
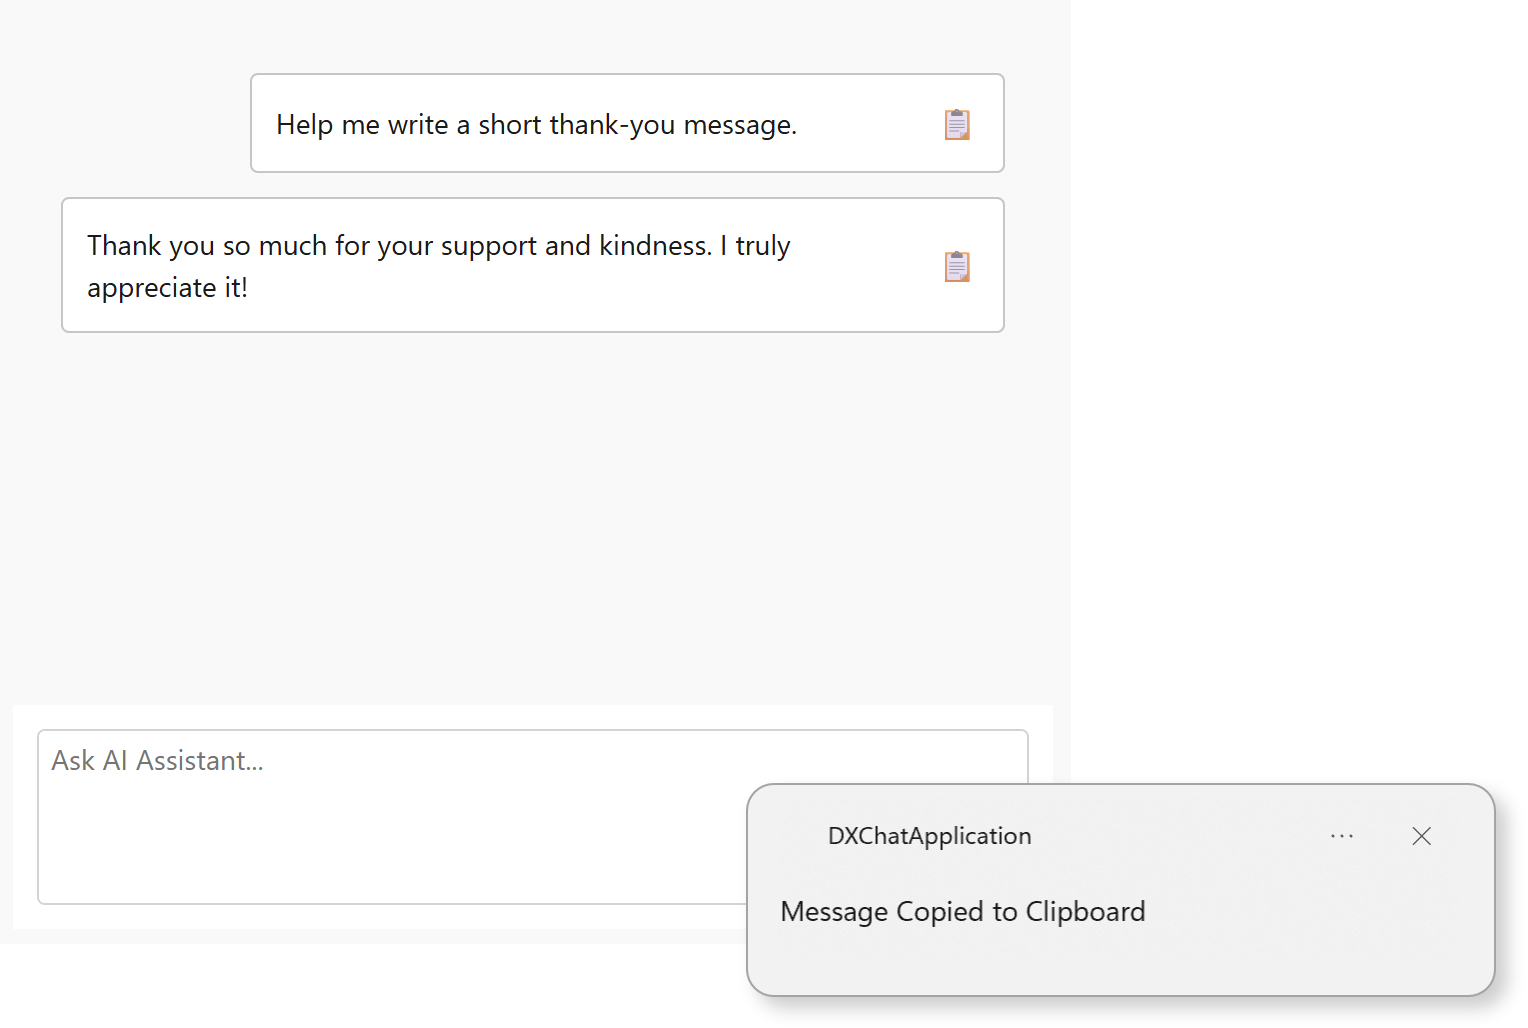
- C#
using DevExpress.AIIntegration.Blazor.Chat;
using DevExpress.Mvvm.UI;
using Microsoft.AspNetCore.Components;
using System.Windows;

namespace DXChatApplication {
    public partial class MainWindow {
        RenderFragment<BlazorChatMessage> MyMessageTemplate;
        readonly NotificationService notificationService;

        public MainWindow() {
            InitializeComponent();

            // Configure DevExpress NotificationService.
            notificationService = new NotificationService() {
                ApplicationId = "DXChatApplication",
                ApplicationName = "DXChatApplication",
                PredefinedNotificationTemplate = NotificationTemplate.LongText
            };

            MyMessageTemplate = message => builder => {
                builder.OpenComponent<Message>(0);
                builder.AddAttribute(1, "message", message);
                builder.AddAttribute(2, "OnButtonClick", EventCallback.Factory.Create<BlazorChatMessage>(this, CustomButtonClick));
                builder.CloseComponent();
            };

            aiChatControl.MessageTemplate = MyMessageTemplate;
        }

        void CustomButtonClick(BlazorChatMessage message) {
            Dispatcher.Invoke(() => {
                try { Clipboard.SetText(message.Content ?? string.Empty); } catch { }
                var notification = notificationService.CreatePredefinedNotification("Message Copied to Clipboard", message.Content, null);
                _ = notification.ShowAsync();
            });
        }
    }
}
The *Message.razor* file:
```
@using Microsoft.AspNetCore.Components.Web
@using DevExpress.AIIntegration.Blazor.Chat
@if (message.Typing)
{
Loading...
}
else
{
@message.Content
📋
}
<dxaichat:AIChatControl x:Name="aiChatControl"
                EmptyStateText="AI Assistant is ready to answer your questions."
                HorizontalAlignment="Stretch"
                VerticalAlignment="Stretch"
                Margin="10">
</dxaichat:AIChatControl>
#### Customize Empty Area Appearance
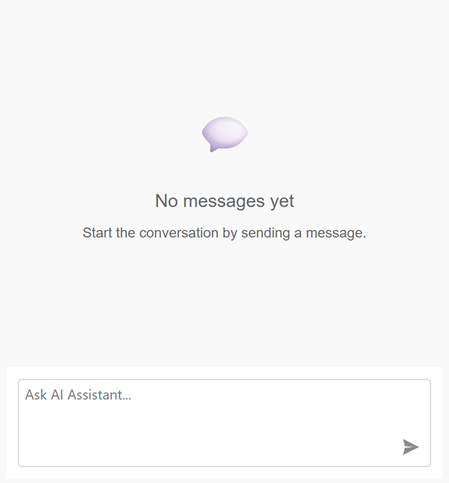
- C#
using Microsoft.AspNetCore.Components;

public MainWindow() {
    InitializeComponent();
    aiChatControl.EmptyStateTemplate = MyEmptyStateTemplate;
}

RenderFragment MyEmptyStateTemplate = builder => {
    builder.OpenComponent<EmptyArea>(0);
    builder.CloseComponent();
};
The *EmptyArea.razor* file:
```
💬
No messages yet
Start the conversation by sending a message.
```
### User and Assistant Message Background
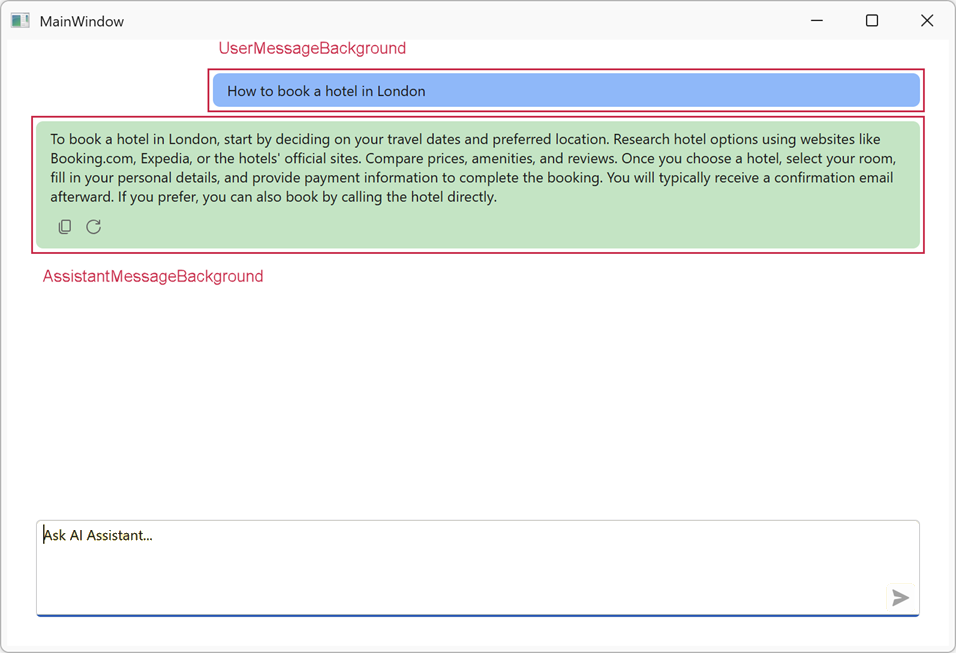
Use the following properties to specify the background color for user and assistant messages:
- [AIChatControl.UserMessageBackground](/WPF/DevExpress.AIIntegration.Wpf.Chat.AIChatControl.UserMessageBackground) – specifies the background color for user messages.
- [AIChatControl.AssistantMessageBackground](/WPF/DevExpress.AIIntegration.Wpf.Chat.AIChatControl.AssistantMessageBackground) – specifies the background color for assistant messages.
- XAML
<dxaichat:AIChatControl x:Name="aiChatControl"
                        UserMessageBackground="#FF7AB8FF"
                        AssistantMessageBackground="#FFB8E6C1">
</dxaichat:AIChatControl>
### Error Message Background
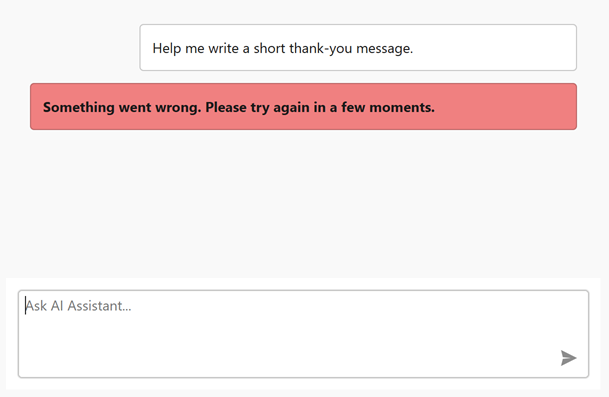
Use the [AIChatControl.ErrorMessageBackground](/WPF/DevExpress.AIIntegration.Wpf.Chat.AIChatControl.ErrorMessageBackground) property to specify the background color of error messages:
- XAML
<dxaichat:AIChatControl x:Name="aiChatControl"
                ErrorMessageBackground="LightCoral"
                Margin="10">
</dxaichat:AIChatControl>
### Title and Clear Chat Button
The `AIChatControl` can display a header. This header contains a customizable chat title and the **Clear Chat** button (that removes all messages from conversation history, except for system messages).
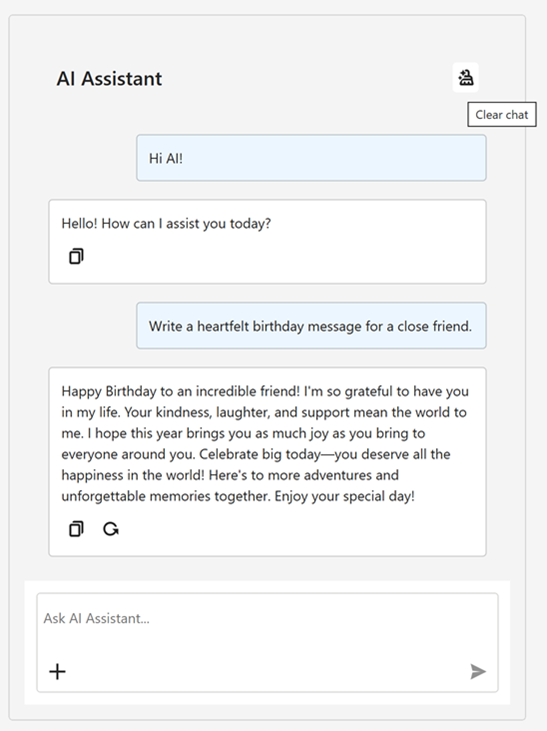
Use the [AIChatControl.ShowHeader](/WPF/DevExpress.AIIntegration.Wpf.Chat.AIChatControl.ShowHeader) option to display the chat header. The [AIChatControl.HeaderText](/WPF/DevExpress.AIIntegration.Wpf.Chat.AIChatControl.HeaderText) property specifies the chat title.
### Input Area Placeholder
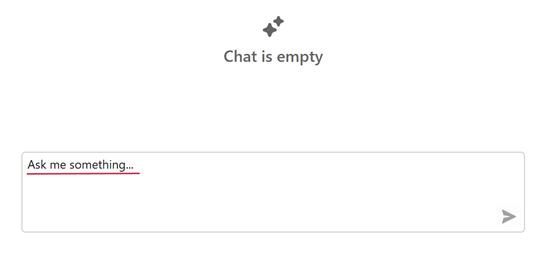
Use the [InputBoxNullText](/WPF/DevExpress.AIIntegration.Wpf.Chat.AIChatControl.InputBoxNullText) property to display the prompt text in the AI Chat input box when it is empty.
If there is no property specified, the component uses the `AIChat_InputPlaceholder` localization string as the prompt text.
- XAML
<dxaichat:AIChatControl x:Name="aiChatControl"
                InputBoxNullText="Ask me something...">
</dxaichat:AIChatControl>
### Input Area Background
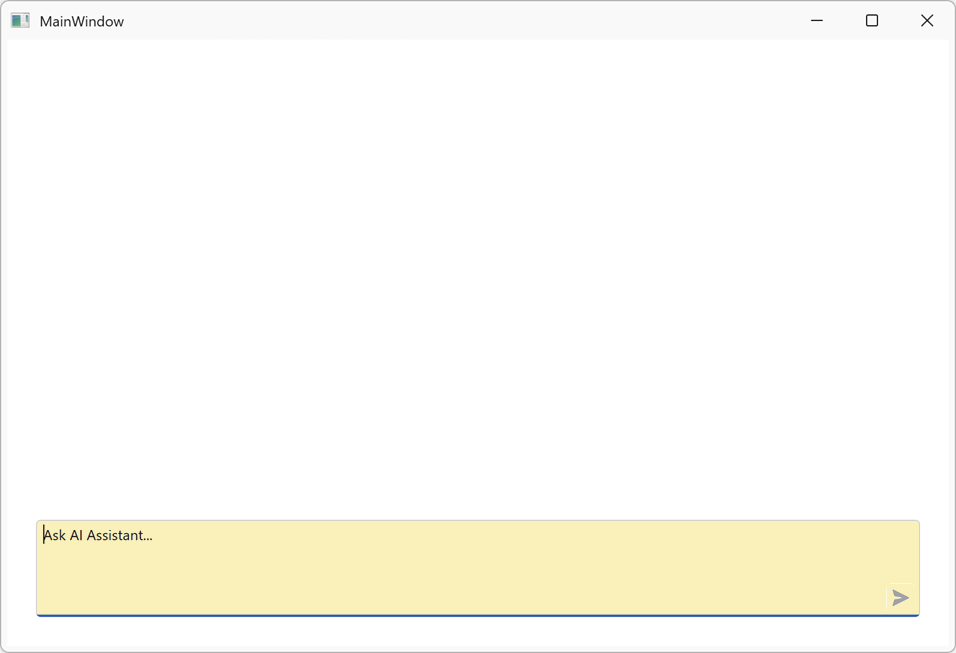
Use the [AIChatControl.InputBackground](/WPF/DevExpress.AIIntegration.Wpf.Chat.AIChatControl.InputBackground) property to specify the background color of the input area (the prompt input box and the surrounding submit area):
- XAML
<dxaichat:AIChatControl x:Name="aiChatControl"
                        InputBackground="#FFFFF0B3">
</dxaichat:AIChatControl>
### Resize Input Area
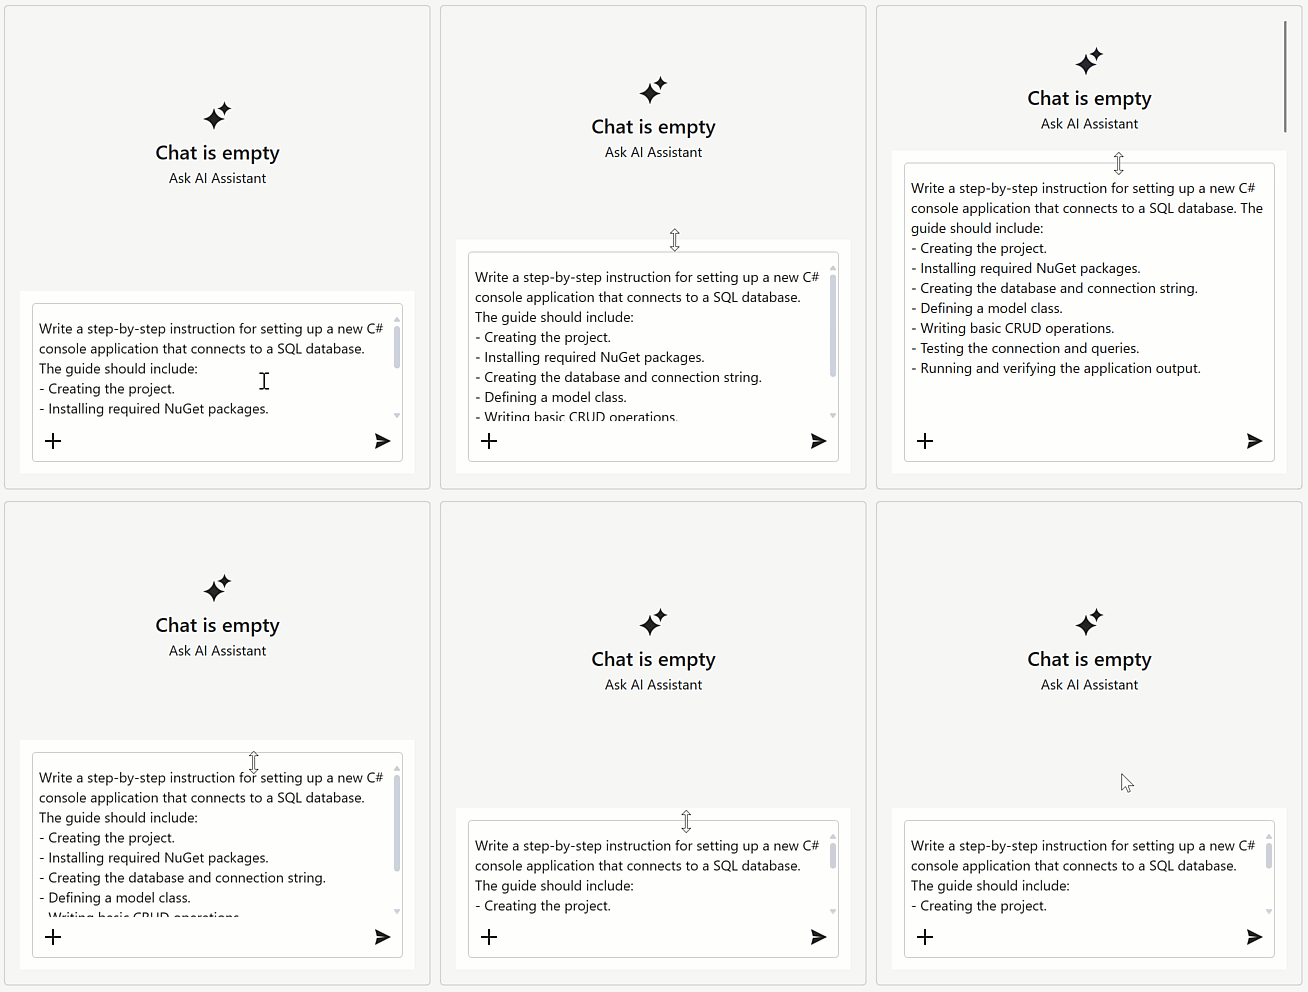
Enable the [AIChatControl.AllowResizeInput](/WPF/DevExpress.AIIntegration.Wpf.Chat.AIChatControl.AllowResizeInput) option to allow users to resize the input area. Users can drag the top edge up to enlarge the input area or down to display a more detailed chat history.
### Change Border Appearance
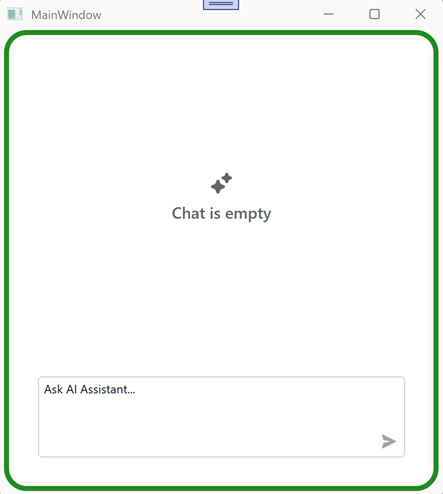
Use `BorderBrush` and `BorderThickness` properties to customize chat control border appearance. To round chat control corners, specify the [CornerRadius](/WPF/DevExpress.AIIntegration.Wpf.Chat.AIChatControl.CornerRadius) property.
- XAML
<dxaichat:AIChatControl x:Name="aiChatControl"
                BorderBrush="ForestGreen"
                BorderThickness="5"
                CornerRadius="20">
</dxaichat:AIChatControl>
## Resources
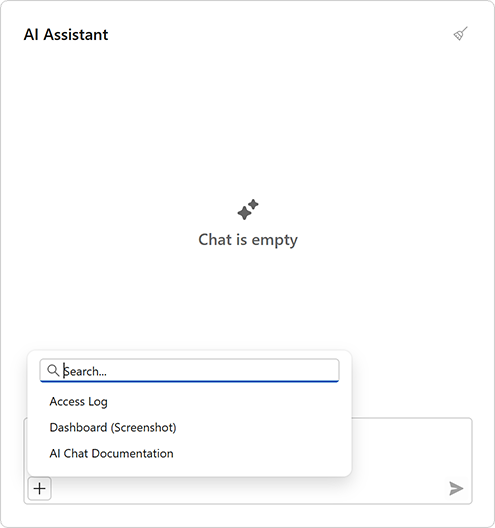
The `AIChatControl` can access external or dynamically generated data through resources. A resource is an instance of the [AIChatResource](/Blazor/DevExpress.AIIntegration.Blazor.Chat.AIChatResource) class that supplies text or binary content to the AI model at request time.
Resources extend chat context with additional input (for example, local documents, logs, or images). The AI model uses this data to generate more accurate and context-aware responses.
After you assign resources, the `AIChatControl` displays the “Attach Context” (+) button. Users can select one or more resources to include in the chat request.
[Run Demo: Resources — AI Chat](dxdemo://Wpf/DXAI/MainDemo/AIChatResourcesModule)
See the following help topic for additional information: [Chat Resources](/WPF/405613/ai-powered-extensions/ai-chat-control/resources).
## Tool Calling
[AI Tool Calling API](/CoreLibraries/405585/ai-integration/ai-tool-calling) integrates application logic with natural language interaction. It allows AI to analyze requests, select appropriate tools, resolve target instances, and invoke application methods at runtime in response to user prompts. Developers expose functionality as AI tools by annotating methods with metadata attributes. Each tool describes its purpose, input parameters, and (optionally) the target object on which it operates.
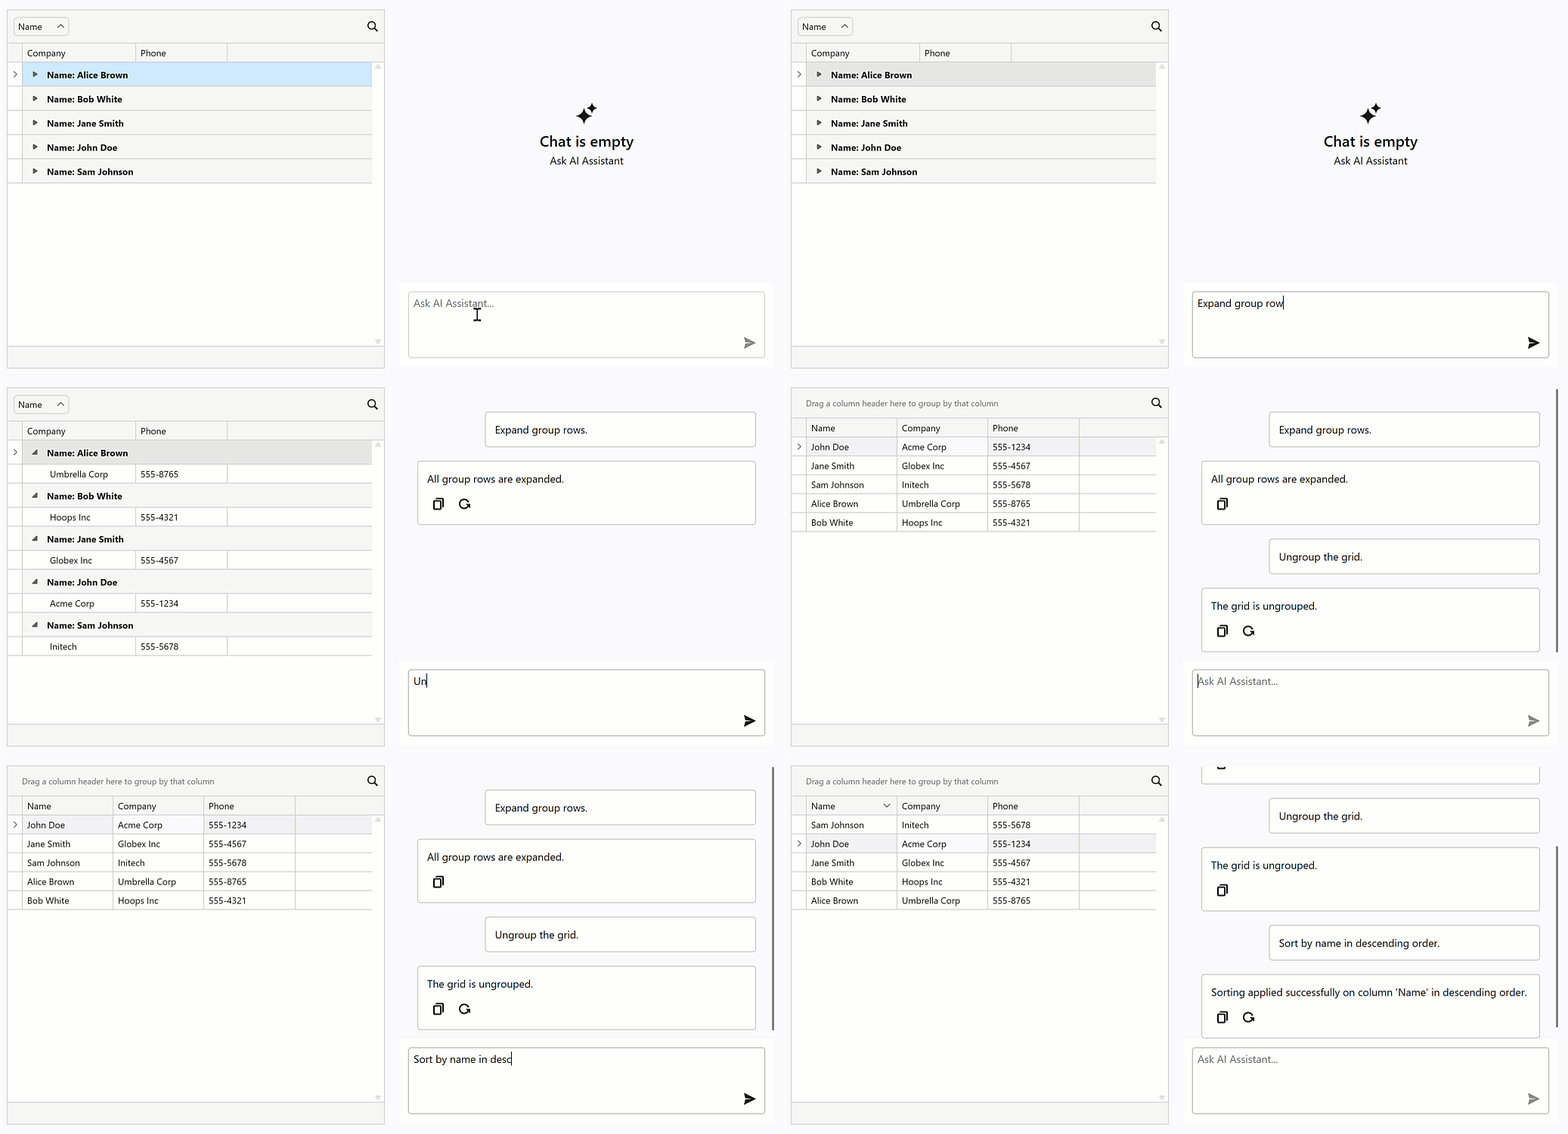
[Run Demo: AI Tool Calling](dxdemo://Wpf/DXAI/MainDemo/AIToolsModule)
See the following help topics for additional information:
- [AI Tool Calling](/CoreLibraries/405585/ai-integration/ai-tool-calling)
- [AIToolsBehavior](/WPF/DevExpress.AIIntegration.Wpf.AIToolsBehavior)
## Create an Assistant That Chats Using Your Own Data
When integrating the AI Chat Control with AI Assistant API (for example, the [OpenAI Responses API](https://openai.com/index/new-tools-for-building-agents/) or [Azure AI Projects](https://learn.microsoft.com/en-us/azure/foundry/quickstarts/get-started-code?tabs=csharp)), you can configure the control to work with external data sources (for example, text files or PDF documents).
Refer to the following help topic for additional information: [Chat with Your Own Data](/WPF/405606/ai-powered-extensions/ai-chat-control/chat-with-your-own-data).
Warning
[OpenAI Assistants API will be deprecated in August 2026](https://learn.microsoft.com/en-us/answers/questions/5571874/openai-assistants-api-will-be-deprecated-in-august).
## Manage Multiple Chat Client Services
The WPF AIChatControl supports multiple AI services in a single application that enable you to:
- Run several independent chat UIs side by side powered by different AI services.
- Use one chat UI and dynamically switch between AI services or AI agents.
See the following help topic for additional information: [Manage Multiple Chat Clients](/WPF/405607/ai-powered-extensions/ai-chat-control/manage-multiple-chat-clients).
## Troubleshooting
### Deploy to Windows Server
When deploying WPF applications with the AI Chat Control to Windows Server or earlier versions of Windows, you may encounter the following error:
Warning
**Microsoft.Web.WebView2.Core.WebView2RuntimeNotFoundException**: “Could not find a compatible WebView2 Runtime installation to host WebViews.”
The WPF AI Chat Control leverages `BlazorWebView` to reuse the DevExpress Blazor `DxAIChat` component. This integration requires the WebView2 runtime to be installed on the target machine.
Windows 11 includes WebView2. Earlier versions of Windows and Windows Server may not have it preinstalled. To ensure compatibility, see [Distribute your app and the WebView2 Runtime](https://learn.microsoft.com/en-us/microsoft-edge/webview2/concepts/distribution?tabs=dotnetcsharp) for information on how to distribute the WebView2 Runtime with your WPF application on operating systems other than Windows 11.
### Airspace Issue in .NET 9 and Earlier: WPF Controls are Overlapped by the AI Chat Control
In .NET 9 and earlier, WPF popups, dialogs, flyouts, tooltips, menus, dock panels, and other overlay UI elements are always invisible when displayed over the AI Chat Control.
This rendering issue occurs because the AI Chat Control hosts the DevExpress Blazor `DxAIChat` component in `BlazorWebView`, which in turn relies on an HWND-hosted `WebView2` control. The resulting native window appears above the WPF visual tree and overlaps any WPF content rendered in the same area.
#### Solution: Upgrade to .NET 10
The *Airspace issue* no longer occurs in .NET 10 because `Microsoft.AspNetCore.Components.WebView.Wpf` uses [WebView2CompositionControl](https://learn.microsoft.com/en-us/dotnet/api/microsoft.web.webview2.wpf.webview2compositioncontrol) instead of the HWND-hosted `WebView2` control. This composition-based control integrates properly with the WPF visual tree and allows overlapping WPF UI elements to be displayed on top of the AI Chat Control.
To avoid the *Airspace issue*:
1. Update the target framework to .NET 10.
2. Update the `Microsoft.AspNetCore.Components.WebView.Wpf` package to `10.0.x` or newer.
- .csproj
<PropertyGroup>
    <TargetFramework>net10.0-windows</TargetFramework>
</PropertyGroup>

<ItemGroup>
    <PackageReference Include="Microsoft.AspNetCore.Components.WebView.Wpf" Version="10.0.*" />
</ItemGroup>
Refer to the following help topics for additional information:
- [WebView2CompositionControl Specification](https://github.com/MicrosoftEdge/WebView2Feedback/blob/main/specs/WPF_WebView2CompositionControl.md)
- [WebView2CompositionControl API Reference](https://learn.microsoft.com/en-us/dotnet/api/microsoft.web.webview2.wpf.webview2compositioncontrol)
- [WPF and HwndHost Descendant Interoperation Limitations](/WPF/7551/controls-and-libraries/layout-management/dock-windows/wpf-and-winforms-interoperation-limitations)