Lesson 1 - Create a Data-Aware Report
- 5 minutes to read
This tutorial will guide you through the process of creating a simple LightSwitch application containing a report using Microsoft® Visual Studio®. You will learn how to add a report to a LightSwitch application, bind it to a data source and show its print preview in a separate screen.
To learn about installation and deployment of XtraReports extensions for LightSwitch, see Assemblies Deployed with LightSwitch Reporting Applications.
To create a data-aware report and show its preview to print and/or export the report in a LightSwitch application, do the following.
- Create a LightSwitch Application with an XtraReports Extension
- Add a Data Source to the Application
- Add a Report to the Application
- Bind the Report to Data and Adjust Its Layout
- Add a Report Preview Screen
- View the Result
Create a LightSwitch Application with an XtraReports Extension
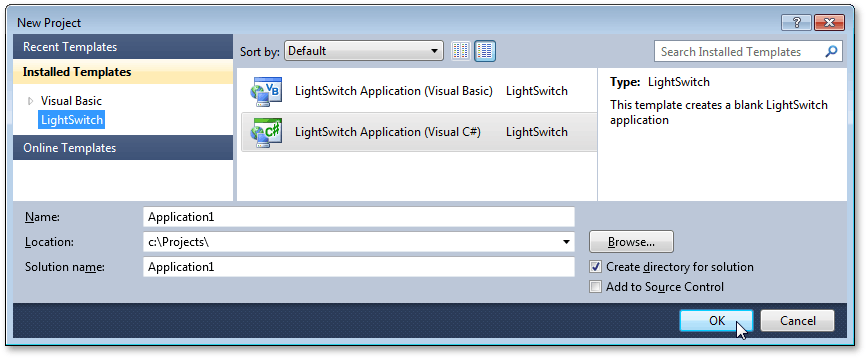
- Run Microsoft® Visual Studio® (2010, 2012, 2013, 2015 or 2017) or Visual Studio® LightSwitch.
Start a new project (CTRL+SHIFT+N) and create a new LightSwitch Application.
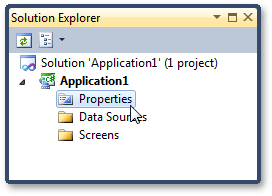
Switch to the Solution Explorer (CTRL+ALT+L), and double-click the application’s Properties.
Then, in the Application Designer, switch to Extensions, and enable the check box near the DevExpress.XtraReports.LightSwitch extensions, to add it to the application.
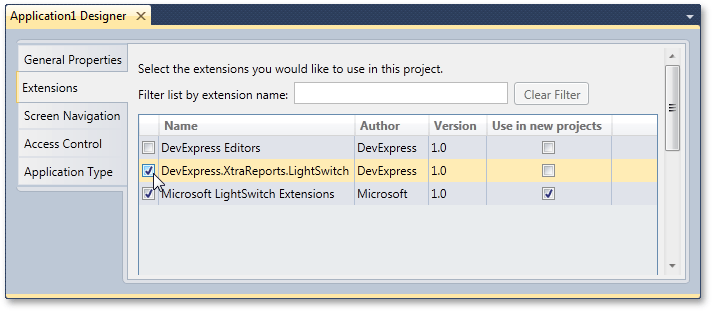
Click Save to apply the changes, and close the Application Designer.
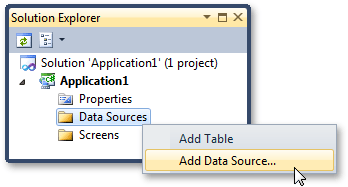
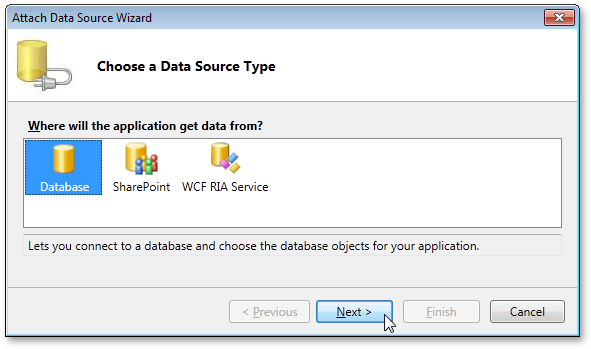
Back in the Solution Explorer, right-click the Data Sources folder and in the invoked menu, click Add Data Source…
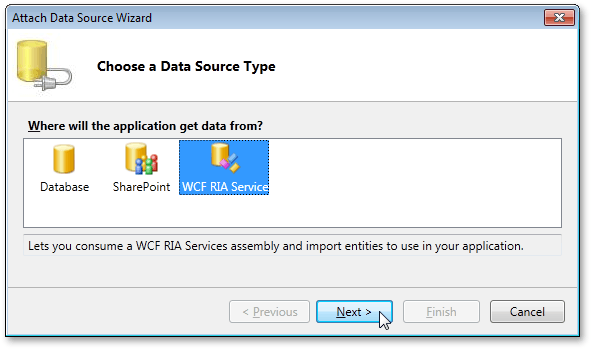
On the first page of the invoked wizard, choose WCF RIA Service and click Next.
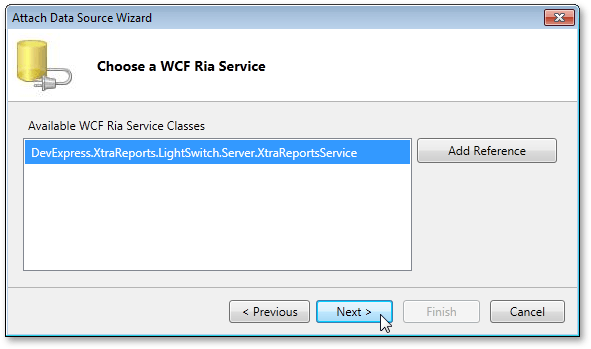
On the next page, the XtraReportsService is selected by default, so click Next.
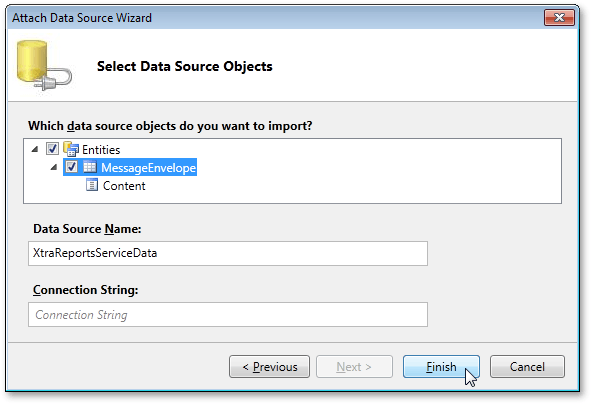
On the last page, choose to include all entities and click Finish.
Note
We do not recommend changing the data source name from its default value (XtraReportsServiceData), nor the names of other auto-generated entities and their attributes, to ensure that your application operates properly.
When using localized Visual Studio LightSwitch versions, ensure that these entities are named properly.
By default, XtraReportsService settings are stored in memory. You can choose to store its settings in an explicit database, which may increase the application’s performance. To use such a database, specify its Connection String on the wizard page above. For details on this, see LightSwitch Reporting Overview.
Add a Data Source to the Application
Although the following steps demonstrate how to use an external data source in your LightSwitch application, XtraReports fully supports working with intrinsic data sources as well.
In the Solution Explorer, right-click the Data Sources folder and in the invoked menu, click Add Data Source…
At this time, choose Database in the wizard, and click Next.
In the invoked Choose Data Source dialog, choose Microsoft SQL Server and click Continue.
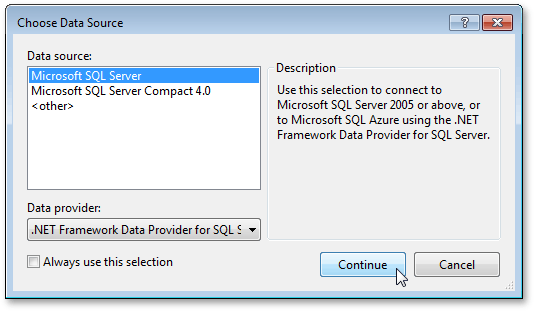
Next, in the Connection Properties dialog, specify the server name, authentication mode and your database name.

Test the connection and click OK to proceed.
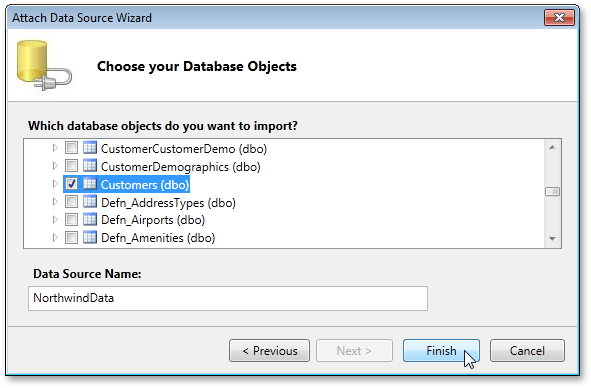
On the last wizard page, select the required table(s), and click Finish.
Add a Report to the Application
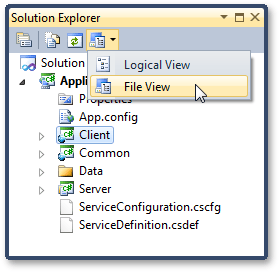
In the Solution Editor, switch to the File View.
Then, right-click Server, and in the invoked menu, choose Add | New Item…
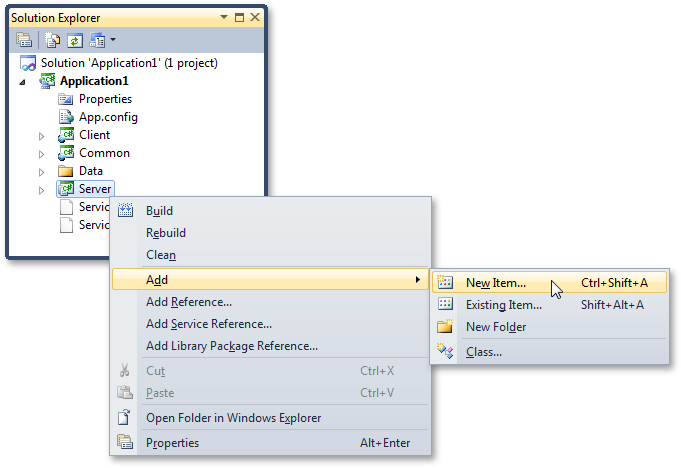
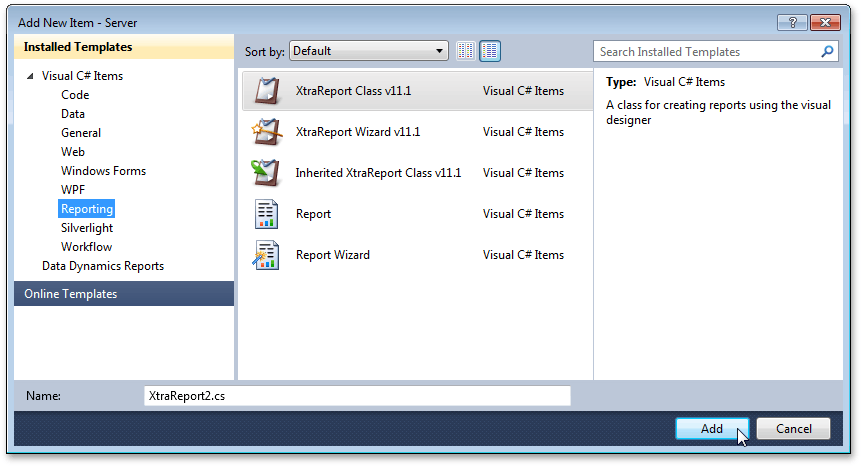
In the Add New Item dialog, select the XtraReport Class v11.1 item, and click Add.
Bind the Report to Data and Adjust Its Layout
After the report is added, rebuild your application.
Then, click the report’s smart tag and in its actions list, invoke the drop-down list for the XtraReportBase.DataSource property and choose the existing data source.
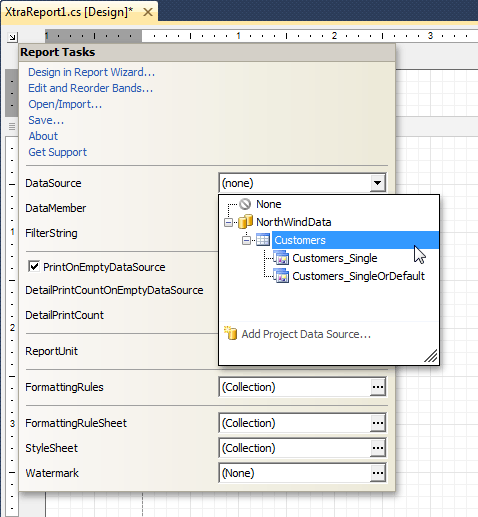
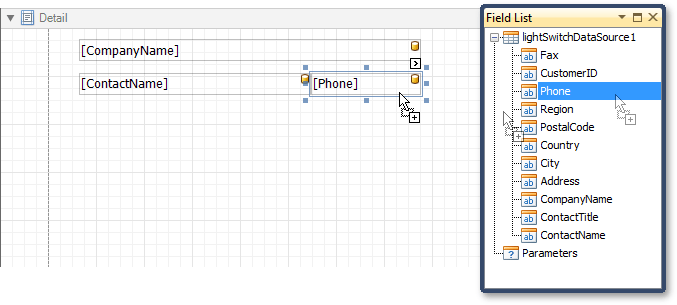
Following this step, the Field List reflects the structure of your report’s data source, and can be used to create data-aware controls.
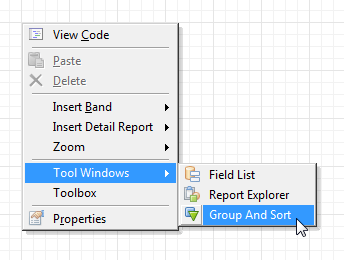
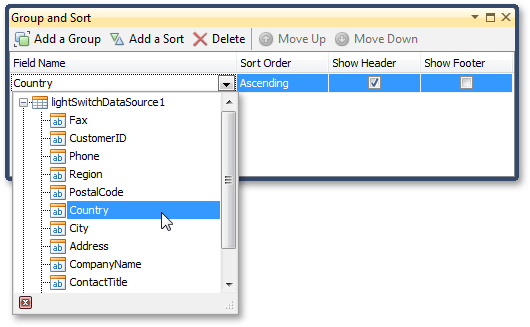
To group a report’s data, use the Group and Sort panel. To show this panel, right-click your report and in the invoked menu, choose Tool Windows and click Group And Sort.
Then, group the report by the Country field…
… and drop the corresponding item from the Field List onto the created Group Header band.
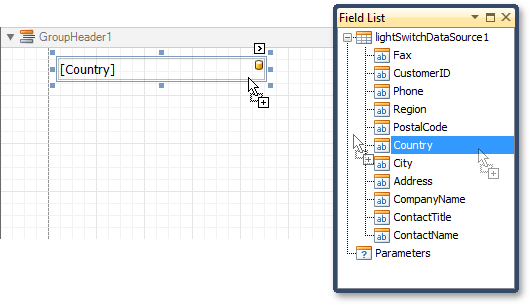
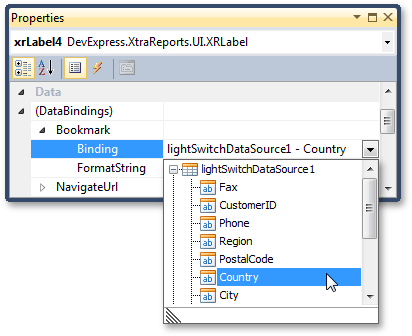
To provide a Document Map to your report, bind the XRControl.Bookmark property of the created XRLabel to the same data field.
Add a Report Preview Screen
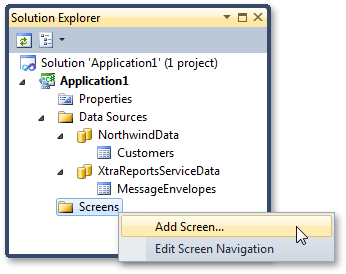
In the Solution Explorer, switch back to the Logical View, select Screens, and in the invoked menu, choose Add Screen…
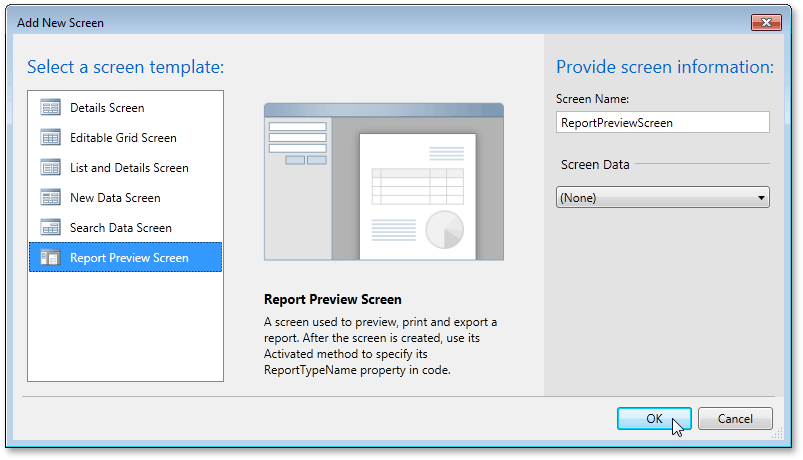
In the Add New Screen dialog, select Report Preview Screen. Leave its Screen Data empty and click OK.
In the application designer, select the created Report Viewer and click the Write Code button. In its drop-down menu, click ReportPreviewScreen_Activated.
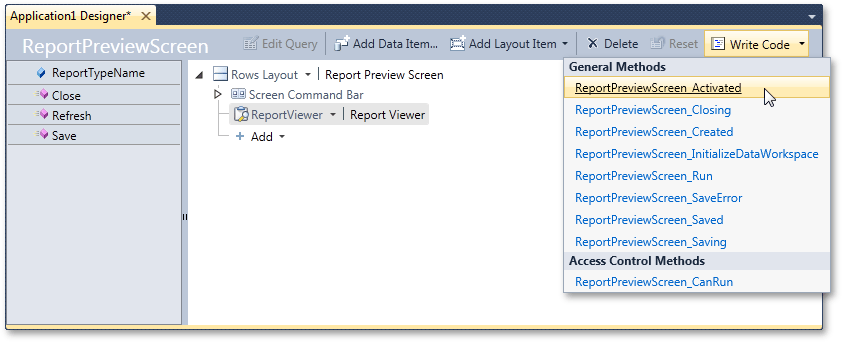
In the body of the Activated() method, specify the type name of your report.
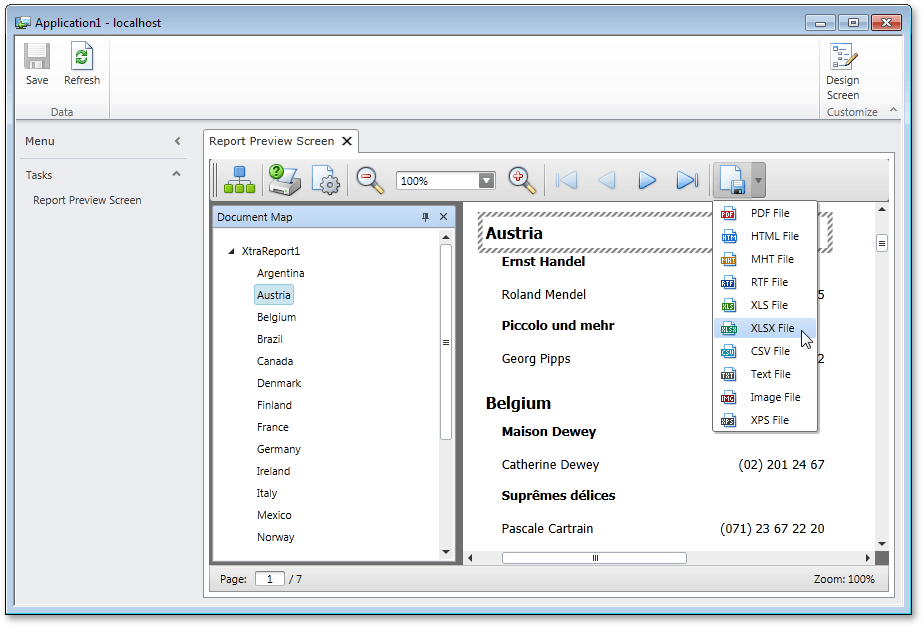
View the Result
Run the application and view the result.