Add an End-User Report Designer to an ASP.NET Core Application
- 6 minutes to read
This tutorial describes how to add the Report Designer control to a web application that uses .NET 5, .NET Core 3.1, or .NET Core 2.1 framework.
Prerequisites
| .Net Core 3.1 | .Net 5 | .Net Core 2.1 |
|---|---|---|
| Visual Studio 2019 v16.4 or later | Visual Studio 2019 v16.6 or later | Visual Studio 2017 v15.3 or later |
Create an ASP.NET Core MVC Web Application
Create a new project in Visual Studio and select ASP.NET Core Web App (Model-View-Controller) on the start page as a project template.
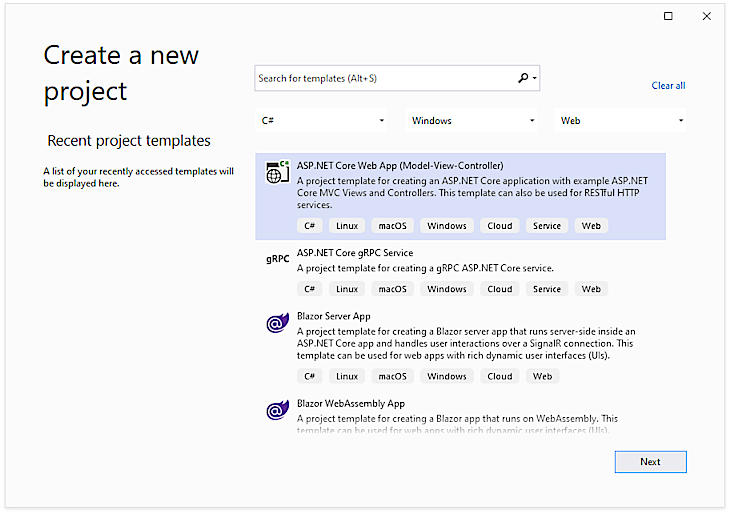
Click Next.
- Specify the application name (WebApplication1), location, target framework and other options, and click Create.
Manage Packages and Libraries
Follow the steps below to install NuGet packages:
Right-click Dependencies in the Solution Explorer and select Manage NuGet Packages from the context menu.
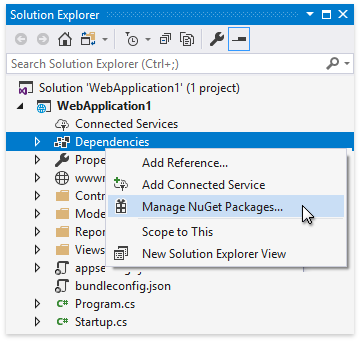
Select All from the Package source drop-down list, switch to the Browse tab, and install the following packages:
- DevExpress.AspNetCore.Reporting
- BuildBundlerMinifier
- Microsoft.Web.LibraryManager.Build
- Microsoft.AspNetCore.Mvc.NewtonsoftJson
Install Node.js (LTS version) from the Node.js website, if you do not have Node.js installed.
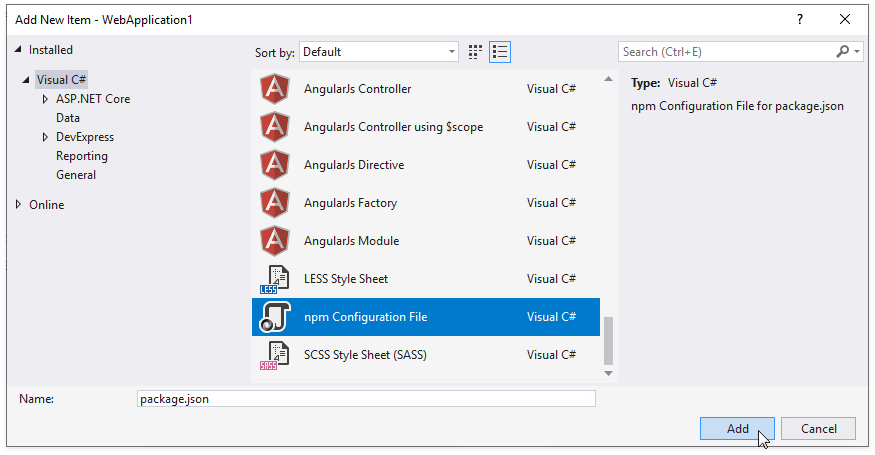
Right-click the project in the Solution Explorer and select Add | New Item from the context menu. Select npm Configuration File in the invoked Add New Item dialog.
Open the newly created
package.jsonfile, replace its content with the following code, and save the file:{ "version": "1.0.0", "name": "asp.net", "private": true, "dependencies": { "bootstrap": "^4.3.1", "cldrjs": "^0.5.0", "devextreme": "20.2.*", "@devexpress/analytics-core": "20.2.*", "devexpress-reporting": "20.2.*", "globalize": "^1.3.0", "jquery-ui-dist": "^1.12.1" } }Add a text file (
bundleconfig.json) to the project. Open the newly created file, paste the following content, and save the file:[ { "outputFileName": "wwwroot/css/thirdparty.bundle.css", "inputFiles": [ "node_modules/jquery-ui-dist/jquery-ui.min.css", "node_modules/bootstrap/dist/css/bootstrap.min.css", "node_modules/devextreme/dist/css/dx.common.css", "node_modules/devextreme/dist/css/dx.light.css" ], "minify": { "enabled": false, "adjustRelativePaths": false } }, { "outputFileName": "wwwroot/css/viewer.part.bundle.css", "inputFiles": [ "node_modules/@devexpress/analytics-core/dist/css/dx-analytics.common.css", "node_modules/@devexpress/analytics-core/dist/css/dx-analytics.light.css", "node_modules/devexpress-reporting/dist/css/dx-webdocumentviewer.css" ], "minify": { "enabled": false, "adjustRelativePaths": false } }, { "outputFileName": "wwwroot/css/designer.part.bundle.css", "inputFiles": [ "node_modules/@devexpress/analytics-core/dist/css/dx-querybuilder.css", "node_modules/devexpress-reporting/dist/css/dx-reportdesigner.css" ], "minify": { "enabled": false, "adjustRelativePaths": false } }, { "outputFileName": "wwwroot/js/thirdparty.bundle.js", "inputFiles": [ "node_modules/jquery/dist/jquery.min.js", "node_modules/jquery-ui-dist/jquery-ui.min.js", "node_modules/knockout/build/output/knockout-latest.js", "node_modules/bootstrap/dist/js/bootstrap.min.js", "node_modules/cldrjs/dist/cldr.js", "node_modules/cldrjs/dist/cldr/event.js", "node_modules/cldrjs/dist/cldr/supplemental.js", "node_modules/cldrjs/dist/cldr/unresolved.js", "node_modules/globalize/dist/globalize.js", "node_modules/globalize/dist/globalize/message.js", "node_modules/globalize/dist/globalize/number.js", "node_modules/globalize/dist/globalize/currency.js", "node_modules/globalize/dist/globalize/date.js", "node_modules/devextreme/dist/js/dx.all.js", "node_modules/ace-builds/src-min-noconflict/ace.js", "node_modules/ace-builds/src-min-noconflict/ext-language_tools.js", "node_modules/ace-builds/src-min-noconflict/theme-dreamweaver.js", "node_modules/ace-builds/src-min-noconflict/theme-ambiance.js", "node_modules/ace-builds/src-min-noconflict/snippets/text.js" ], "minify": { "enabled": false }, "sourceMap": false }, { "outputFileName": "wwwroot/js/viewer.part.bundle.js", "inputFiles": [ "node_modules/@devexpress/analytics-core/dist/js/dx-analytics-core.min.js", "node_modules/devexpress-reporting/dist/js/dx-webdocumentviewer.min.js" ], "minify": { "enabled": false }, "sourceMap": false }, { "outputFileName": "wwwroot/js/designer.part.bundle.js", "inputFiles": [ "node_modules/@devexpress/analytics-core/dist/js/dx-querybuilder.min.js", "node_modules/devexpress-reporting/dist/js/dx-reportdesigner.min.js" ], "minify": { "enabled": false }, "sourceMap": false } ]Note
If your application already uses libraries listed above, remove duplicate library references to ensure they are registered only once.
Right-click package.json in the Solution Explorer and select Restore Packages. Alternatively, you can execute the following comand in the folder that contains the package.json file:
npm installRight-click the project in the Solution Explorer and select Manage Client-Side Libraries to open the
libman.jsonfile.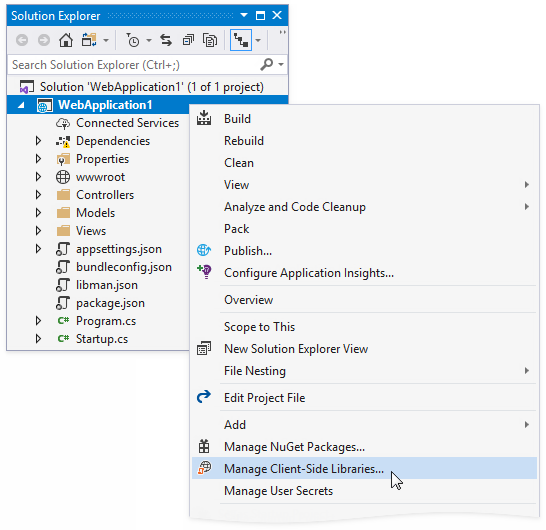
Paste the following content and save the file:
{
  "version": "1.0",
  "defaultProvider": "filesystem",
  "libraries": [
    {
      "library": "node_modules/devextreme/dist/css/icons/",
      "destination": "wwwroot/css/icons",
      "files": [
        "dxicons.ttf",
        "dxicons.woff2",
        "dxicons.woff"
      ]
    }
  ]
}
For more information on LibMan, review the following article: Use LibMan with ASP.NET Core in Visual Studio.
Configure Application and Services
Add the following code at application startup to register the MVC middleware and ASP.NET Core MVC reporting controllers in your application:
using DevExpress.AspNetCore;
using DevExpress.AspNetCore.Reporting;
//...

public class Startup {
//...
    public void ConfigureServices(IServiceCollection services) {
        // Register reporting services in the application's dependency injection container.
        services.AddDevExpressControls();
        // Use the AddMvc (or AddMvcCore) method to add MVC services.
        services.AddMvc();
    }

    public void Configure(IApplicationBuilder app, IHostingEnvironment env) {
        // ...
        // Initialize reporting services.
        app.UseDevExpressControls();
        // ...
        app.UseStaticFiles();
    }
}
The code above registers all necessary ASP.NET MVC Core controllers with predefined routes.
Note
If you use the ASP.NET Web App template to create an application with ASP.NET Razor Pages content, add the endpoints.MapDefaultControllerRoute() line to the app.UseEndpoints() method in the application’s Startup.cs file.
You can customize controllers and change routes, but it is not necessary in most situations. The following table lists controllers that process requests from reporting components, and their default routes:
| Component | Controller | Predefined Route |
|---|---|---|
| Report Designer | ReportDesignerController | DXXRD |
| Document Viewer | WebDocumentViewerController | DXXRDV |
| Query Builder | QueryBuilderController | DXXQB |
An application with End-User Report Designer requires all three controllers for proper operation.
To implement a custom controller, create a descendant of the class listed above and use the HandlerUri property to specify the route:
| Component | Handler Uri |
|---|---|
| Report Designer | ReportDesignerHandlerUri, ReportPreviewHandlerUri, QueryBuilderHandlerUri |
| Document Viewer | HandlerUri |
For more code samples with custom controllers, review the following example:
Add a Sample Report
Right-click the project in the Solution Explorer and select Add | New Folder from the context menu. Rename the newly created folder to Data.
Right-click the project in the Solution Explorer and select Add | Existing Item from the context menu. Open the following path and copy the nwind.xml file to the project’s Data folder:
C:\Users\Public\Documents\DevExpress Demos 20.2\Components\Data\nwind.xmlRight-click the project in the Solution Explorer and select Add | New Folder from the context menu. Rename the newly created folder to Reports.
Right-click the Reports folder and select Add | New Item from the context menu. In the invoked Add New Item dialog, click the Reporting section in the tree on the left and select the DevExpress v20.2 Report item.
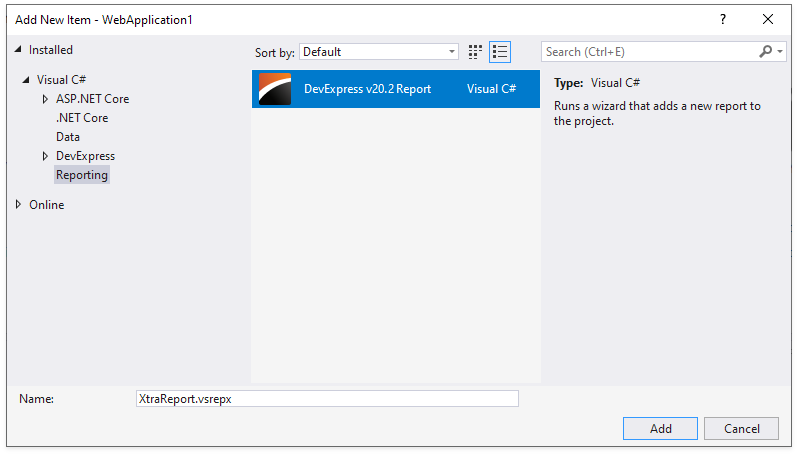
Change the file name to TestReport.vsrepx and click Add.
In the invoked Report Wizard, select the Table report type:
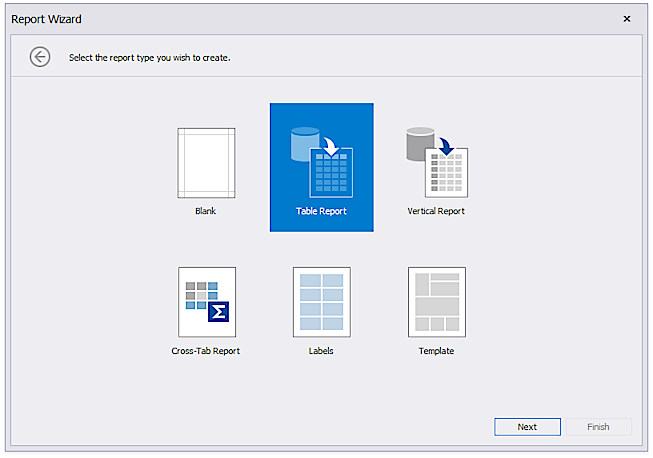
Click Next.
Select the Database data source type:
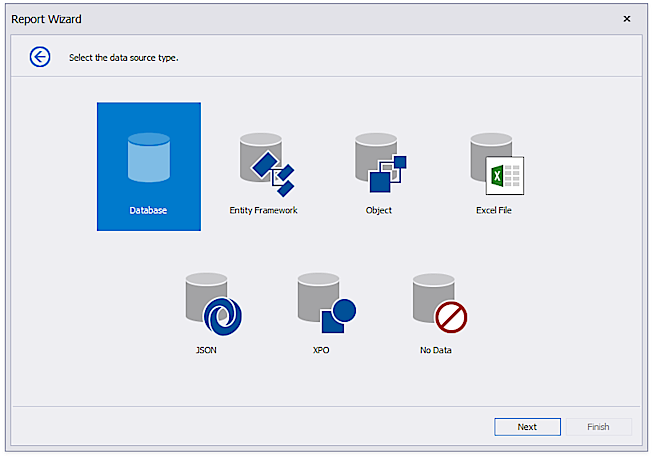
Click Next.
Select the XML file as the data provider:
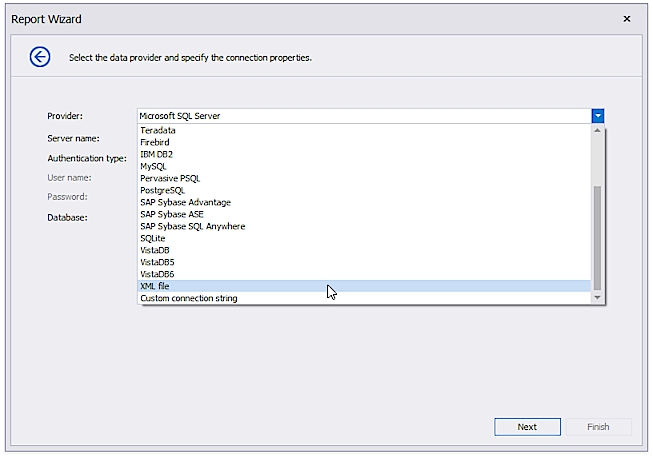
Specify the nwind.xml file in the Data folder. Click Next.
Save the connection string:

Click Next.
Select the Categories table:
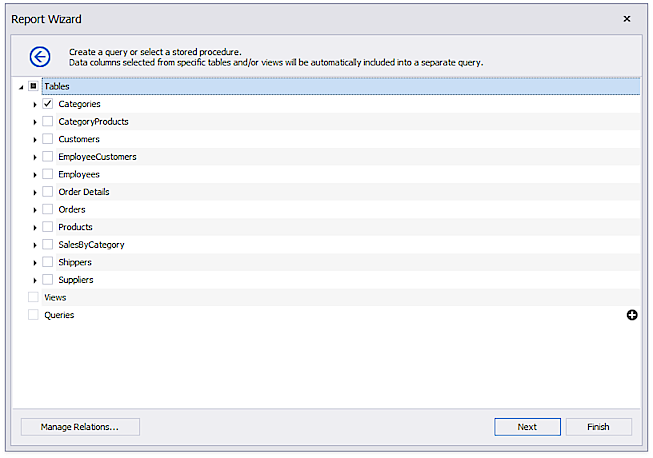
Click Next.
Select data fields:
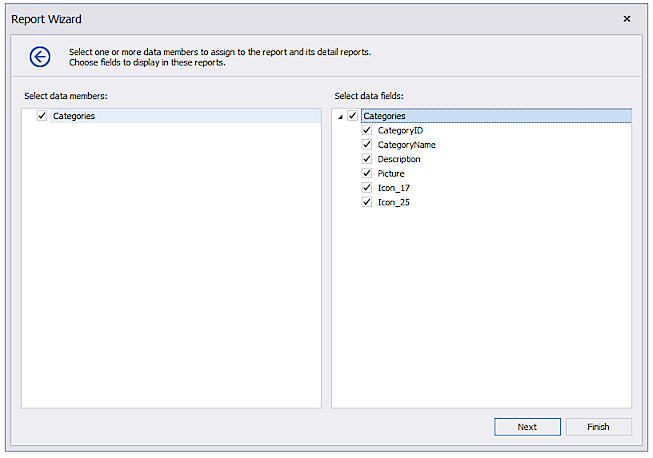
Click Finish.
Add the End-User Report Designer Component
Add the DevExpress.AspNetCore namespace directive to the _ViewImports.cshtml file. As an alternative, you can add this namespace to the view that contains the Report Designer control.
@using DevExpress.AspNetCoreOpen the Layout.cshtml file (Views|Shared folder) and replace its content with the following code:
<!DOCTYPE html>
<html>
<head>
    <meta charset="utf-8" />
    <meta name="viewport" content="width=device-width, initial-scale=1.0" />
    <title>SimpleAspNetCoreReportingDesigner</title>
    <link rel="stylesheet" href="~/css/thirdparty.bundle.css" />
    <link rel="stylesheet" href="~/css/site.css" />
    <script src="~/js/thirdparty.bundle.js"></script>
    <script src="~/js/site.js" asp-append-version="true"></script>
</head>
<body>
    <div class="container body-content">
        @RenderBody()
    </div>
</body>
</html>
Replace the contents of the Index.cshtml file with the following code, which displays the Report Designer and loads the TestReport (the using directive is correct if the application name is WebApplication1 and the TestReport is created in the Reports folder):
Note
If you implement a custom report that inherits from XtraReport and want to open it in the End-User Report Designer, add a constructor without parameters to this report.
@using WebApplication1.Reports

<link rel="stylesheet" href="~/css/viewer.part.bundle.css" />
<link rel="stylesheet" href="~/css/designer.part.bundle.css" />

<script src="~/js/viewer.part.bundle.js"></script>
<script src="~/js/designer.part.bundle.js"></script>

@(Html.DevExpress().ReportDesigner("reportDesigner")
    .Height("1000px")
        .Bind(new TestReport()))
Run the Application
When you run the application, the page contains the End-User Report Designer with the TestReport. You can design a report, preview it, print and export, but you cannot save it or load another report.
To enable users to save and load reports, create and register a report storage and use related features. See the following topic for instructions: Add Report Storage to ASP.NET Core Application.