Document Viewer Integration (npm or Yarn Package Managers)
- 3 minutes to read
Note
The complete sample project How to Perform the JavaScript Document Viewer (Reporting) Integration (with npm or Yarn package managers) is available in the DevExpress Examples repository.
You can use the HTML5 Document Viewer in JavaScript based on the server-side model. You should create two projects:
- server (backend) project that enables Cross-Origin Resource Sharing and retrieves a report from the storage
- client (frontend) part that includes all the necessary styles, scripts, and HTML-templates.
Server (Backend) Part
Perform the steps from one of the following topics to prepare a backend application:
- Document Viewer Server-Side Application (ASP.NET MVC)
- Document Viewer Server-Side Application (ASP.NET Core)
Client (Frontend) Part
The following steps describe how to configure and host the client part:
Create a new folder to store the client-side files (ClientSide in this example).
Create the text file package.json in the ClientSide folder with the following content:
{
    "name": "web-document-viewer",
    "dependencies": {
        "devextreme": "20.2.*",
        "@devexpress/analytics-core": "20.2.*",
        "devexpress-reporting": "20.2.*",
        "jquery-ui-dist": "^1.12.1"
    }
}
Note
Frontend and backend applications should use the same version of DevExpress controls.
Ensure that you have npm or Yarn package managers installed. Package manager are required to download all the necessary client resources to the node_modules folder.
Open the command prompt, navigate to the client application root folder (ClientSide) and run the command:
- if you have npm:
npm install if you have yarn:
yarn install
- if you have npm:
Create the index.html file in the root folder. It is the View file in our model. Copy the following HTML code and insert it in this file:
<!DOCTYPE html>
<html xmlns="https://www.w3.org/1999/xhtml/">
<head>
    <title></title>

    <link href="node_modules/jquery-ui-dist/jquery-ui.min.css" rel="stylesheet" />
    <script src="node_modules/jquery/dist/jquery.min.js"></script>
    <script src="node_modules/jquery-ui-dist/jquery-ui.min.js"></script>

    <script src="node_modules/knockout/build/output/knockout-latest.js"></script>

    <!--Link DevExtreme resources-->
    <script src="node_modules/devextreme/dist/js/dx.all.js"></script>
    <link href="node_modules/devextreme/dist/css/dx.common.css" rel="stylesheet" />
    <link href="node_modules/devextreme/dist/css/dx.light.css" rel="stylesheet" />


    <!-- Link the Reporting resources -->
    <script src="node_modules/@devexpress/analytics-core/dist/js/dx-analytics-core.js"></script>
    <script src="node_modules/devexpress-reporting/dist/js/dx-webdocumentviewer.js"></script>
    <link href="node_modules/@devexpress/analytics-core/dist/css/dx-analytics.common.css" rel="stylesheet" />
    <link href="node_modules/@devexpress/analytics-core/dist/css/dx-analytics.light.css" rel="stylesheet" />
    <link href="node_modules/devexpress-reporting/dist/css/dx-webdocumentviewer.css" rel="stylesheet" />
</head>
<!-- ... -->
</html>
Note
The requirements and resources to deploy the control on the client are described in the Report Designer Requirements and Limitations document.
Create the example.js file in the root folder to provide data to the View. The JavaScript code in this file creates the designerOptions variable and activates the Knockout bindings. Copy the following code and insert it in the example.js file:
const host = 'https://localhost:54114/',
    reportUrl = "Products",
    viewerOptions = {
        reportUrl: reportUrl, // The URL of a report that the Document Viewer loads when the application starts.
        requestOptions: { // Options for processing requests from the Document Viewer.
            host: host, // URI of your backend project.
            invokeAction: "/WebDocumentViewer/Invoke", // Action to enable CORS.
        }
    }

ko.applyBindings({ viewerOptions });
Modify the index.html file to specify the HTML template that uses the Document Viewer’s binding with the viewerOptions parameter. Add the following code to the body section:
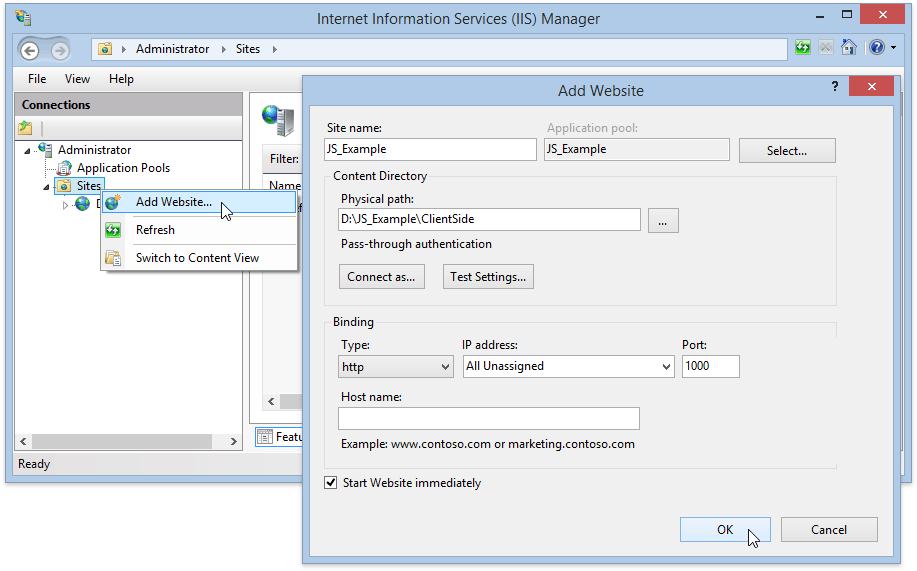
...
<body>
    <div style="width:100%; height: 1000px" data-bind="dxReportViewer: viewerOptions"></div>
    <script type="text/javascript" src="example.js"></script>
</body>
Host the client-side part on the web server. Start the Internet Information Services (IIS) Manager, right-click the Sites item in the Connections section, and select Add Website. In the invoked dialog, specify the site name, path to the client-side application root folder, and the website’s IP address and port.
Run the backend project in Visual Studio.
- Open the website, created in the step 8, in the browser. In this example the address is http://localhost:1000 .