Use Visual Studio Templates to Create an ASP.NET Core Application with a Report Designer
- 4 minutes to read
This tutorial describes how to use the DevExpress Template Gallery to generate a basic ASP.NET Core application that contains the End-User Report Designer control.
Tip
See the following topic for information about DevExpress Reporting in ASP.NET Core applications: Reporting for ASP.NET Core.
The following tutorial explains how to add a report to an ASP.NET Core application: Create a Report in Visual Studio.
Use the DevExpress Template Gallery
The DevExpress Template Gallery implements a step-by-step process that allows you to create an ASP.NET Core application with a Report Designer.
The created application implements the CustomReportStorageWebExtension class that saves the reports you change in the Report Designer to a SQLite database (reportsData.db) in the Data folder. This sample storage is intended for demonstration purposes only. Do not use it in production. Create a ReportStorageWebExtension class descendant instead and implement logic to save reports.
Follow the steps below to create an ASP.NET Core application in Visual Studio:
Ensure that Node.js 10.0 or later with the npm package manager is installed on your computer. Use the node -v and npm -v console commands on 64-bit Windows systems to check package versions. Check the PATH environment variable’s value if a package’s version does not match the version you installed, as there may be a conflict between an x86 and x64 package.
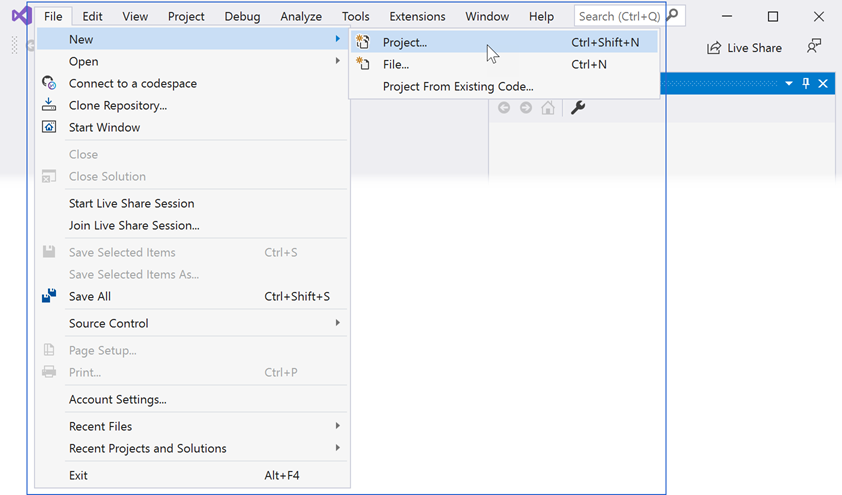
Select FILE | New | Project in the main menu or press CTRL+SHIFT+N to create a new project.
Select the DevExpress v23.2 Web App Template Gallery, and click Next:
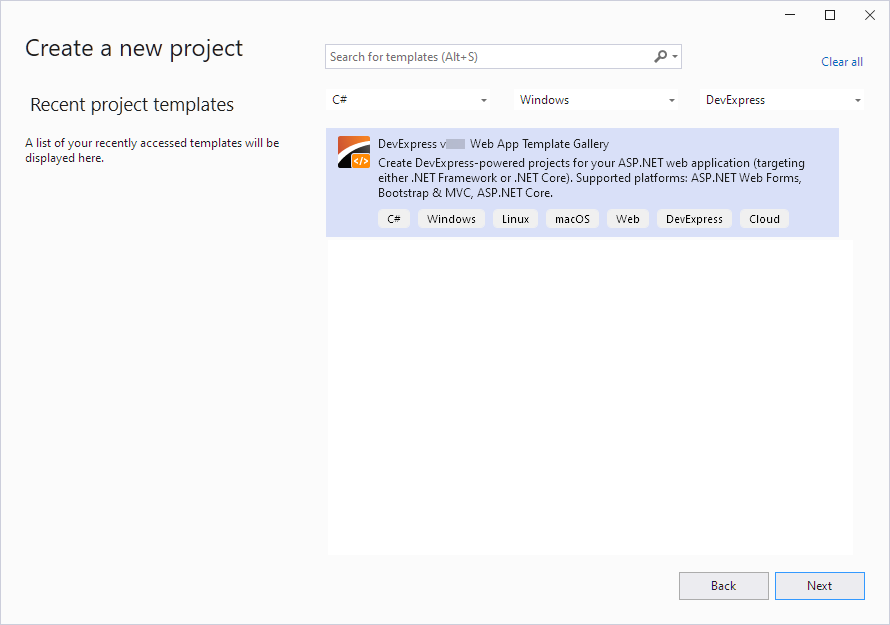
Specify a project name and location, and click Create:

Select Reporting Application from the .NET category in the invoked DevExpress Template Gallery.

Select the framework version and click Create Project.
Set Add Designer Page to true to add the Report Designer (the
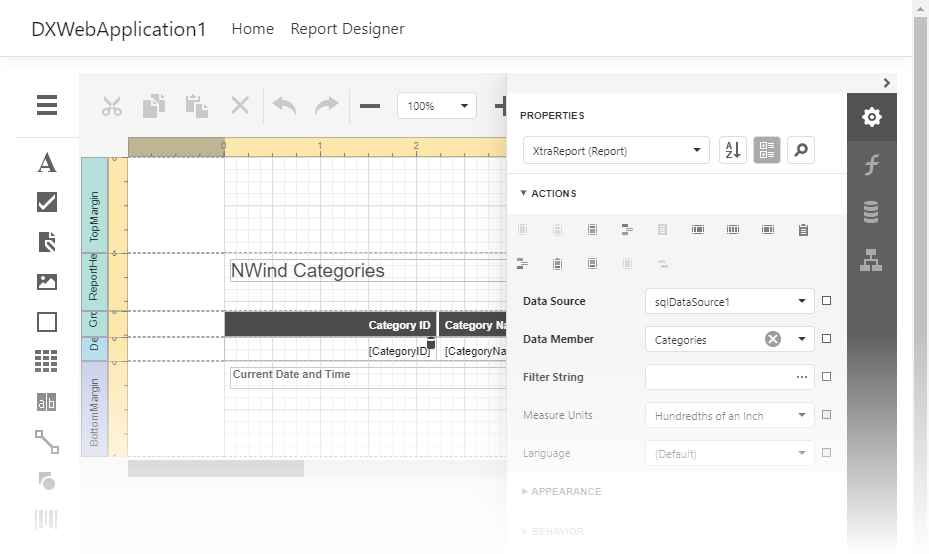
Designer.cshtmlview) to the web application. You can add a Web Document Viewer and a Report Designer to the application.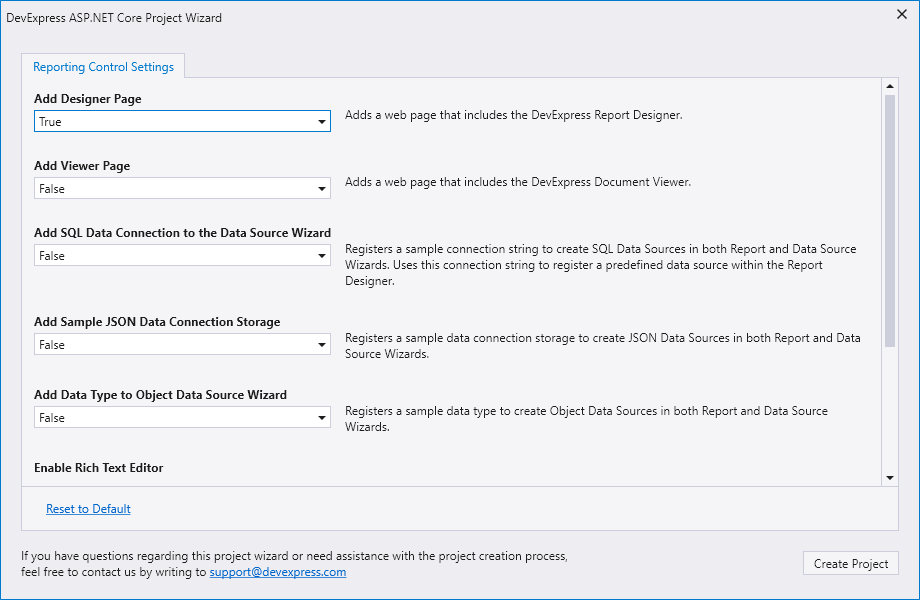
Use the following Report Designer settings:
- Add SQL Data Connection to the Data Source Wizard (applies to Report Designer)
- Specifies whether to create a sample connection string and register it in the Report Designer to create SQL Data Sources in the Report Wizard and Data Source Wizard. The connection string is also used to register a predefined data source.
- Add Sample JSON Data Connection Storage (applies to Report Designer)
- Specifies whether to create a storage and register it to create JSON Data Sources in the Report Wizard and Data Source Wizard.
- Add Data Type to Object Data Source Wizard (applies to Report Designer)
- Specifies whether to add a sample data object to an application and register this data object to create Object Data Sources in the Report Wizard and Data Source Wizard.
- Enable Rich Text Editor (applies to Report Designer)
- Specifies whether to add an in-line Rich Text Editor for the RichText control.
- Enable Docker Support Based on Selected OS
Creates a Dockerfile based on the selected OS. Review the following online example for more information: How to Use the DevExpress CrossPlatform Drawing Engine in an ASP.NET Core Application. Select
Noneto not enable Docker support.- None (defaut)
- Skip docker support.
- Debian
- Debian-based Dockerfile.
- Alpine
- Alpine-based Dockerfile.
- Ubuntu
- Ubuntu-based Dockerfile.
- openSUSE
- openSUSE-based Dockerfile.
- Amazon Linux
- Amazon Linux based Dockerfile.
- Specify Document Cache Storage Type
- Specifies the storage type to cache documents that the report creates. For more information, review the following help topic: Web Document Viewer Cache Management.
- InMemory (default)
- Default cache that stores objects directly in memory without serialization, optimized for frequent operations.
- XPO
- Implements database cache based on the XPO library, designed for multi-instance applications to prevent cache data loss.
- File
- Configures the reporting engine to store documents generated by reports on disk instead of in memory.
- DistributedCache
- Enables cache as external service that uses ASP.NET Core distributed caching mechanism and can be shared by multiple application servers.
- Azure
- Configures the application to use Azure caching services.
Click Create Project to apply these settings to the project.
After Visual Studio has created the application, right-click the package.json file in Solution Explorer and choose Restore Packages.

Optional. You can configure the Report Designer to load a report when the application starts. Navigate to the Views | Home | Designer.cshtml file and replace the built-in unique report name with your report’s name:
Note
If you implement a custom report that inherits from XtraReport and want to open it in the End-User Report Designer, add a constructor without parameters to this report.
@{
    var designerRender = Html.DevExpress().ReportDesigner("reportDesigner")
        .Height("1000px")
        .Bind("TestReport");
    @designerRender.RenderHtml()
}
Run the project to see the result: