Add an End-User Report Designer to an ASP.NET Core Application
- 6 minutes to read
This tutorial describes how to add the Report Designer control to an ASP.NET Core application.
Tip
See an overview on using DevExpress Reporting in ASP.NET Core applications.
Learn how to add a report to an ASP.NET Core application using the Add a New Report to an ASP.NET Core Application tutorial.
Install Packages
Perform the following steps to install the NuGet packages required for the Report Designer control:
Note
If you prefer using Bower packages, install the xtrareportsjs bower package instead.
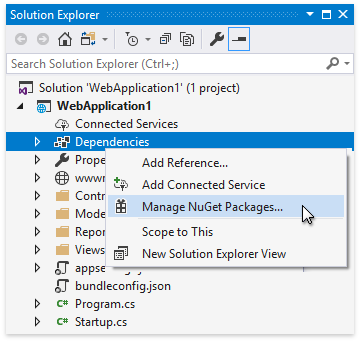
Right-click the Dependencies node in the Solution Explorer and select Manage NuGet Packages in the invoked context menu.
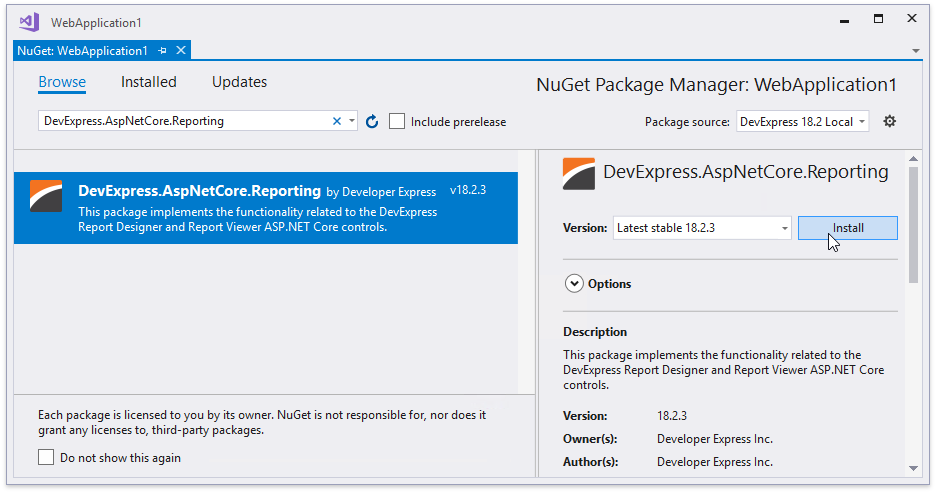
Select DevExpress 18.2 Local in the Package source drop-down list and go to the Browse page. Find the DevExpress.AspNetCore.Reporting package and install it.
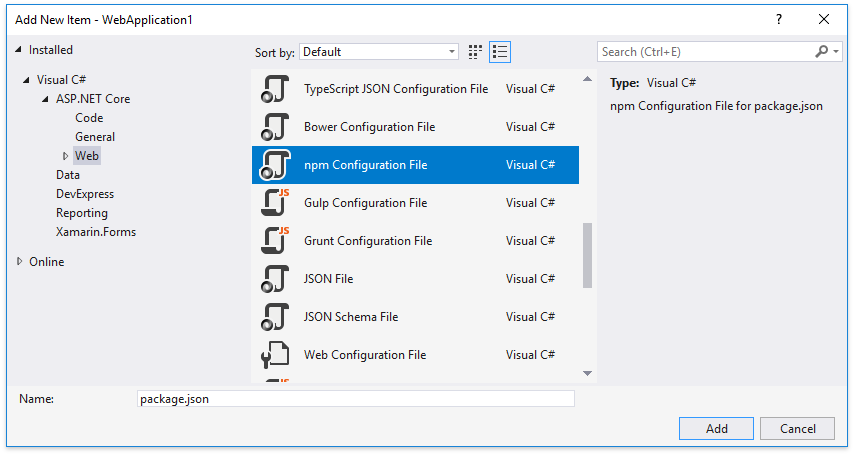
Right-click the application name in the Solution Explorer and select Add | Add New Item. In the invoked Add New Item dialog, select the Installed | Visual C# | ASP.NET Core | Web category and the npm Configuration File item template. Click Add.
This adds the package.json file to the project. Open this file and add the following dependencies:
{
    "version": "1.0.0",
    "name": "asp.net",
    "private": true,
    "dependencies": {
        "devexpress-reporting": "~18.2.3",
        "globalize": "^1.3.0",
        "cldrjs": "^0.5.0",
        "jquery-ui-dist": "^1.12.1",
        "ace-builds": "^1.3.3"
    }
}
The ace-builds package is required if you want to enable intelligent code completion and error validation in the Expression Editor and Filter Editor.
Right-click the package.json file and select Restore Packages. This adds the node_modules folder to the application project. Configure the application so that it can serve this folder’s files.
using DevExpress.AspNetCore;
using DevExpress.AspNetCore.Reporting;
using Microsoft.Extensions.FileProviders;
using System.IO;
//...

public class Startup {
//...
    public void Configure(IApplicationBuilder app, IHostingEnvironment env) {
        // ...
        app.UseStaticFiles();
        // ...
        app.UseStaticFiles(new StaticFileOptions {
            FileProvider = new PhysicalFileProvider(Path.Combine(env.ContentRootPath, "node_modules")),
            RequestPath = "/node_modules"
        });
    }
}
Note
All the files in the node_modules folder are now accessible from the client. To make only required client resources accessible, use bundling and minification by the means of Gulp, as an example.
Provide Report Storage
Do the following to provide server-side report storage to the Report Designer:
Create a new folder under the Services name to store all custom services by right-clicking the application name in the Solution Explorer and selecting Add | New Folder.
Add a new class, inherit it from the abstract ReportStorageWebExtension class and implement the following methods:
ReportStorageWebExtension.IsValidUrl - Determines whether the URL passed to the current report storage is valid. For instance, implement your own logic to prohibit URLs that contain spaces or other specific characters. This method is called before the CanSetData and GetData methods.
ReportStorageWebExtension.CanSetData - Determines whether a report with the specified URL can be saved. For instance, make the CanSetData method return false for reports that should be read-only in your storage. This method is called only for valid URLs (if the IsValidUrl method returns true) before the SetData method is called.
ReportStorageWebExtension.SetData - Saves the specified report to the report storage with the specified URL (that is, saves existing reports only). This method is called only after the IsValidUrl and CanSetData methods are called.
ReportStorageWebExtension.SetNewData - Saves the specified report with a new URL (that is, saves new reports only). The IsValidUrl and CanSetData methods are never called before this method. You can validate and correct the specified URL directly in the SetNewData method implementation and return the resulting URL to save the report.
ReportStorageWebExtension.GetData - Returns a report layout with the specified URL from the report storage. This method is called only for valid URLs after the IsValidUrl method is called.
ReportStorageWebExtension.GetUrls - Returns a dictionary of existing report URLs and display names. This method is called when the Report Designer runs, before the Open Report and Save Report dialogs are shown, and after a new report is saved to the storage.
Use the static ReportStorageWebExtension.RegisterExtensionGlobal method at the application’s startup to register the implemented report storage.
using DevExpress.AspNetCore;
using DevExpress.AspNetCore.Reporting;
//...

public class Startup {
//...
    public void Configure(IApplicationBuilder app, IHostingEnvironment env) {
        // ...
        DevExpress.XtraReports.Web.Extensions.ReportStorageWebExtension.RegisterExtensionGlobal(new MyReportStorageWebExtension());
    }
//...
}
Refer to Implement a Report Storage for more information and a report storage example.
Add the Report Designer Control
Do the following to integrate the Report Designer into the ASP.NET Core project:
Open the Startup file and modify it to configure services as demonstrated below.
using DevExpress.AspNetCore;
using DevExpress.AspNetCore.Reporting;
//...

public class Startup {
//...
    public void ConfigureServices(IServiceCollection services) {
        // Register reporting services in an application's dependency injection container.
        services.AddDevExpressControls();
        // Add MVC services.
        services.AddMvc();
    }

    public void Configure(IApplicationBuilder app, IHostingEnvironment env) {
        // ...
        app.UseStaticFiles();
        // Initialize reporting services.
        app.UseDevExpressControls();
        // ...
    }
}
In the _ViewImports.cshtml file, import the DevExpress.AspNetCore namespace to be used by all other Views. Alternatively, you can add this namespace to the Views with reporting controls.
@using DevExpress.AspNetCoreCreate a new View file or open an existing one (for example, the Index.cshtml file), and link all the required resources as shown below.
<link href="~/node_modules/jquery-ui-dist/jquery-ui.min.css" rel="stylesheet" />

<script src="~/node_modules/jquery/dist/jquery.min.js"></script>
<script src="~/node_modules/jquery-ui-dist/jquery-ui.min.js"></script>

<script src="~/node_modules/knockout/build/output/knockout-latest.js"></script>

<script src="~/node_modules/cldrjs/dist/cldr.js"></script>
<script src="~/node_modules/cldrjs/dist/cldr/event.js"></script>
<script src="~/node_modules/cldrjs/dist/cldr/supplemental.js"></script>
<script src="~/node_modules/cldrjs/dist/cldr/unresolved.js"></script>

<script src="~/node_modules/globalize/dist/globalize.js"></script>
<script src="~/node_modules/globalize/dist/globalize/currency.js"></script>
<script src="~/node_modules/globalize/dist/globalize/message.js"></script>
<script src="~/node_modules/globalize/dist/globalize/number.js"></script>
<script src="~/node_modules/globalize/dist/globalize/date.js"></script>

<script src="~/node_modules/devextreme/dist/js/dx.all.js"></script>
<link href="~/node_modules/devextreme/dist/css/dx.common.css" rel="stylesheet" />
<link href="~/node_modules/devextreme/dist/css/dx.light.css" rel="stylesheet" />

<!-- Optionally (for intelligent code completion in the Expression Editor and Filter Editor) -->
<script src="~/node_modules/ace-builds/src/ace.js"></script>
<script src="~/node_modules/ace-builds/src/ext-language_tools.js"></script>
<script src="~/node_modules/ace-builds/src/snippets/text.js"></script>
<!--  -->

<!-- If your application contains the Report Designer or both the Report Designer and Document Viewer -->
<script src="~/node_modules/@@devexpress/analytics-core/dist/js/dx-analytics-core.js"></script>
<script src="~/node_modules/@@devexpress/analytics-core/dist/js/dx-querybuilder.js"></script>
<script src="~/node_modules/devexpress-reporting/dist/js/dx-webdocumentviewer.js"></script>
<script src="~/node_modules/devexpress-reporting/dist/js/dx-reportdesigner.js"></script>
<link href="~/node_modules/@@devexpress/analytics-core/dist/css/dx-analytics.common.css" rel="stylesheet" />
<link href="~/node_modules/@@devexpress/analytics-core/dist/css/dx-analytics.light.css" rel="stylesheet" />
<link href="~/node_modules/@@devexpress/analytics-core/dist/css/dx-querybuilder.css" rel="stylesheet" />
<link href="~/node_modules/devexpress-reporting/dist/css/dx-webdocumentviewer.css" rel="stylesheet" />
<link href="~/node_modules/devexpress-reporting/dist/css/dx-reportdesigner.css" rel="stylesheet" />
Make sure that you meet all the requirements for deploying the control on the client. Refer to the Report Designer Requirements and Limitations topics or a list of necessary client resources.
In the View file, use the ReportDesigner wrapper to display the End-User Report Designer on your web page.
@Html.DevExpress().ReportDesigner("ReportDesigner")
    .Height("1000px")
    .Bind("Insert your report URL here")
In the Layout.cshtml file, move jQuery script registration from the body to the head section:
<head>
    ...
    <environment include="Development">
        <script src="~/node_modules/jquery/dist/jquery.js"></script>
        ...
    </environment>
    <environment exclude="Development">
        ...
    </environment>
</head>
Perform this action to avoid overriding scripts required to correctly render the control, since jQuery links in the environment containers are inserted after rendering the reporting control by default.
Implement a report storage to store reports created in the Report Designer and get reports from the project’s embedded resources (this allows you to edit reports added at design time).
If required, you can register predefined data sources available for all reports in the Report Designer.
You can also register data connections available in the SQL Data Source Wizard when creating new data sources.