Create a Custom Numeric Label
- 3 minutes to read
This tutorial provides an example of creating a custom report control (XRNumericLabel). This control is inherited from the XRLabel (so, it supports all functionality provided by a standard label), but accepts only numeric text to be displayed within it.
Tip
Online Example: How to create custom report controls
To create a numeric label control, do the following.
- To create a new Class Library project, run the Microsoft Visual Studio 2010, 2012, 2013, 2015 or 2017, choose “File | New | Project…” menu item. Then in the New Project dialog, select the template for the “Class Library”, type the “CustomControls” name for the new project, and click OK.
- Rename the newly added class from Class1 to XRNumericLabel.
Add the following assemblies to the References list of your project:
System.Drawing;
System.Windows.Forms;
DevExpress.Data.v18.2;
DevExpress.Utils.v18.2;
DevExpress.XtraPrinting.v18.2
DevExpress.XtraReports.v18.2.
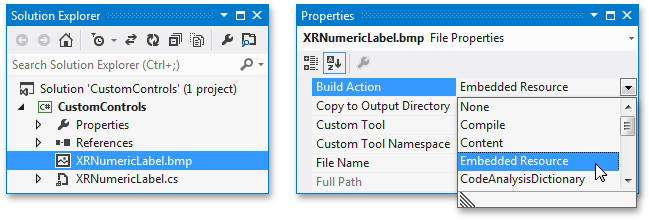
To define a custom control icon, displayed in the Toolbox and Report Explorer, create a custom bitmap file (24x24 pixels) and add it to the project.
When adding an image file to the project, please make certain that its name matches the class name, and the Build Action property is set to Embedded Resource.
The code below demonstrates how to inherit the XRNumericLabel class from the XRLabel class, introduce the Number property, and override the Text property to hide it.
using System; using System.Drawing; using System.ComponentModel; using System.Windows.Forms; using DevExpress.XtraReports; using DevExpress.XtraReports.UI; using DevExpress.XtraReports.Localization; //... namespace CustomControls { [DefaultBindableProperty("Number"), ToolboxBitmap24Attribute(@"WindowsFormsApplication1.Icon24x24.png,WindowsFormsApplication1") ] public class XRNumericLabel : XRLabel { private int number; [SRCategory(ReportStringId.CatData), DefaultValue(0), Bindable(true)] public virtual int Number { get { return number; } set { number = value; } } [Browsable(false), EditorBrowsable(EditorBrowsableState.Never), Bindable(false)] public override string Text { get { return number.ToString(); } set { int i; if (int.TryParse(value, out i)) { number = i; } else { throw new ArgumentException("This text can't be converted to a number!"); } } } } }- Rebuild the project. After building a solution, a CustomControls.dll containing the Numeric Label control will appear in the ‘\Bin\Debug” directory of the project.
The XRNumericLabel control is now ready to be used in your reporting applications.