Export to HTML
- 5 minutes to read
Overview
This document details the export of a document to HTML format.
Tip
A code example illustrating how to export a report to HTML is available at How to export a report to HTML format.
The options that can be specified for a document exported to an HTML file are stored in the HtmlExportOptions class, and can be accessed via a report’s ExportOptions.Html property.
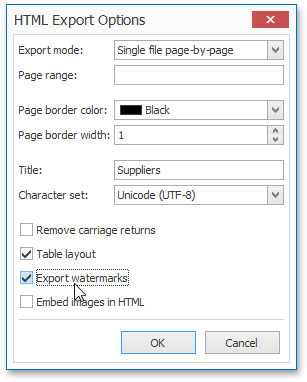
Among these options, the HtmlExportOptionsBase.ExportMode property determines the way in which a document is exported to HTML. For instance, it may be exported to a single file (with a single page header at the beginning and a single page footer at the end), or it may be exported page-by-page to either a single file or different files.
The HtmlExportOptionsBase.TableLayout property determines whether or not to use the table layout in the resulting HTML file. If this property is set to false, the non-table layout is used instead. The table layout is recommended, as it uses a more compact and efficient markup.
The HtmlExportOptionsBase.ExportWatermarks property specifies whether or not to maintain the existing text and image watermarks of a report in an HTML file. The following image illustrates the corresponding option in the HTML Export Options dialog.
Note that only the report controls that do not intersect with each other can be correctly exported to HTML using the table layout. In other cases, a layout of the resulting HTML file may be completely broken.
To make sure that your report layout will be preserved in HTML format, enable the report’s DesignerOptions.ShowExportWarnings property at design time and check to ensure there are no exclamation marks shown indicating intersecting controls (colored in red).
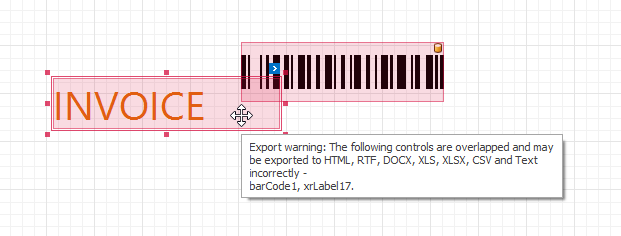
If you need to export a report that contains intersecting controls to HTML, use the non-table layout.
If the XRControl.BorderDashStyle property of any control is set to BorderDashStyle.DashDot or BorderDashStyle.DashDotDot, a resulting HTML file will render such borders as BorderDashStyle.Dash.
Document Compatibility Options
By default, the document styles are written to the <head> section of an HTML document, and become ignored by some mail clients. To maintain a consistent look for your reports, set the HtmlExportOptionsBase.InlineCss property to true. In this case, the style properties will be defined at the same place where a specific style is assigned in a document. This will ensure that the resulting document is compatible with any mail client (although at the expense of a larger document size).
This property also affects how the XRPictureBox and XRBarCode controls are rendered on a web page. By default, images corresponding to rendered controls are assigned to the background-image property of styles that are specified in the <head> section of an HTML document. Setting the HtmlExportOptionsBase.InlineCss property to true will make these controls rendered as <img> elements in the document body, with the src attribute specifying a base64 image representation.
Vector images (e.g., pictures, charts or bar codes) are always rasterized on export to HTML. You can use the PageByPageExportOptionsBase.RasterizationResolution property to define the image resolution.
By default, the document navigation is implemented by using scripts. To enable the use of standard HTML link references in document navigation, set the HtmlExportOptionsBase.UseHRefHyperlinks property to true. On viewing such a document in a client web browser, unnecessary script security messages will not be displayed. When this property is enabled, links with empty text may be generated if a corresponding control’s content is not specified. It will be impossible to click such links in a published document.
Tip
You can export a report to HTML using one of the following methods with or without the options listed above passed as parameters:
Customizing a Control’s Content on Export to HTML
Tip
Online Example: How to customize control content on export to HTML
The following example demonstrates how to use the XRControl.HtmlItemCreated event to customize the content of an XRLabel control, when a report is exported to HTML. In the event handler, create two custom HTML elements, which will display a check box and a hyperlink on a Web page, and add them to the control’s content using the HtmlEventArgs.ContentCell property of the event parameter.
Follow the steps below to create a sample project.
- Start Visual Studio and create a new Windows Forms Application or open an existing one.
- Add a new report (named XtraReport1) to the application.
Drop an XRLabel control onto a report and handle its HtmlItemCreated event as follows.
using DevExpress.XtraPrinting.HtmlExport;
using DevExpress.XtraPrinting.HtmlExport.Controls;
using DevExpress.XtraReports.UI;
// ...

private void xrLabel1_HtmlItemCreated(object sender, HtmlEventArgs e) {
    // Clear content of the currently processed item.
    e.ContentCell.Controls.Clear();

    // Create a check box.
    DXHtmlGenericControl checkBox = new DXHtmlGenericControl(DXHtmlTextWriterTag.Input);
    checkBox1.Attributes["checked"] = "true";
    checkBox1.Attributes["type"] = "CheckBox";

    // Create a hyperlink.
    DXHtmlAnchor hypLink = new DXHtmlAnchor();
    hypLink.InnerText = "XtraReports Web Page";
    hypLink.HRef = "https://www.devexpress.com/Subscriptions/Reporting/";

    // Add the created elements to the item's content.
    e.ContentCell.Controls.Add(checkBox);
    e.ContentCell.Controls.Add(hypLink);
}
Then, to export a report to HTML, you can use code similar to the following.
using System;
using System.Windows.Forms;
using System.Diagnostics;
// ...

private void ExportToHTML() {
    XtraReport1 report = new XtraReport1();
    report.ExportToHtml("Test.html");
    StartProcess("Test.html");
}

public void StartProcess(string path) {
    Process process = new Process();
    try {
        process.StartInfo.FileName = path;
        process.Start();
        process.WaitForInputIdle();
    }
    catch { }
}