Manual Integration of Reporting Extensions Into an Existing Project
- 10 minutes to read
This topic explains how to manually incorporate DevExpress Reporting Extensions for ASP.NET MVC into existing ASP.NET MVC applications.
When you create a new ASP.NET MVC application using the Devexpress Template Gallery or use the general approach to manual integration into an existing project, the resulting application is configured to support the whole set of DevExpress ASP.NET MVC extensions. This may be redundant for some applications, particularly if you want to only utilize the XtraReports Suite. In this case, perform the steps described below to manually incorporate DevExpress Reporting Extensions for ASP.NET MVC into your project.
Reference the Required Assemblies
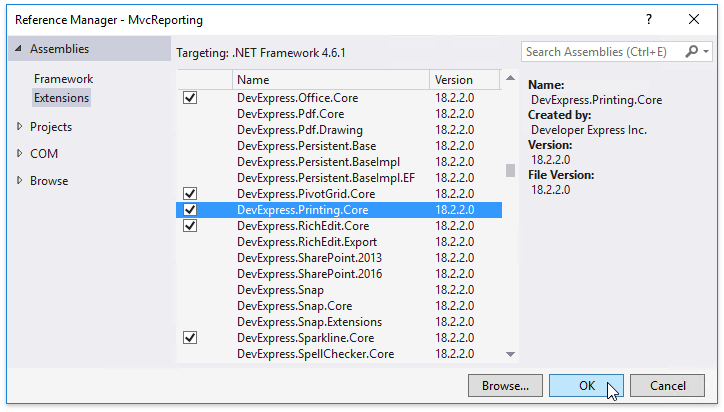
Add references to the following assembly files in the ASP.NET MVC application (refer to the Assemblies Deployed with ASP.NET MVC Reporting Applications document to learn more).
- DevExpress.Charts.v18.2.Core
- DevExpress.CodeParser.v18.2
- DevExpress.Data.v18.2
- DevExpress.DataAccess.v18.2
- DevExpress.Office.v18.2.Core
- DevExpress.PivotGrid.v18.2.Core
- DevExpress.Printing.v18.2.Core
- DevExpress.RichEdit.v18.2.Core
- DevExpress.Sparkline.v18.2.Core
- DevExpress.Web.ASPxThemes.v18.2
- DevExpress.Web.Mvc.v18.2 (or DevExpress.Web.Mvc5.v18.2 if using ASP.NET MVC 5)
- DevExpress.Web.v18.2
- DevExpress.Xpo.v18.2
- DevExpress.XtraCharts.v18.2
- DevExpress.XtraReports.v18.2
- DevExpress.XtraReports.v18.2.Web
Typically, after installation, the required DevExpress assemblies have already been registered in the GAC. So, you can open the Reference Manager dialog (for instance, using the PROJECT | Add Reference… menu item) and select these assemblies in the dialog’s Extensions tab.
Note
The version numbers and public key mentioned in this document may differ depending on the product version you purchased.
You can then set the CopyLocal property of the referenced assemblies to true or add the following lines to the ‘configuration > system.web > compilation > assemblies‘ section of the application’s Web.config file.
...
<assemblies>
  ...
  <add assembly="DevExpress.Charts.v18.2.Core, Version=18.2.3.0, Culture=neutral, PublicKeyToken=b88d1754d700e49a" />
  <add assembly="DevExpress.CodeParser.v18.2, Version=18.2.3.0, Culture=neutral, PublicKeyToken=b88d1754d700e49a" />
  <add assembly="DevExpress.Data.v18.2, Version=18.2.3.0, Culture=neutral, PublicKeyToken=b88d1754d700e49a" />
  <add assembly="DevExpress.DataAccess.v18.2, Version=18.2.3.0, Culture=neutral, PublicKeyToken=b88d1754d700e49a" />
  <add assembly="DevExpress.Office.v18.2.Core, Version=18.2.3.0, Culture=neutral, PublicKeyToken=b88d1754d700e49a" />
  <add assembly="DevExpress.PivotGrid.v18.2.Core, Version=18.2.3.0, Culture=neutral, PublicKeyToken=b88d1754d700e49a" />
  <add assembly="DevExpress.Printing.v18.2.Core, Version=18.2.3.0, Culture=neutral, PublicKeyToken=b88d1754d700e49a" />
  <add assembly="DevExpress.RichEdit.v18.2.Core, Version=18.2.3.0, Culture=neutral, PublicKeyToken=b88d1754d700e49a" />
  <add assembly="DevExpress.Sparkline.v18.2.Core, Version=18.2.3.0, Culture=neutral, PublicKeyToken=b88d1754d700e49a" />
  <add assembly="DevExpress.Web.ASPxThemes.v18.2, Version=18.2.3.0, Culture=neutral, PublicKeyToken=b88d1754d700e49a" />
  <add assembly="DevExpress.Web.Mvc.v18.2, Version=18.2.3.0, Culture=neutral, PublicKeyToken=b88d1754d700e49a" />
  <add assembly="DevExpress.Web.v18.2, Version=18.2.3.0, Culture=neutral, PublicKeyToken=b88d1754d700e49a" />
  <add assembly="DevExpress.Xpo.v18.2, Version=18.2.3.0, Culture=neutral, PublicKeyToken=b88d1754d700e49a" />
  <add assembly="DevExpress.XtraCharts.v18.2, Version=18.2.3.0, Culture=neutral, PublicKeyToken=b88d1754d700e49a" />
  <add assembly="DevExpress.XtraReports.v18.2, Version=18.2.3.0, Culture=neutral, PublicKeyToken=b88d1754d700e49a" />
  <add assembly="DevExpress.XtraReports.v18.2.Web, Version=18.2.3.0, Culture=neutral, PublicKeyToken=b88d1754d700e49a" />
  ...
</assemblies>
Note
When using the ASP.NET MVC 5 framework, you should add the DevExpress.Web.Mvc5.v18.2 assembly instead of the DevExpress.Web. Mvc.v18.2 assembly, as shown in the code sample below.
<assemblies>
  ...
  <add assembly="DevExpress.Web.Mvc5.v18.2, Version=18.2.3.0, Culture=neutral, PublicKeyToken=b88d1754d700e49a" />
  ...
</assemblies>
Register the Required Settings in the Application’s Configuration Files
The next step is to register the DevExpress HTTP handler, required namespaces and DevExpress configuration section in the application’s configuration files.
Register the ASPxHttpHandlerModule service in four sections of the application’s Web.config file (system.web/httpModules, system.webServer/modules, system.web/httpHandlers and system.webServer/handlers).
<system.web>
...
  <httpHandlers>
    ...
    <add type="DevExpress.Web.ASPxHttpHandlerModule, DevExpress.Web.v18.2, Version=18.2.3.0, Culture=neutral, PublicKeyToken=b88d1754d700e49a"
         verb="GET,POST" path="DXXRD.axd" validate="false" />
    <add type="DevExpress.Web.ASPxHttpHandlerModule, DevExpress.Web.v18.2, Version=18.2.3.0, Culture=neutral, PublicKeyToken=b88d1754d700e49a"
         verb="GET,POST" path="DXXRDV.axd" validate="false" />
    <add type="DevExpress.Web.ASPxHttpHandlerModule, DevExpress.Web.v18.2, Version=18.2.3.0, Culture=neutral, PublicKeyToken=b88d1754d700e49a"
         verb="GET,POST" path="DXQB.axd" validate="false" />
  </httpHandlers>
  <httpModules>
    <add type="DevExpress.Web.ASPxHttpHandlerModule, DevExpress.Web.v18.2, Version=18.2.3.0, Culture=neutral, PublicKeyToken=b88d1754d700e49a" name="ASPxHttpHandlerModule" />
  </httpModules>
</system.web>
<system.webServer>
  <handlers>
    ...
    <add type="DevExpress.Web.ASPxHttpHandlerModule, DevExpress.Web.v18.2, Version=18.2.3.0, Culture=neutral, PublicKeyToken=b88d1754d700e49a"
         verb="GET,POST" path="DXXRD.axd" name="ASPxReportDesignerHandlerModule" preCondition="integratedMode" />
    <add type="DevExpress.Web.ASPxHttpHandlerModule, DevExpress.Web.v18.2, Version=18.2.3.0, Culture=neutral, PublicKeyToken=b88d1754d700e49a"
         verb="GET,POST" path="DXXRDV.axd" name="ASPxWebDocumentViewerHandlerModule" preCondition="integratedMode" />
    <add type="DevExpress.Web.ASPxHttpHandlerModule, DevExpress.Web.v18.2, Version=18.2.3.0, Culture=neutral, PublicKeyToken=b88d1754d700e49a"
         verb="GET,POST" path="DXQB.axd" name="ASPxQueryBuilderDesignerHandlerModule" preCondition="integratedMode" />
  </handlers>
  <modules runAllManagedModulesForAllRequests="true">
    <add type="DevExpress.Web.ASPxHttpHandlerModule, DevExpress.Web.v18.2, Version=18.2.3.0, Culture=neutral, PublicKeyToken=b88d1754d700e49a" name="ASPxHttpHandlerModule" />
  </modules>
</system.webServer>
To make the DevExpress Reporting Extensions available for use within web project pages, register the required DevExpress namespaces in the ‘system.web.webPages.razor‘ section, which is located within the View folder’s Web.config file.
<system.web.webPages.razor>
  ...
  <pages pageBaseType="System.Web.Mvc.WebViewPage">
    <namespaces>
      <add namespace="System.Web.Helpers" />
      <add namespace="System.Web.Mvc" />
      <add namespace="System.Web.Mvc.Ajax" />
      <add namespace="System.Web.Mvc.Html" />
      <add namespace="System.Web.Routing" />
      <add namespace="System.Web.WebPages" />
      <add namespace="System.Web.UI.WebControls" />
      <add namespace="DevExpress.Web.ASPxThemes" />
      <add namespace="DevExpress.XtraReports" />
      <add namespace="DevExpress.XtraReports.UI" />
      <add namespace="DevExpress.XtraReports.Web" />
      <add namespace="DevExpress.XtraReports.Web.DocumentViewer" />
      <add namespace="DevExpress.Web.Mvc" />
      <add namespace="DevExpress.Web.Mvc.UI" />
    </namespaces>
  </pages>
</system.web.webPages.razor>
Note
If you use the ASPX view engine, register these namespaces within the ‘configuration > system.web > pages > namespaces‘ section of the application’s Web.config file.
You can also manually insert the @using directives into view pages to import the required namespaces.
Different aspects of DevExpress functionality can be centrally controlled through configuration options provided by a specially designed DevExpress configuration section. Register this section in the application’s Web.config file using the following code.
<configuration>
  <configSections>
    <sectionGroup name="devExpress">
      <section name="themes" type="DevExpress.Web.ThemesConfigurationSection, DevExpress.Web.v18.2, Version18.2.3.0, Culture=neutral, PublicKeyToken=b88d1754d700e49a" requirePermission="false" />
      <section name="compression" type="DevExpress.Web.CompressionConfigurationSection, DevExpress.Web.v18.2, Version=18.2.3.0, Culture=neutral, PublicKeyToken=b88d1754d700e49a" requirePermission="false" />
      <section name="settings" type="DevExpress.Web.SettingsConfigurationSection, DevExpress.Web.v18.2, Version=18.2.3.0, Culture=neutral, PublicKeyToken=b88d1754d700e49a" requirePermission="false" />
      <section name="errors" type="DevExpress.Web.ErrorsConfigurationSection, DevExpress.Web.v18.2, Version=18.2.3.0, Culture=neutral, PublicKeyToken=b88d1754d700e49a" requirePermission="false" />
      <section name="resources" type="DevExpress.Web.ResourcesConfigurationSection, DevExpress.Web.v18.2, Version=18.2.3.0, Culture=neutral, PublicKeyToken=b88d1754d700e49a" requirePermission="false" />
    </sectionGroup>
  </configSections>
  ...
  <devExpress>
    <themes enableThemesAssembly="true" styleSheetTheme="" theme="Mulberry" customThemeAssemblies="" />
    <compression enableHtmlCompression="false" enableCallbackCompression="true" enableResourceCompression="true" enableResourceMerging="true" />
    <settings doctypeMode="Html5" rightToLeft="false" ieCompatibilityVersion="edge" />
    <errors callbackErrorRedirectUrl="" />
    <resources>
        <add type="ThirdParty" />
        <add type="DevExtreme" />
    </resources>
  </devExpress>
</configuration>
Note
In order to properly register the DevExpress ASP.NET MVC Reporting Extensions, rebuilding the project after this step is recommended.
Attach the Required Java Script Files and Style Sheets
The following script files should be installed on the client web browser to run the Document Viewer:
- jQuery 1.11.3+
jQuery UI 1.11.4+ (both JavaScript and CSS files) with the following scripts:
- core.js
- widget.js
- mouse.js
- draggable.js
- resizable.js
- selectable.js
To assemble a custom jQuery UI library that includes the required scripts, visit the following page: Download Builder.
-
The Document Viewer requires the core Globalize script and its four modules (message, number, date and currency), as well as some cldrjs scripts. Here is a list of the required Globalize scripts:
<script src="js/cldr.js"></script>
<script src="js/cldr.event.js"></script>
<script src="js/cldr.supplemental.js"></script>
<script src="js/cldr.unresolved.js"></script>

<script src="js/globalize.js"></script>
<script src="js/globalize/message.js"></script>
<script src="js/globalize/number.js"></script>
<script src="js/globalize/currency.js"></script>
<script src="js/globalize/date.js"></script>
Read more about Globalize modules and requirements in the Globalize documentation.
The basic cldr content needed for the Document Viewer is included in the library. However, for locales other than “en” (or currencies other than “USD”), cldr content should be loaded additionally (read more in the Globalize documentation).
- knockout 3.3.0+
You should download and place all JavaScript files into your application’s Scripts folder, set the paths to these libraries in the src attribute, and put the CSS files into the Content folder. You can also use NuGet to download and install these files automatically.
To include these script files in a client application, do one of the following:
Automatic Integration
Include these client-side libraries on the web page automatically by adding the “resources” section to the application’s Web.config file, as shown below.
<devExpress>
    <!-- ... -->
    <resources>
        <add type="ThirdParty" />
        <add type="DevExtreme" />
    </resources>
</devExpress>
Manual Integration
To avoid automatic loading of any libraries by a control (that is, when such libraries are already referenced on the web page), do the following:
Declare an empty “resources” section in the Web.config file.
<resources>
</resources>
Manually attach DevExtreme resources and the required third-party libraries (such as jQuery and Globalize) to the web page.
<html>
<head>
    <script src="Scripts/jquery-3.3.1.js" type="text/javascript"></script>
    <script src="Scripts/jquery-ui-1.12.1.custom.min.js" type="text/javascript"></script>
    <script src="Scripts/knockout-3.4.2.js" type="text/javascript"></script>

    <script src="Scripts/globalize/cldr.js"></script>
    <script src="Scripts/globalize/cldr.event.js"></script>
    <script src="Scripts/globalize/cldr.supplemental.js"></script>
    <script src="Scripts/globalize/cldr.unresolved.js"></script>

    <script src="Scripts/globalize/globalize.js"></script>
    <script src="Scripts/globalize/globalize.message.js"></script>
    <script src="Scripts/globalize/globalize.number.js"></script>
    <script src="Scripts/globalize/globalize.currency.js"></script>
    <script src="Scripts/globalize/globalize.date.js"></script>

    <link href="Content/themes/base/jquery-ui.css" type="text/css" rel="Stylesheet" />
    ...
</head>
...
</html>
Note
Deleting the DevExpress “resources” section from the Web.config file enables the default behavior (with automatic loading only of DevExtreme, without adding third-party libraries).
To learn more about this configuration, see Embedding Third-Party Libraries.
For a list of web browsers supported by the Document Viewer, refer to the following document: Supported Browsers.
Then, register reporting scripts using the ExtensionsFactory.GetScripts (or ExtensionsFactory.RenderScripts, if your project uses the ASPX view engine) method within the View (or Layout View) page’s HEAD or BODY tag. Typically, scripts can be attached to all Views in a central location within the layout View.
<head>
    ...
    @Html.DevExpress().GetScripts(
        new Script { ExtensionSuite = ExtensionSuite.Report }
    )
    ...
</head>
To attach the required style sheets, use the ExtensionsFactory.GetStyleSheets extension method within the View page’s HEAD (recommended) or BODY tag. Typically, style sheets can be attached to all Views in a central location within the layout View (before the @RenderBody() expression).
<head>
    ...
    @Html.DevExpress().GetStyleSheets(
        new StyleSheet { ExtensionSuite = ExtensionSuite.Report }
    )
    ...
</head>
Override the Default Model Binder
When DevExpress editors are bound to data model fields by using Bind (dataObject, propertyName) methods or using strongly typed helpers, the DevExpressEditorsBinder model binder must be used instead of the default model binder to correctly transfer values from DevExpress editors back to corresponding data model fields.
You can specify DevExpressEditorsBinder as a model binder in the following manners.
Decorating the Parameter of Action Method
You can declare DevExpressEditorsBinder as a parameter attribute on an action method: ([ModelBinder(typeof(DevExpressEditorsBinder))]).
Controller:
[HttpPost]
    public ActionResult ModelBinding([ModelBinder(typeof(DevExpressEditorsBinder))] MyModelData myModel) {
        ...
    }
Overriding the Default Model Binder
You can assign DevExpressEditorsBinder to the ModelBinders.Binders.DefaultBinder property to replace the global default model binder.
Global.asax:
protected void Application_Start(){
        ...
        ModelBinders.Binders.DefaultBinder = new DevExpress.Web.Mvc.DevExpressEditorsBinder();
    }
Note
Starting with v2012 vol 1, the DevExpressEditorsBinder is automatically defined as a default model binder within projects created with the help of DevExpress MVC project templates.
Perform Additional Project Adjustments
At this stage, DevExpress Reporting Extensions are fully functional, so the following steps are optional but can be useful in certain scenarios.
Include the ignore route statements with the following patterns to prevent requests from being passed to a controller.
{resource}.axd/{*pathInfo}- for the Web resource files (e.g., scripts, styles);{resource}.ashx/{*pathInfo}- for the ASHX handler, which processes the file upload functionality of DevExpress ASP.NET MVC extensions (e.g., UploadControl, FileManager, HtmlEditor).
In the registered route collection, add the required ignore route statements above the other route definitions.
// ... public static void RegisterRoutes(RouteCollection routes) { // Ignore route statements. routes.IgnoreRoute("{resource}.axd/{*pathInfo}"); routes.IgnoreRoute("{resource}.ashx/{*pathInfo}"); // Route definitions. // ... } // ...Note
If you use the ASP.NET MVC 3 framework, you can find the route definition in the ~/Global.asax.cs file. If you use the ASP.NET MVC 4 or 5 framework, the route definition is placed in the ~/App_Start/RouteConfig.cs file by default.
- If you create an MVC project using the standard ASP.NET MVC Web Application template provided by Visual Studio, the project’s Content folder contains the automatically generated Site.css file. Specific type selectors that are defined in this file and relate directly to HTML element types (such as links, input elements, tables and table cells) may affect the appearance of DevExpress MVC Reporting extensions. To fix this problem, clear the style settings defined in the element type selectors. This requirement also applies to your custom CSS files and rules.
Using the following document type of Views to ensure that DevExpress MVC Reporting Extensions operate properly is recommended.
<!DOCTYPE html>Check and correct (if necessary) the document type for all Views containing DevExpress MVC Reporting Extensions and/or document type of layout pages used by Views.
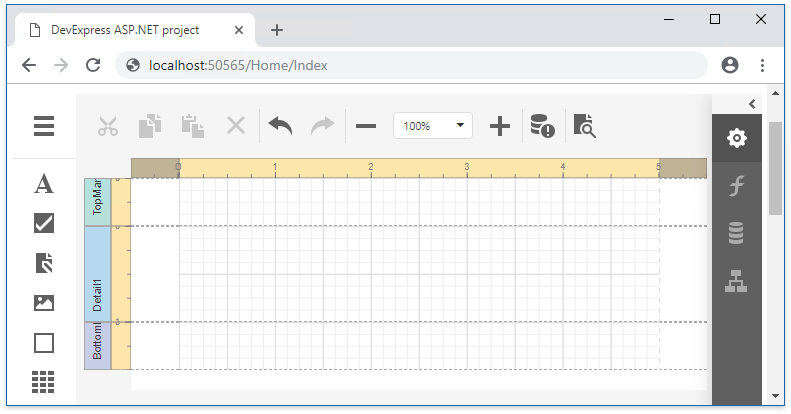
Add Extension Code
You can now use DevExpress MVC Reporting Extensions within your ASP.NET MVC application. This example uses the ReportDesigner extension (the project was initially created using the ASP.NET MVC 4 Web Application template). Add the following code to the Index View page.
@Html.DevExpress().ReportDesigner(settings => {
    settings.Name = "ReportDesigner";
    settings.SaveCallbackRouteValues = new { Controller = "Home", Action = "ReportDesigner_Save" };
}).Bind(new DevExpress.XtraReports.UI.XtraReport()).GetHtml()
After building and running the application, the Index page will appear as follows.