How to: Bind an XPCollection to Standard Controls
- 5 minutes to read
This example demonstrates how to build a simple data-aware application using standard controls. The application will be used to view and edit a person’s details using standard controls. A person’s data will be displayed in a standard DataGridView control in read-only mode. All data editing will be done via the editing section, which contains separate standard controls for each person’s property. Changes made in the corresponding editor will be immediately reflected in the DataGridView control. The changes will be persisted in a database by pressing the Save button.
Persistent Classes Declaration
First, declare the Person and Position classes. In this sample application a person is represented by the Name and Position properties. The Simplified Property Syntax is used to implement property accessors.
public class Person : XPObject {

    public string Name {
        get { return GetPropertyValue<String>("Name"); }
        set { SetPropertyValue("Name", value); }
    }

    public Position Position {
        get { return GetPropertyValue<Position>("Position"); }
        set { SetPropertyValue("Position", value); }
    }
}

public class Position : XPObject {

    public string PositionName {
        get { return GetPropertyValue<String>("PositionName"); }
        set { SetPropertyValue("PositionName", value); }
    }
}
Before you continue, add this code to your project and re-build it.
User Interface Design and Data Binding
The viewing section contains the DataGridView control that is used to navigate through the Person objects. The editing section contains the standard Textbox and Combobox controls that are used to edit the person’s Name and Position properties. The Save button is used to save changes to a database.
To display data we use two XPCollection components provided by XPO. The first collection should contain Person objects, and the second collection should contain Position objects.
Follow the steps below to create the required collections:
- Drag the XPCollection component from the toolbox and drop it onto the main form.
- Rename the collection to “xpCollectionPersons”.
Assign the “Person” persistent class to the XPCollection.ObjectClassInfo property:
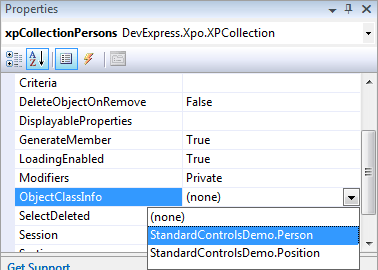
- Drag the second XPCollection component from the toolbox and drop it onto the form.
- Rename this collection to “xpCollectionPositions”.
- Assign the “Position” persistent class to the ObjectClassInfo property.
To bind the controls to the collections, do the following:
Open the DataGridView’s task pane. Set the DataSource property to “xpCollectionPersons”. Uncheck the “Enable Adding”, “Enable Editing” and “Enable Deleting” options:
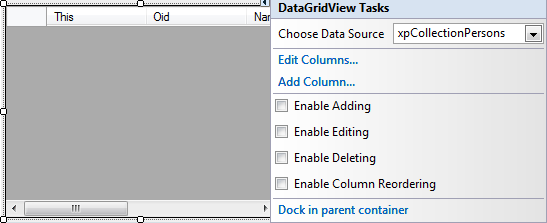
- Invoke the Columns editor by clicking “Edit Columns…” task.
- Remove the automatically generated columns except the “Name” column.
- Create a new “Position” DataGridViewComboBoxColumn column.
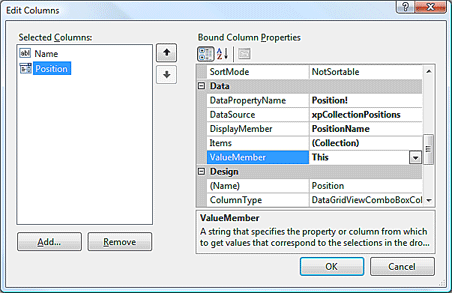
Set its properties as follows: DataPropertyName to “Position!”, DataSource to “xpCollectionPositions”, DisplayMember to “PositionName”, ValueMember to “This”.
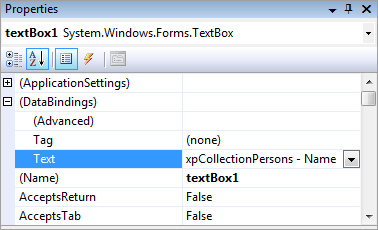
Bind the TextBox’s Text property to the xpCollectionPersons’ Name property:
- Set the ComboBox’s DataSource property to “xpCollectionPositions”. Bind the SelectedValue property to xpCollectionPersons’ Position! property. Set the DisplayMember property to “PositionName” and the ValueMember property to “This”.
Saving the Persistent Objects
To save the changes made, handle the button’s Click event as shown below:
using DevExpress.Xpo;

...

private void button1_Click(object sender, EventArgs e) {
   Session ses = XpoDefault.Session;
   ses.Save(xpCollectionPersons);
   ses.Save(xpCollectionPositions);
}
Synchronizing the Viewing and Editing Sections
To update the DataGridView control and immediately reflect the changes made, handle the TextBox’s TextChanged and ComboBox’s SelectedIndexChanged events:
enum refreshType {
    Name,
    Position
}

...

private void refreshObjects(object sender, refreshType refT) {
    Person cur = (Person)(this.BindingContext[xpCollectionPersons] as CurrencyManager).Current;
    switch (refT) {
        case refreshType.Name:
            cur.Name = (sender as TextBox).Text;
            break;
        case refreshType.Position:
            cur.Position = (sender as System.Windows.Forms.ComboBox).SelectedValue as Position;
            break;
        default:
            break;
    }
}

private void textBox1_TextChanged(object sender, EventArgs e) {
    refreshObjects(sender, refreshType.Name);
}

private void comboBox1_SelectedIndexChanged(object sender, EventArgs e) {
    if (comboBox1.Focused) {
        refreshObjects(sender, refreshType.Position);
    }
}
Populating the Database
To fill the database with sample data, do the following:
private void Form1_Load(object sender, EventArgs e) {

    Position pos1 = new Position();
    pos1.PositionName = "Manager";
    pos1.Save();
    Position pos2 = new Position();
    pos2.PositionName = "Technician";
    pos2.Save();
    Person per1 = new Person();
    per1.Name = "Bob";
    per1.Position = pos1;
    per1.Save();
    Person per2 = new Person();
    per2.Name = "John";
    per2.Position = pos2;
    per2.Save();

    xpCollectionPersons.Reload();
    xpCollectionPositions.Reload();
}
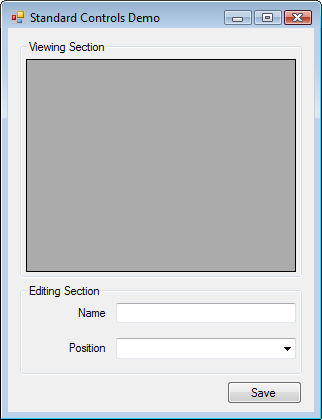
Results
The following image illustrates the implemented application’s main form:
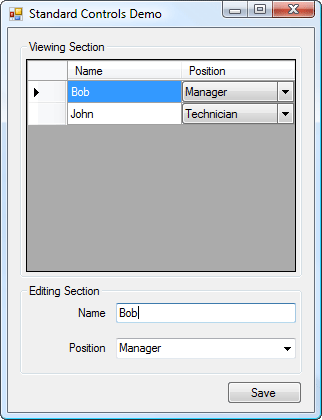
Run the project. It’s assumed that the database isn’t empty. Select a row in the DataGridView control and edit its data using the corresponding editors displayed within the editing section. Any changes made are immediately reflected within the DataGridView control. To save the changes to the database, press the Save button.