Tutorial 4 - A Windows Forms Application for Data Editing
- 8 minutes to read
Use this tutorial to learn how to use transactions, Data Access Layer (DAL), an XPView component, etc.
The Task
To create a data-aware application for viewing and editing customer details.
- The customer’s name and the name of his/her company should be read-only (for end-users) and displayed within the main form.
- End-users are only allowed to change customer details. To do this, they must double click the desired record to invoke a modal dialog, in which they can add or remove notes on the customer.
- To accept the changes (to save them to the database), press the Save button. To cancel all changes, press either the Cancel button or Esc key.
- Data must be stored in the MS Access Database “Customer.mdb” and located on the following path: “C:\Database".
Solution
Persistent Object Class Definition
First, a persistent object class, which is the subject of the first tutorial, must be defined.
In this case, it will be the Customer class. The CustomerName, CompanyName and CustomerInfo properties of this class represent the values of the corresponding fields in a database table.
Please note that the implementations of the CustomerName and CompanyName properties don’t have all the code in their setters that we recommend. We have shortened the sample code for brevity and simplicity.
using DevExpress.Xpo;

public class Customer : XPObject {
    public Customer() {}
    public Customer(Session session) :
            base(session) {
    }

    public string CustomerName;
    public string CompanyName;

    private string customerInfo;
    public string CustomerInfo {
        get { return customerInfo; }
        set {
            // The old value of the CustomerInfo property.
            string oldValue = CustomerInfo;
            if (oldValue == value) return;
            customerInfo = value;
            OnChanged("CustomerInfo", oldValue, value);
        }
    }
}
Please note how the CustomerInfo property is implemented. In this scenario, we will use transactions (nested units of work). A Unit of Work tracks every change to every persistent object during a transaction that can affect a data store. Its UnitOfWork.CommitChanges method saves all the changes made to persistent objects to a data store (you don’t need to save each persistent object as was required in previous versions of XPO). The only requirement for this is that the property setters call the OnChanged method.
The CustomerInfo property’s set accessor calls the OnChanged method to track any changes made to this property. After the Unit of Work UnitOfWork.CommitChanges method has been called, the changes will be automatically saved to a database.
Define Database to Store Data
To improve web application performance, create a single data access layer (DAL for short) to connect to a data store and share it across multiple units of work (sessions). In the following code (for Visual Studio 2005), the InitDAL() method creates a new DAL with the specified settings and initializes the XpoDefault.DataLayer property. As a result, all units of work will by default access the Customer database using the specified path.
static class Program {
    [STAThread]
    static void Main() {
        InitDAL();
        Application.EnableVisualStyles();
        Application.SetCompatibleTextRenderingDefault(false);
        Application.Run(new Form1());
    }

    private static void InitDAL() {
       DevExpress.Xpo.XpoDefault.DataLayer = DevExpress.Xpo.XpoDefault.GetDataLayer(
       DevExpress.Xpo.DB.AccessConnectionProvider.GetConnectionString(@"c:\database\customer.mdb"),
       DevExpress.Xpo.DB.AutoCreateOption.DatabaseAndSchema);
    }
}
Simple UI Design
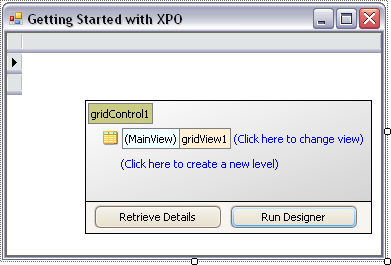
Our simple application will consist of two forms: the main form and the modal form. The main form will display the customer and company names via a grid. Create a new form and place an XtraGrid control on it.
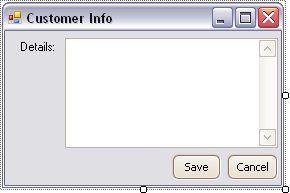
The modal form will be used to view and edit customer details. It will be displayed after an end-user has double clicked on a grid row within the main form. Once again, create a new form. Place a MemoEdit and two SimpleButton controls labeled “Save” and “Cancel” on the form.
Since customer data that is displayed within the main form is read-only for end-users, we’ll use the XPView component, which is provided by XPO. Unlike an XPCollection, the XPView doesn’t create objects for the records it queries from the database, so it usually has slightly better performance and it’s often the perfect choice for grid binding.
Follow the steps below.
- Drag the XPView component from the Toolbox and drop it onto the main form.
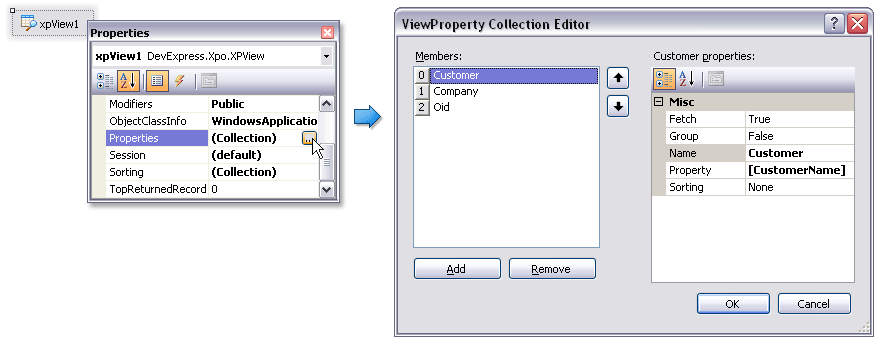
- Assign the “Customer” persistent class to the view’s XPView.ObjectClassInfo property (see the image below).
Create “Customer”, “Company” and “Key” view columns that correspond to the “CustomerName”, “CompanyName” and “Oid” fields in a database table. To do this, populate the view’s XPView.Properties collection as shown below.
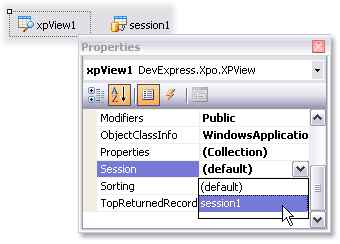
Drag the Session component from the Toolbox and drop it onto the main form. Assign it to the XPView’s XPView.Session property using the Properties window.
- Bind the grid control to the XPView. To do this, assign the XPView to the grid’s DataSource property.
Implementing Transactions
End-users are only allowed to change customer details by double clicking the desired record to invoke a modal dialog. Here, they can add or remove notes about the customer.
To implement this functionality, handle the grid view’s DoubleClick event. The next step is to identify whether or not the row indicator has been double clicked. To do this, add the following line to the event handler.
using DevExpress.XtraGrid.Views.Grid.ViewInfo;

GridHitInfo hi = gridView1.CalcHitInfo(gridControl1.PointToClient(MousePosition));
if (!hi.InRow) return;
If an end-user has double clicked the row indicator, invoke the modal form in which an end-user can edit customer details. At this point, create a nested unit of work. In other words, begin a transaction. Once a transaction has been started, retrieve the persistent object that corresponds to the currently focused grid row (record), pass it as a parameter to the modal form’s constructor, and show the modal form.
using DevExpress.Xpo;
using DevExpress.XtraGrid.Views.Grid.ViewInfo;

private void gridView1_DoubleClick(object sender, EventArgs e) {
    // Checks whether an end-used has double clicked the row indicator.
    GridHitInfo hi = gridView1.CalcHitInfo(gridControl1.PointToClient(MousePosition));
    if (!hi.InRow) return;
    // Starts the nested unit of work.
    using (NestedUnitOfWork nuow = xpView1.Session.BeginNestedUnitOfWork()) {
        // Retrieves the persistent object that corresponds to the currently focused grid row.
        Customer currentCustomer = nuow.GetNestedObject(
    xpView1[gridView1.GetDataSourceRowIndex(gridView1.FocusedRowHandle)].GetObject())
          as Customer;
        // Creates the modal form so that an end-user can edit the customer's details.
        using (Form2 modalForm = new Form2(currentCustomer)) {
            // Specifies the modal form's caption.
            modalForm.Text = gridView1.GetRowCellDisplayText(gridView1.FocusedRowHandle,
              gridView1.FocusedColumn);
            // Shows the modal form. If the modal form's 'Save' button has been pressed,
            // the changes made to the customer's details are saved to a database
           //and the form is closed.
            if (modalForm.ShowDialog() == DialogResult.OK)
                nuow.CommitChanges();
        }
    }
}
As for the modal form, we need to implement the second constructor for it to initialize the dataSource field. This field represents the Customer persistent object currently being processed. It serves as a datasource for the MemoEdit control.
Add the following code to the Form2 class.
private Customer dataSource;

public Form2(Customer dataSource) {
    InitializeComponent();
    this.dataSource = dataSource;
}
Handle the form’s Load event to bind the MemoEdit control to the CustomerInfo field of the Customer persistent object.
private void Form2_Load(object sender, EventArgs e) {
    memoEdit1.DataBindings.Add(new Binding("Text", dataSource, "CustomerInfo"));
}
Finally, set the form’s AcceptButton property to the ‘Save’ button and the CancelButton to the ‘Cancel’ button. Set the ‘Save’ button’s DialogResult property to ‘OK’ and the ‘Cancel’ button’s DialogResult property to ‘Cancel’.
Results
Run the project. It’s assumed that the database isn’t empty. Double click any row indicator. This invokes the modal form that allows you to edit customer details.
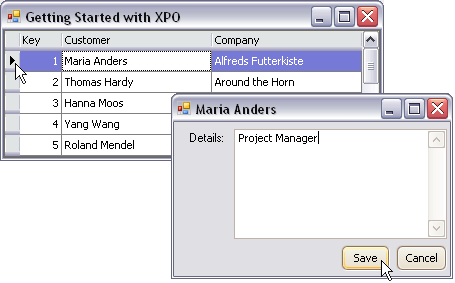
Press the Save button to save the changes made. To discard the changes made, press the Cancel button.
In this tutorial, you’ve learned how to:
- Implement persistent class properties (using the XPBaseObject.OnChanged method);
- Create and customize the Data Access Layer (DAL);
- Use and customize an XPView component;
- Work with nested units of work.