RibbonMiniToolbar Class
A popup toolbar whose transparency depends on the distance from the mouse cursor to it.
Namespace: DevExpress.XtraBars.Ribbon
Assembly: DevExpress.XtraBars.v18.2.dll
Declaration
Related API Members
The following members return RibbonMiniToolbar objects:
Remarks
The RibbonMiniToolbar object is a popup toolbar, whose transparency depends on the distance from the mouse cursor to it (see the RibbonMiniToolbarOpacityOptions.OpacityDistance topic). To create a toolbar in code, use the RibbonMiniToolbar constructor. After the toolbar is created, it must be added to a RibbonControl‘s toolbar collection via the RibbonControl.MiniToolbars property.
Use the RibbonMiniToolbar.Show method to show the toolbar. The toolbar visibility depends on the distance from the mouse cursor to the toolbar. The nearer the mouse cursor, the more opaque the toolbar. The farther the mouse cursor, the more transparent the toolbar. When the mouse cursor reaches a specific remote distance, the toolbar disappears and becomes closed. You can control a toolbar’s opacity options via the RibbonMiniToolbar.OpacityOptions property. If you want to manually hide the toolbar, use the RibbonMiniToolbar.Hide method.

When a toolbar is made visible, it is displayed relative to the mouse cursor as specified by the RibbonMiniToolbar.Alignment property.
You can display a toolbar and a popup menu simultaneously. First, assign a popup menu to a toolbar via the RibbonMiniToolbar.PopupMenu property, or assign a toolbar to a popup menu via the PopupMenu.RibbonToolbar property. Then call the RibbonMiniToolbar.Show or the PopupMenu.ShowPopup method.
To add elements to the toolbar (such as buttons, sub-menus, etc.), use the RibbonMiniToolbar.ItemLinks property.
To add toolbars and to add items to toolbars, use the Ribbon MiniToolbar Items page in the Ribbon Control Designer:

Example
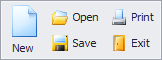
The following example demonstrates how to create a RibbonMiniToolbar and add buttons to the toolbar. The toolbar is displayed on right-clicking a form.
Note, that the toolbar needs to be added to the RibbonControl.MiniToolbars collection to ensure it will display correctly.
using DevExpress.XtraBars;
using DevExpress.XtraBars.Ribbon;

RibbonMiniToolbar rtb;
public Form1() {
    InitializeComponent();
    rtb = new RibbonMiniToolbar();
    rtb.ParentControl = this;
    RibbonControl1.MiniToolbars.Add(rtb);

    BarButtonItem itemNew = new BarButtonItem(RibbonControl1.Manager, "New");
    rtb.ItemLinks.Add(itemNew);
    itemNew.Glyph = Image.FromFile("..\\..\\new16x16.png");
    itemNew.LargeGlyph = Image.FromFile("..\\..\\new32x32.png");

    BarButtonItem itemOpen = new BarButtonItem(RibbonControl1.Manager, "Open");
    rtb.ItemLinks.Add(itemOpen);
    itemOpen.Glyph = Image.FromFile("..\\..\\open16x16.png");

    BarButtonItem itemSave = new BarButtonItem(RibbonControl1.Manager, "Save");
    rtb.ItemLinks.Add(itemSave);
    itemSave.Glyph = Image.FromFile("..\\..\\save16x16.png");

    BarButtonItem itemPrint = new BarButtonItem(RibbonControl1.Manager, "Print");
    rtb.ItemLinks.Add(itemPrint);
    itemPrint.Glyph = Image.FromFile("..\\..\\print16x16.png");

    BarButtonItem itemExit = new BarButtonItem(RibbonControl1.Manager, "Exit");
    rtb.ItemLinks.Add(itemExit);
    itemExit.Glyph = Image.FromFile("..\\..\\exit16x16.png");
}

private void Form1_MouseClick_1(object sender, MouseEventArgs e) {
    if (e.Button == System.Windows.Forms.MouseButtons.Right) {
        rtb.Show(PointToScreen(e.Location));
    }
}