Inline Pictures
- 5 minutes to read
Note
Refer to the Shapes article for information on new pictures and shapes.
Pictures in the User Interface
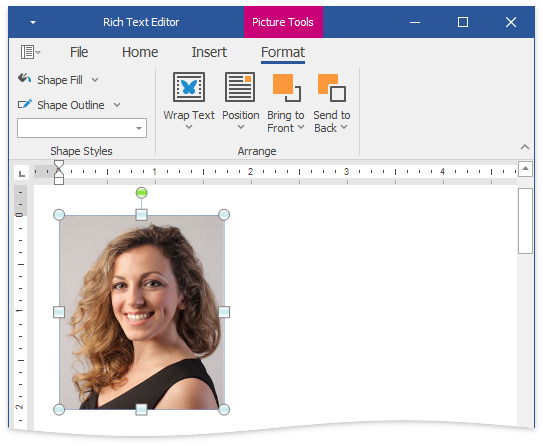
End users can use the Insert ribbon tab to insert pictures in a document. Click Pictures button to invoke the browser dialog and select target image files.

When image is selected, the Picture Tools | Format contextual tab becomes available. This tab allows you to change the image’s position, text wrapping, and outline options. The inline image has In line with Text wrapping style.
Note
If you you work with documents created in a Microsoft Word version earlier than 2007, its inline images do not have additional UI elements.
Right-click an image and select More Layout Options… to invoke the Shape Layout Dialog. This dialog allows end users to specify advanced drawing object’s properties.
Pictures in Code
Insert an Image
All images in the document are contained in two collections: DocumentImageCollection (accessible by the SubDocument.Images property) and ShapeCollection (accessible by the SubDocument.Shapes property).
Call the DocumentImageCollection.Append or DocumentImageCollection.Insert method to place an inline image in the document. The resulting object is also added to the ShapeCollection.
The RichEditControl supports the following graphic types:
- Bitmap (*.bmp, *.dib)
- JPEG File Interchange Format (*.jpg, *.jpeg)
- Portable Network Graphics (*.png)
- Graphics Interchange Format (*.gif)
- Tagged Image Format (*.tif, *.tiff)
- Microsoft Enhanced Metafile (*.emf)
- Windows Metafile (*.wmf)
Note
When you work with documents created in a Microsoft Word version earlier than 2007, its inline pictures are stored in the DocumentImageCollection only.
Note
A complete sample project is available at https://github.com/DevExpress-Examples/winforms-richedit-document-api-e5219
DocumentPosition pos = document.Range.Start;
document.Images.Insert(pos, DocumentImageSource.FromFile("beverages.png"));
Resize an Image
The following properties allow you to resize an inline image:
API | Description |
|---|---|
Gets or sets the X-axis scale factor. | |
Gets or sets the Y-axis scale factor. | |
Specifies the picture’s size in current measurement units (specified by the Document.Unit property). |
The following example examines all images in the document. If the width of an image exceeds 50 millimeters, the image is scaled proportionally to half its size.
document.LoadDocument("Documents//Grimm.docx", DevExpress.XtraRichEdit.DocumentFormat.OpenXml);
ReadOnlyDocumentImageCollection images = document.Images;
// If the width of an image exceeds 50 millimeters,
// the image is scaled proportionally to half its size.
for (int i = 0; i < images.Count; i++)
{
    if (images[i].Size.Width > DevExpress.Office.Utils.Units.MillimetersToDocumentsF(50))
    {
        images[i].ScaleX /= 2;
        images[i].ScaleY /= 2;
    }
}
Obtain Image Information
The DocumentImage.Image property enables you to get information on image size, resolution and color depth. The returned OfficeImage object can be used to get a native .NET Image (the OfficeImage.NativeImage property) or to get image data in a different format (the OfficeImage.GetImageBytes method).
The code sample below retrieves all images in the document and saves them as separate files.
To save an image from the document to a file, use the ReadOnlyDocumentImageCollection.Get method to obtain a collection of images within the specified range, and use the OfficeImage.NativeImage property, which allows access to a native System.Drawing.Image object. This object has the Save method that accomplishes the task.
Note
A complete sample project is available at https://github.com/DevExpress-Examples/winforms-richedit-document-api-e5219
document.LoadDocument("MovieRentals.docx", DevExpress.XtraRichEdit.DocumentFormat.OpenXml);
DocumentRange myRange = document.CreateRange(0,100);
ReadOnlyDocumentImageCollection images = document.Images.Get(myRange);
if (images.Count > 0)
{
    DevExpress.Office.Utils.OfficeImage myImage = images[0].Image;
    System.Drawing.Image image = myImage.NativeImage;
    string imageName = String.Format("Image_at_pos_{0}.png", images[0].Range.Start.ToInt());
    image.Save(imageName);
    System.Diagnostics.Process.Start("explorer.exe", "/select," + imageName);
}
Tip
Use the ReadOnlyDocumentImageCollection.Get method to get images from the specified range.
Delete an Image
Clear the range occupied by the image to delete this image from the document. The DocumentImage.Range property returns the related range.
DocumentRange imageRange = richEditControl.Document.Images[0].Range;
richEditControl.Document.Delete(imageRange);
Export Specifics
RTF
Use the RtfDocumentExporterCompatibilityOptions.DuplicateObjectAsMetafile property to specify whether to save inline pictures in the native format and as metafiles.
HTML
Handle the RichEditControl.BeforeExport event and specify the HtmlDocumentExporterOptions.UriExportType and IExporterOptions.TargetUri properties to specify a location for storing images as external files.
Create custom IUriProvider interface implementation and specify it instead of the default URI provider in the SubDocument.GetHtmlText method to create custom css and image URIs.
Note
A complete sample project is available at How to save the document range in different formats repository on GitHub.
The Document.HtmlText method uses a special URI provider (the DataStringUriProvider), which converts an image to a base64-encoded representation with the “data:” prefix. If you use the Document.HtmlText method to obtain the HTML content, all images are embedded in the page.