Input Mask
- 7 minutes to read
Input masks restrict data input and allow you to guide users to enter correct values. For instance, you can apply the phone number “(000)000-00-00” mask, so that users are unable to enter anything but 10 digits in the given format.

Input masks are in effect only when an editor is focused. Inactive editors can use a different format to display their values (the display format). The following figure illustrates an editor with a “long date” input mask and a “short date” display format.

Masks are supported for all TextEdit descendants, except for the following editors:
- LookUpEdit
- GridLookUpEdit
- TreeListLookUpEdit
- MemoEdit
- MemoExEdit
- ImageComboBoxEdit
- MRUEdit and its descendants
Run this Demo Center module to test various input masks: Mask Box.
Mask Types
DevExpress editors support multiple mask types. Each type allows you to choose from a variety of predefined mask expressions, or build your own.
DateTime type — Allows you to specify masks for date and time values. Uses the standard .NET numeric format for mask expressions.
DateTime with Offset type — Includes the same mask expressions as the regular “DateTime” type, and additionally displays a user time zone.
Numeric type — Allows an editor to accept only numeric values (percentages, currencies, etc.).
Extended Regular Expressions type — Use these masks if an editor should do one of the following:
- Accept values with a custom range of characters at a specific position (for instance, a 16-character license code where each character can be either a digit or a letter).
- Accept values of an indeterminate length (for instance, an e-mail address).
- Accept values that match any of the multiple allowed formats.
- Auto-complete values entered by a user.
Mask expression syntax is similar to that of the POSIX ERE specification.
Simple type — Use this mask type when an editor should accept values in a fixed format without alternatives (for instance, phone numbers or zip codes).
TimeSpan type — Allows users to enter time intervals.
Simplified Regular Expressions — The simplified version of the “Extended Regular Expressions” Mask type. Supports backward compatibility with XtraEditors v2.0. We recommend that you use the RegEx type instead.
How to Apply Masks
In Visual Studio Designer
In the Visual Studio Property Grid, click the ellipsis button next to the Properties.MaskSettings property. In the invoked “Mask Settings” dialog, select the required mask type and choose any of the predefined expressions. To specify additional mask settings, tick the corresponding checkbox at the bottom left corner of the dialog. Available settings depend on the active mask type.
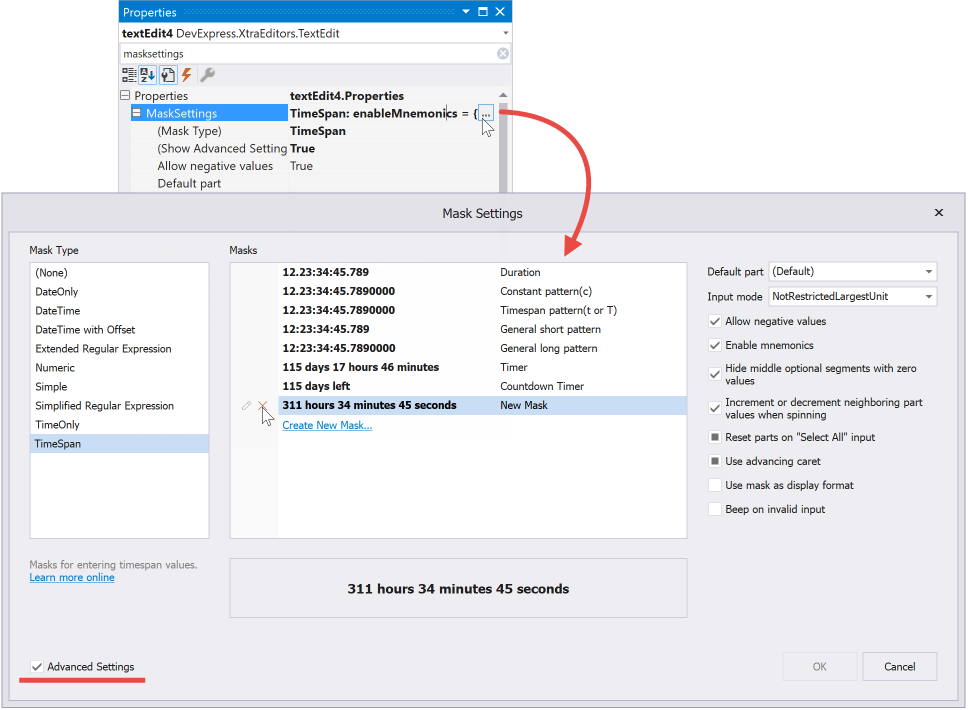
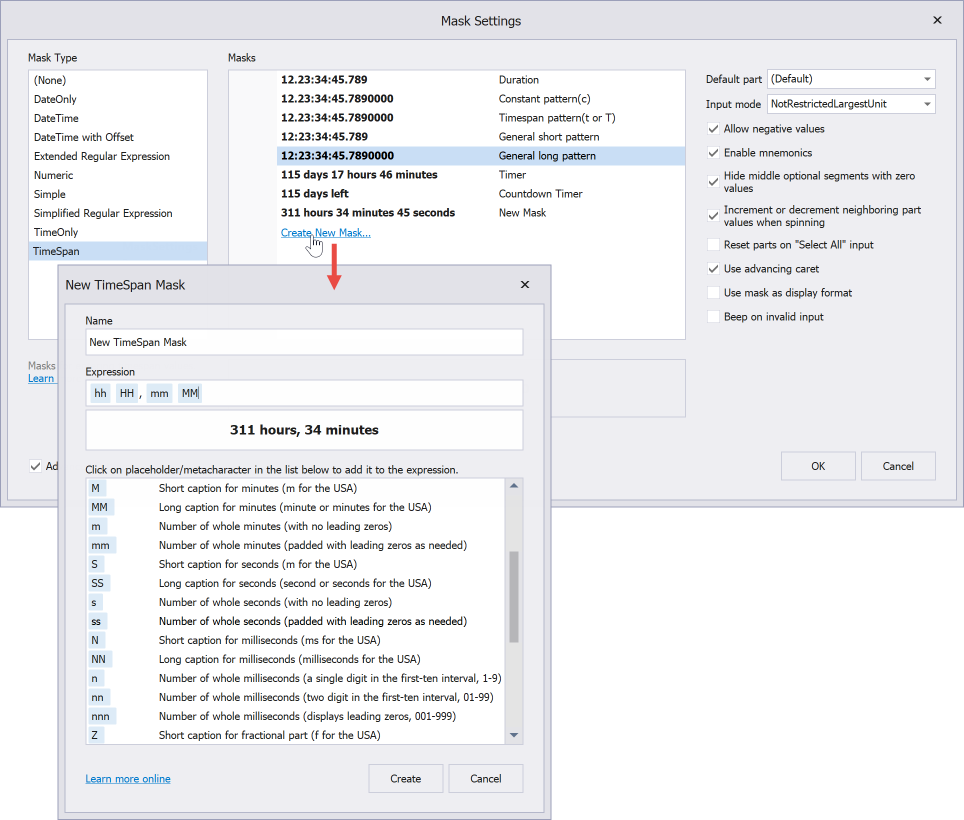
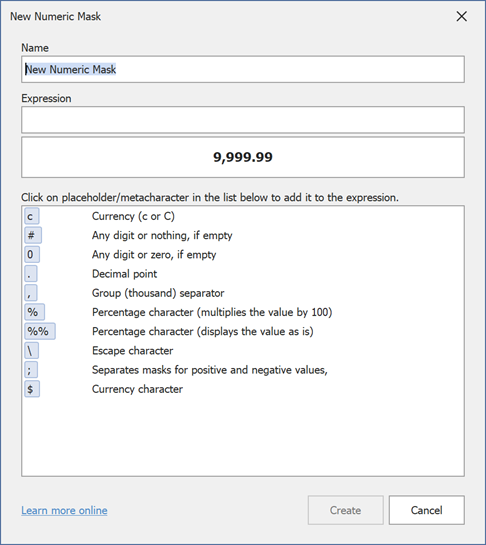
If there is no ready-to-use expression that fits your needs, click “Create New Mask…” and combine metacharacters to create a custom expression.
In Code
To set up a mask expression and configure mask settings in code, use the MaskSettings.Configure method. This method requires that you specify one of the following types defined in the DevExpress.Data.Mask.Internal namespace:
- MaskSettings.Numeric
- MaskSettings.DateTime
- MaskSettings.DateTimeOffset
- MaskSettings.TimeSpan
- MaskSettings.Simple
- MaskSettings.Regular
- MaskSettings.RegExp
For example, the following code applies a numeric mask that allows users to enter decimal numbers in the “000.00” format, and specifies two additional settings: hides zeros that do not affect the value (“0.9” instead of “0.90”), and shows a decimal separator even when the fractional part is 0 (“110.” instead of “110”).
using DevExpress.XtraEditors.Mask;

// Fluent API
textEdit5.Properties.MaskSettings.Configure<MaskSettings.Numeric>(settings => {
    settings.MaskExpression = "##0.##";
    settings.AutoHideDecimalSeparator = false;
    settings.HideInsignificantZeros = true;
});

// Regular API
var settings = textEdit5.Properties.MaskSettings.Configure<MaskSettings.Numeric>();
settings.MaskExpression = "##0.##";
settings.AutoHideDecimalSeparator = false;
settings.HideInsignificantZeros = true;
At the Data Source Layer
If your editor is bound to a field of a code-first data source, you can decorate this field with an “…EditMask” attribute. An editor bound to this field applies a mask of the required type, and sets up additional options you specified as attribute parameters.
For example, the following code applies two masks:
- A RegEx type mask that accepts any number of literals and automatically capitalizes the first character. The
AllowBlankInputparameter set to true allows users to leave this editor empty, andShowPlaceholdersset to false hides placeholders. - A DateTime type mask that displays dates in the short “MM/DD/YYYY” format.
public class Employee {
    [RegExEditMask("[A-Z][a-z]+", AllowBlankInput = true, ShowPlaceholders = false)]
    public string FirstName { get; set; }
    [EditMask("d")]
    public DateTime HiredAt { get; set; }
}
The list below enumerates available data attributes. All attributes are declared in the System.ComponentModel.DataAnnotations namespace and stored in the DevExpress.Data assembly.
NumericEditMaskDateTimeEditMaskDateTimeOffsetEditMaskTimeSpanEditMaskSimpleEditMaskRegularEditMaskRegExEditMask
The EditMask attribute can be used instead of any of these attributes. It exposes only basic mask settings, and applies a mask type that fits the type of the property. For example, in the code sample above, the attribute applies the DateTime mask because the “HiredAt” property is of the DateTime type.
Editor Properties
In addition to advanced mask settings, editors have their own settings that can also affect mask behavior.
BeepOnError — Allows masked editors to play a system error sound when a user enters an invalid character (for example, a literal in an editor with a phone number mask).
MaxLength — Specifies the maximum number of characters a user can enter.
CharacterCasing — Allows you to forcibly switch all literals entered into an editor to either upper or lower case.
UseMaskAsDisplayFormat — When this setting is on, an inactive editor displays its value in the same format as it does when focused.
Allow Users to Specify Masks
If you wish to allow users to manually choose the mask type and format, call the EditMaskSettings method. It shows the same “Mask Settings” dialog invoked in the Visual Studio designer. The Boolean value returned by this method specifies whether a user has changed mask settings or closed the dialog without making any changes.
The optional method parameter allows you to set the value used to preview custom masks in the “Create New Mask…” dialog.
Import and Export Mask Settings
Use the MaskSettings.Save and MaskSettings.Restore methods to import and export mask settings. The following code illustrates how to copy mask settings from textEdit1 to multiple editors.
// Save and restore from a local variable
var state = textEdit1.Properties.MaskSettings.Save();
textEdit2.Properties.MaskSettings.Restore(state);
textEdit3.Properties.MaskSettings.Restore(state);
textEdit4.Properties.MaskSettings.Restore(state);
// Save and restore from a stream
textEdit1.Properties.MaskSettings.Save(myStream);
textEdit2.Properties.MaskSettings.Restore(myStream);
textEdit3.Properties.MaskSettings.Restore(myStream);
textEdit4.Properties.MaskSettings.Restore(myStream);
Custom masks created in the “Mask Settings” dialog are saved to the following file: C:\Users\Public\Documents\DevExpress\Masks\user.masksettings. You can share this file with other developers so that they can reuse your saved masks.
Tip
“Use Mask as Display Format” and “Beep on Invalid Input” options are editor settings rather than mask settings. The values of these settings cannot be saved or restored.