Master-Detail Relationships
- 12 minutes to read
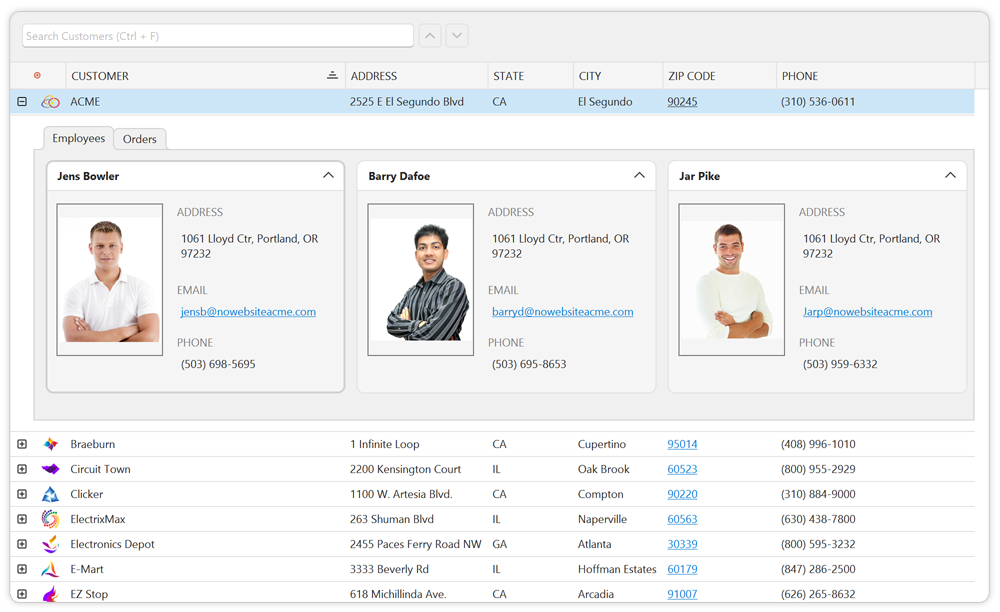
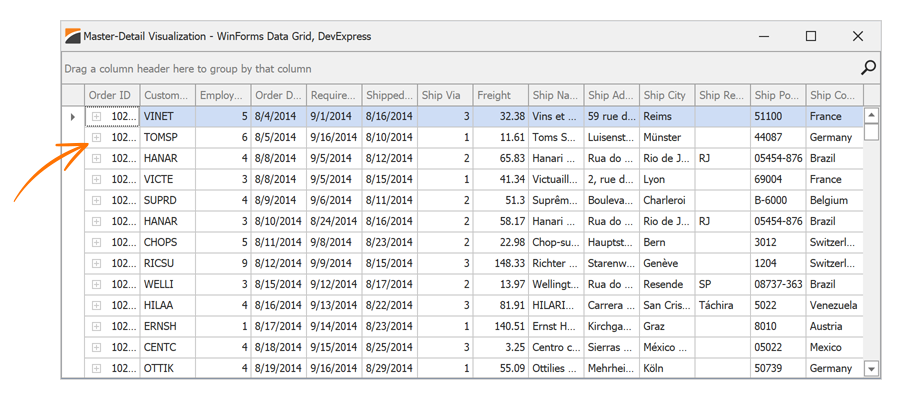
The DevExpress WinForms Data Grid control supports master-detail data presentation – with any number of nesting levels and any number of details at each level. Detail views can display any type of information.
Get Started: Create a Data Grid with Master and Detail Views
Drop the Data Grid control onto a form. Use the Data Grid’s smart tag menu to run the DevExpress Data Source Configuration Wizard.
Important
The DevExpress Data Source Wizard calls the standard Visual Studio Data Source Configuration Wizard that is not available in .NET projects. You should create datasets, binding sources, and table adapters manually (or you can generate them in a .NET Framework project and add to the .NET project).

- Select ADO .NET Typed DataSet and click the New Data Source… button.
- Select Database.
- Select the Dataset model.
- Connect to the nwind.mdb database. This database ships as part of DevExpress WinForms Demos and is located at C:\Users\Public\Documents\DevExpress Demos 2x.x\Components\Data.
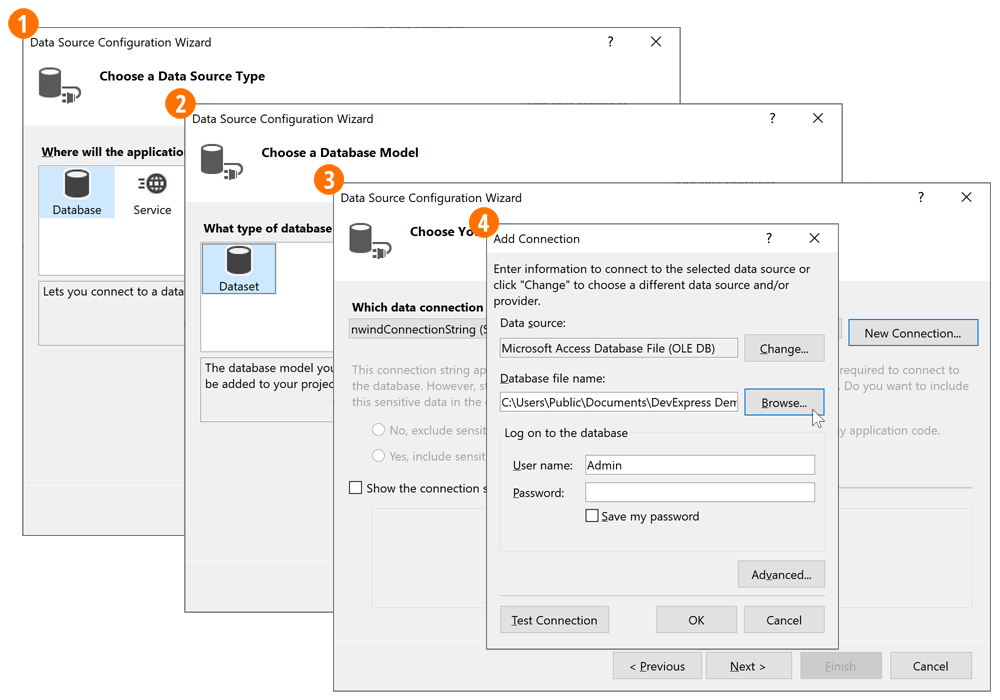
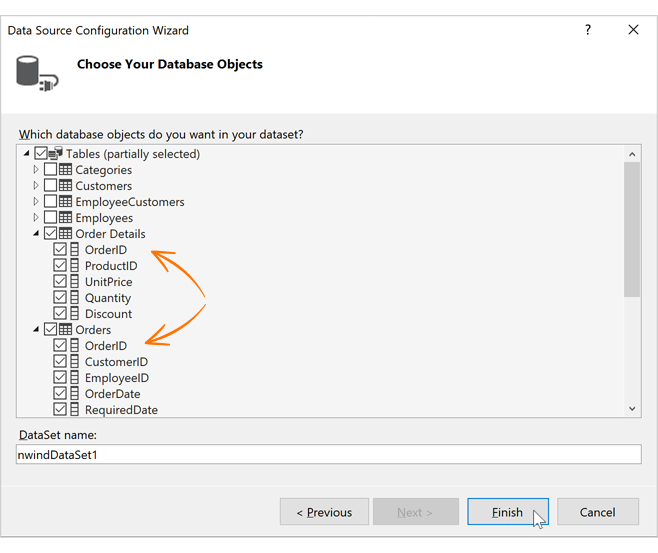
Click Next to proceed. Select the Orders and Order Details tables. These tables are associated with the “OrderID” key (case sensitive).
Note
You may need to register the Microsoft.ACE.OLEDB.12.0 provider on the local machine.
Bind the Data Grid to a master data table.
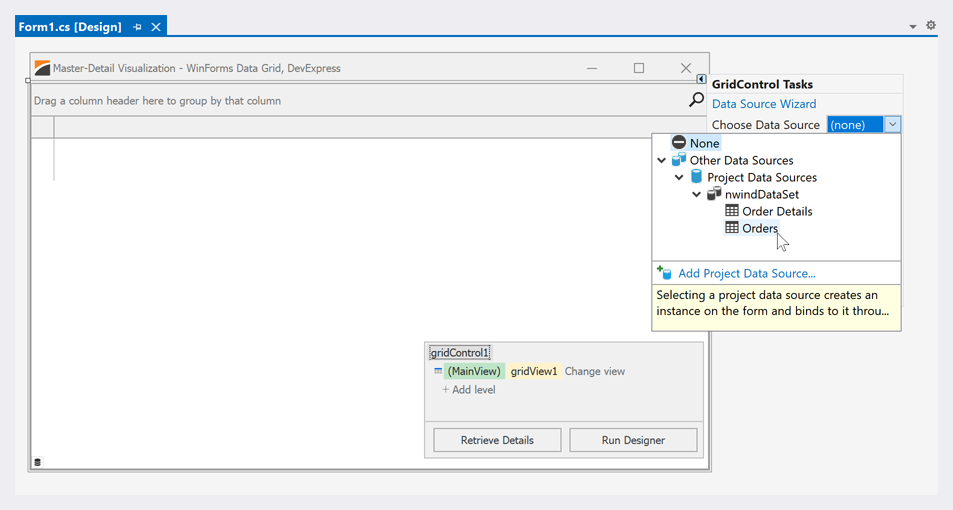
Run the application. The expand/collapse buttons are disabled because the detail data is not loaded.
Tip
Use the OptionsDetail.SmartDetailExpandButtonMode property to specify the display of expand/collapse buttons.
Drag the TableAdapter component associated with the detail data table from the Visual Studio toolbox to the design surface.
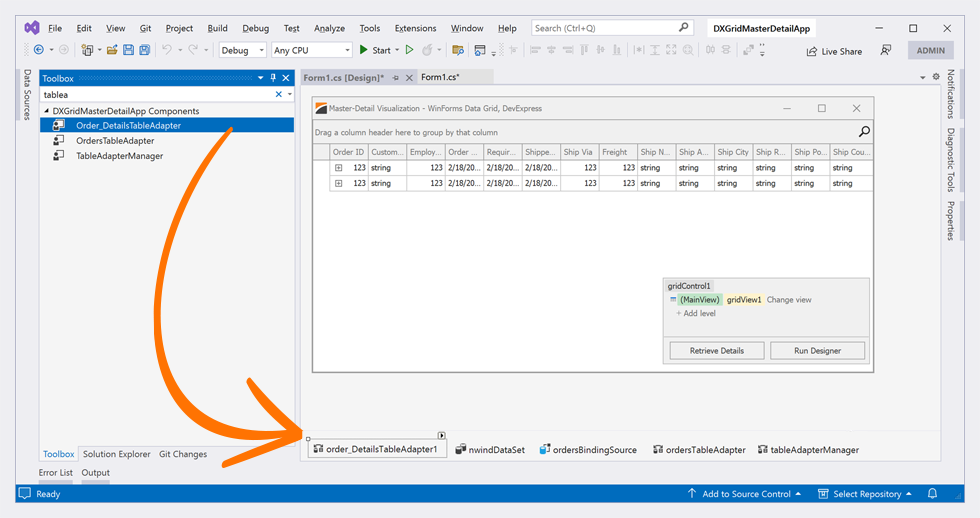
Load detail data in code:
private void Form1_Load(object sender, EventArgs e) {
    // This line is auto-generated by the Data Source Configuration Wizard.
    this.ordersTableAdapter.Fill(this.nwindDataSet.Orders);
    // Loads detail data.
    this.order_DetailsTableAdapter1.Fill(this.nwindDataSet.Order_Details);
}
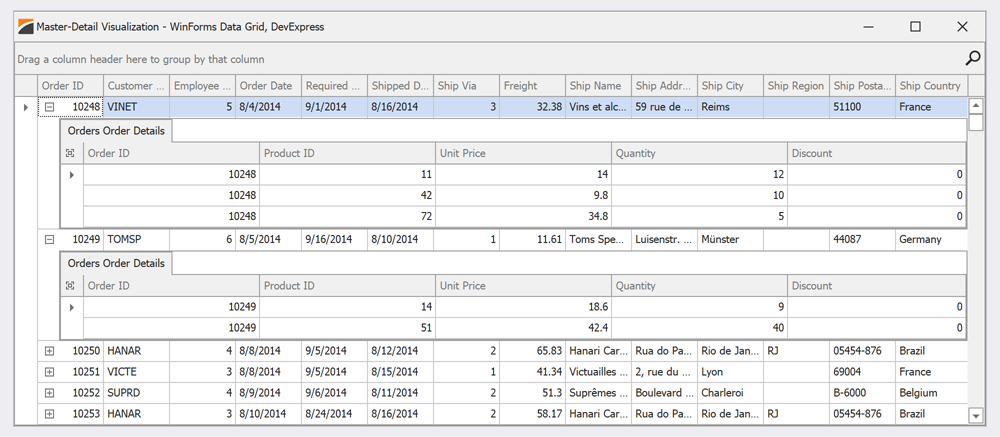
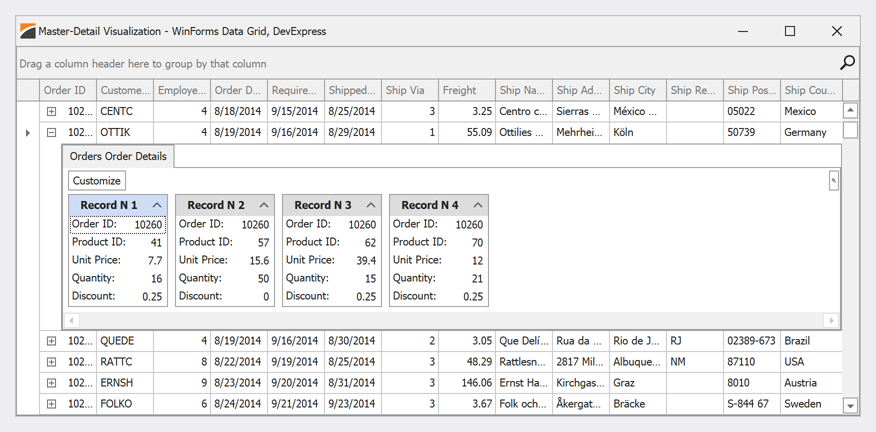
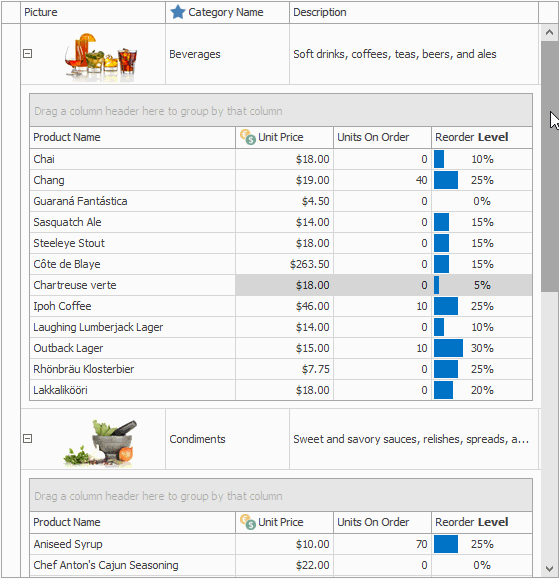
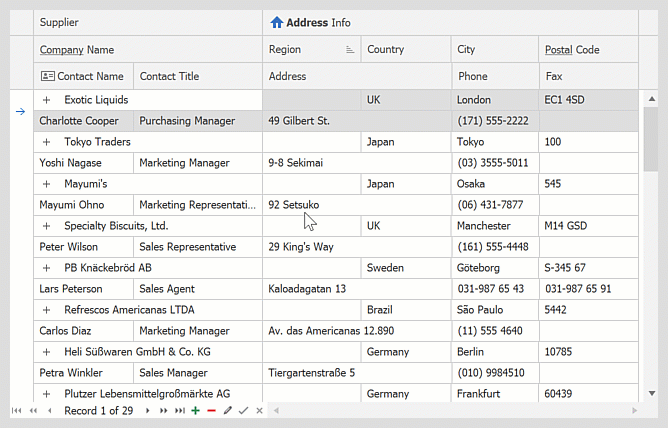
Run the application to see the result. The Data Grid displays both master and detail tables.
Read the following topic for information and examples on how to set up master-detail relations in code: How to Work with Master-Detail Relations in Code.
Customize Detail Levels
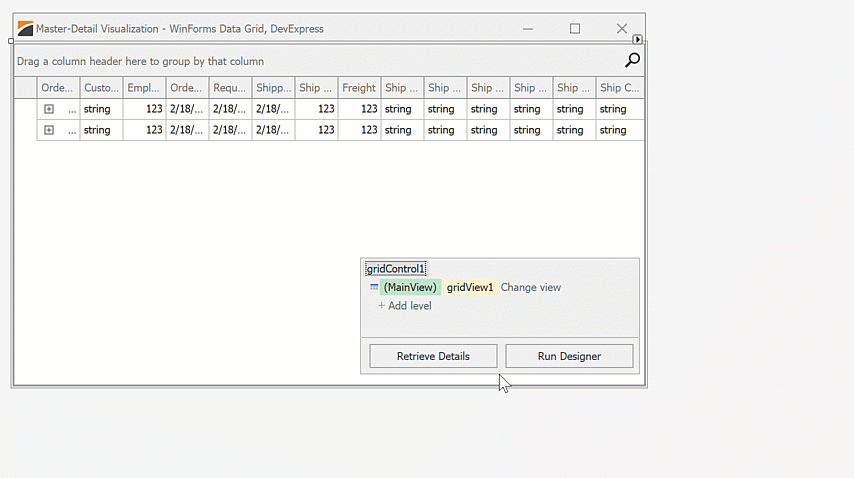
Click the Retrieve Details button in the Grid’s Level Designer to automatically retrieve detail levels from a data source.
Do the following to create and customize a detail level manually:
- Click the Add level command to create a detail level.
- Create a Detail View.
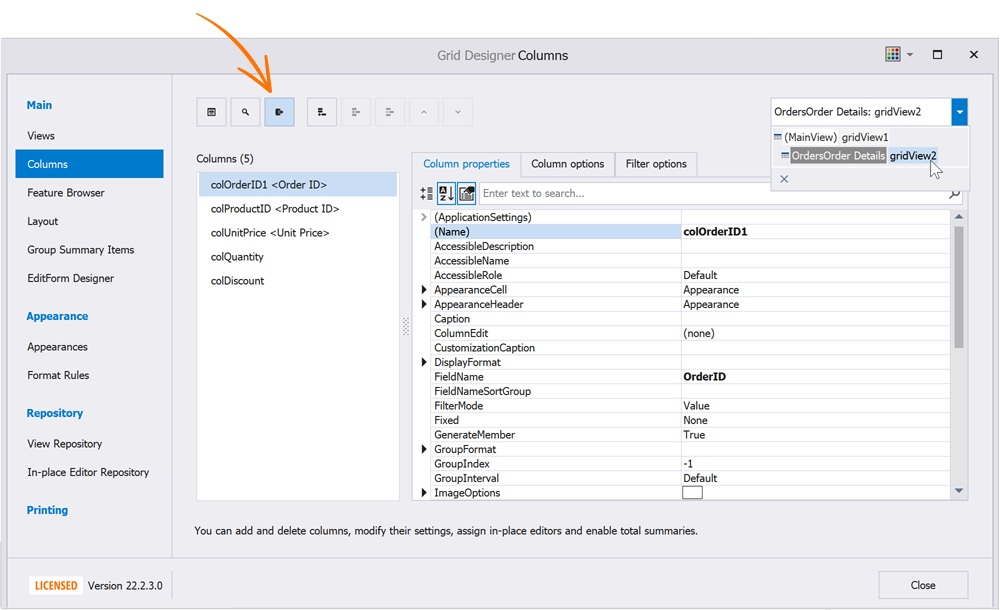
- Specify the level name. The level name is set to OrdersOrder Details in the screenshot below.
Important
The level name must exactly match the name of the master-detail relation.

The following screenshot illustrates the result:
Important
The level name (GridLevelNode.RelationName) must exactly match the name and case of the master-detail relation with which the view is associated. If a detail view displays data from a collection property, the level name must match the collection name.
Customize Columns in Detail Views (Design-Time)
- Run the Grid Designer.
- Switch to the Columns Page.
- Select a detail view.
- Click the Retrieve Fields button to create columns for all fields in a detailed data source (data table) or use the Add Column button to create a column and customize its settings manually.
Show Predefined Detail Views
The Data Grid displays the detail views (relationships) that exist in its GridControl.LevelTree. Disable the grid’s ShowOnlyPredefinedDetails option to display all relations in a data source.
Note
The Data Grid retrieves the detail Views by level names that must match real master-detail relation names (or collection property names, if your pattern Views display collection property data). When you click the “Retrieve Details” button at design time, the level names for all relationships found in a data source are set automatically.
For other cases, specify the valid name through the GridControl.LevelTree collection. Levels with invalid names use master View copies instead of custom Views.
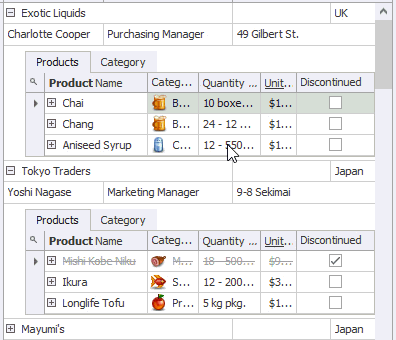
Pattern and Clone Detail Views
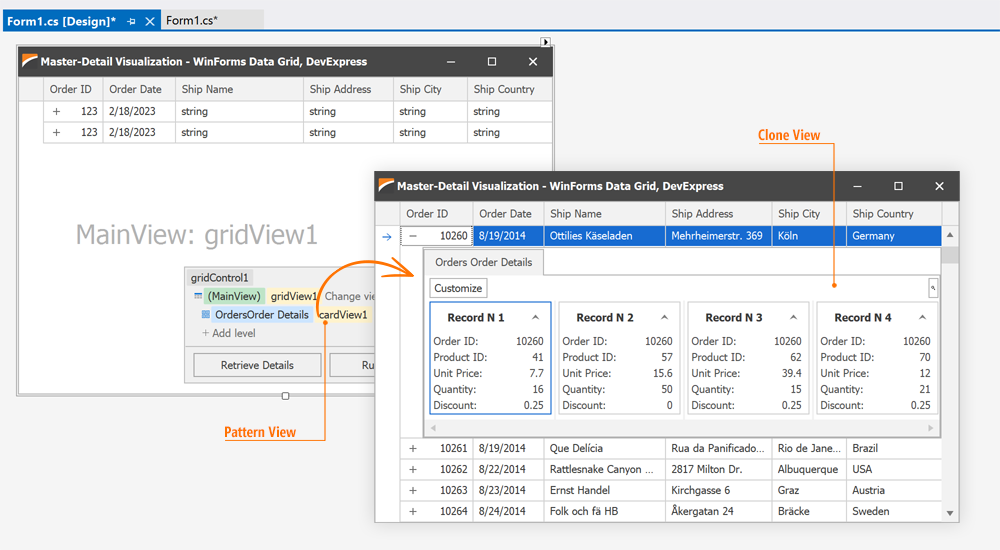
Views that you assign to detail levels are Pattern Views. The Data Grid dynamically creates a Clone View based on the settings of its pattern view when a user expands a master row (a clone view is a copy of a pattern view).
The following screenshot displays the “Orders - Order Details” relationship. The “cardView1” is a pattern view. The Data Grid uses its settings to create a clone view at runtime when a user expands a master row. The Data Grid destroys the clone view when the user collapses the master row.
Important
Pattern views do not contain any real data. Do not use APIs of pattern views to access columns and rows, get cell values, calculate summaries, etc. Use APIs of clone views to access detail data at runtime.
Use the following methods to obtain views:
- GridControl.MainView — returns the top-level view.
- GridControl.FocusedView — returns the focused view.
- GridControl.DefaultView — returns the currently maximized view.
- GridView.GetDetailView — returns a detail clone view of the specified master row.
- The
senderparameter of Grid Control events.
Read the following topic for detailed information and examples: How to Access Detail Views in Code.
Cheat Sheets and Best Practices
Read the following quick-reference guide for general information and examples:
Master-Detail Mode - DevExpress WinForms Cheat Sheet
Detail View Height & Indents
Use the BaseView.DetailHeight property to set the height of a detail View. For Layout Detail Views, this property specifies the maximum allowed height. A Layout View automatically resizes its height to fit the cards.
The following settings allow you to customize the display of detail views.
- ShowEmbeddedDetailIndent - shows/hides vertical indents between master and detail views.
- LevelIndent - specifies the horizontal indent between master and detail views, in pixels.
Rename Detail Tabs
Important
The level name must exactly match the name of the master-detail relation with which the view is associated. If a pattern View displays data from a collection property, the level name must match the collection name.
The caption of a detail tab that displays a clone view matches the corresponding level name. If the level name is specified in CamelCase and has no spaces between the words (for example, “ForeignVendorList”), the Data Grid splits the tab caption into separate words (“Foreign Vendor List”).
Use the pattern view’s ViewCaption property to rename detail tabs of its clone views.
You can also handle the pattern view’s GridView.MasterRowGetRelationDisplayCaption event to rename tabs of certain clone views based on a condition. Only a GridView and its descendant views (BandedGridView, AdvBandedGridView) can be master views.
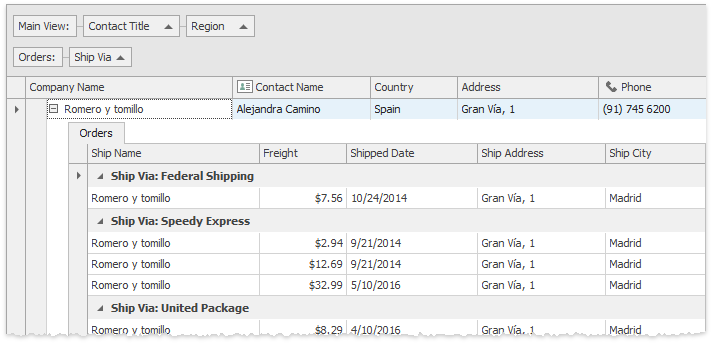
The code below handles the MasterRowGetRelationDisplayCaption event to specify custom tab captions.
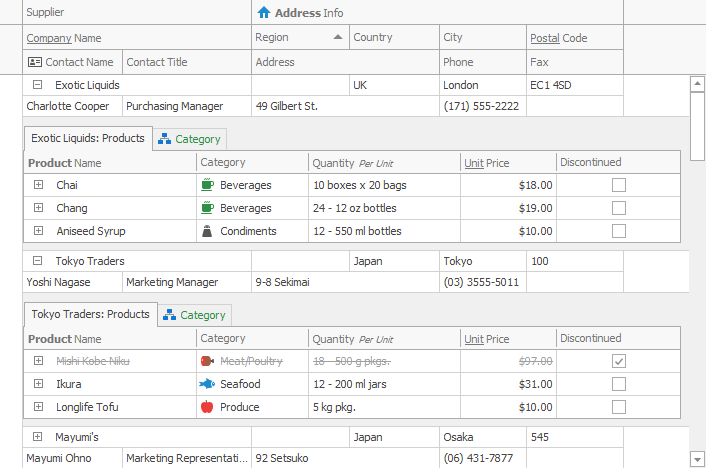
In the image below, tab captions contain the master row’s Company Name column values.
using DevExpress.XtraGrid.Views.BandedGrid;

private void advBandedGridView1_MasterRowGetRelationDisplayCaption(object sender, MasterRowGetRelationNameEventArgs e) {
    AdvBandedGridView view = sender as AdvBandedGridView;
    string companyName = (string)view.GetRowCellValue(e.RowHandle, colCompanyName);
    if(e.RelationIndex == 1)
        e.RelationName = $"{companyName}: Products";
}
HTML-Formatted Detail Tab Captions
You can enable the master view’s AllowHtmlDrawDetailTabs option to parse HTML-inspired tags in detail tab captions.
Custom Images and Appearance Settings for Certain Detail Tabs
The DetailTabStyle event fires for each detail view. This event allows you to assign a custom image to the processed tab and apply custom appearance settings to the tab caption.
Use the Caption event argument to obtain or change the processed tab caption. The following arguments allow you to specify the tab style:
- Appearance — provides access to background and foreground colors, font style, and so forth.
- ImageOptions — provides access to a raster or vector image assigned to the tab.
You can also use the IsSelected argument to apply a specific style depending on whether the tab is selected.
The RefreshDetailTab(Int32) method allows you to update a detail tab at runtime.
Scroll Modes
Each view can display a scrollbar (in Classic mode). Use the DetailMode property to switch to Embedded mode. In this mode, the Data Grid displays a single scroll bar for the master and clone views.
Detail Tooltips
The expand buttons displayed in master rows can display tooltips that contain links. Users can click these links to expand certain clone views. This can be useful when detail tabs are hidden. Use the GridOptionsDetail.ShowDetailTabs option to show/hide detail tabs.
Use the GridOptionsDetail.EnableDetailToolTip property to enable/disable detail tooltips.
Detail Expand Buttons
Use the following settings to configure the display and behavior of detail expand buttons:
- OptionsView.ShowDetailButtons
- OptionsDetail.SmartDetailExpandButtonMode
- OptionsDetail.SmartDetailExpand
- OptionsDetail.AllowExpandEmptyDetails
- GridView.RefreshDetailExpandButton
How to: Hide Expand Buttons for Master Rows with Empty Details
Expand / Collapse Master Rows
Use the parent view’s GridView.ExpandMasterRow and GridView.CollapseMasterRow methods to expand/collapse the specified master row. The CollapseAllDetails() method collapses all master rows in a view. You can also use the SetMasterRowExpanded method to expand/collapse a master row.
Handle the MasterRowExpanding and MasterRowCollapsing events to prevent the user from expanding/collapsing specific master rows.
Read the following topic for additional information: Working with Master-Detail Relationships in Code.
Synchronize Clone Views
Enable the pattern view’s SynchronizeClones option to synchronize its clone views. When a user groups data, resizes a column, or performs any other operation that changes a clone view, the Data Grid applies the same changes to all clone views of the corresponding pattern view.
Master-Detail Grouping – Joint Group Panel
Enable the GridOptionsView.ShowChildrenInGroupPanel option to use a joint group panel for master and detail views.
Master-detail grouping requires that Clone View Synchronization is enabled. Use the master view’s ChildGridLevelName property to specify the name of the detail level.
Zoom Detail Views
If the root master view’s AllowZoomDetail option is enabled, its detail views display the Zoom button. Users can click this button to maximize detail views.
Use the ZoomView() and NormalView() methods to zoom into or out of detail views.
Use the Data Grid’s DefaultView property to get the currently maximized detail view. The Data Grid raises the DefaultViewChanged event when a user zooms into or out of a detail view.
Example: How to Zoom Detail Views
The following example maximizes the first detail view for the focused master row, processes it, and zooms out of the detail view.
using DevExpress.XtraGrid.Views.Grid;
using DevExpress.XtraGrid.Views.Base;

// ...
GridView View = gridControl1.FocusedView as GridView;
if(View.IsMasterRow(View.FocusedRowHandle)) {
    int detailIndex = 0;
    View.SetMasterRowExpandedEx(View.FocusedRowHandle, detailIndex, true);
    ColumnView childView = (ColumnView)View.GetDetailView(View.FocusedRowHandle, detailIndex);
    if(childView != null) {
        // Zooms into the detail view.
        childView.ZoomView();
        // Do something.
        // ...
        // Zooms out of the detail view.
        childView.NormalView();
    }
}
Example: How to Zoom Detail Views Using Keyboard
The following example demonstrates how to zoom into and out of detail views with the CTRL+Left Arrow and CTRL+Right Arrow shortcuts:
private void gridControl1_ProcessGridKey(object sender, System.Windows.Forms.KeyEventArgs e) {
    if(e.Control) {
        if(e.KeyCode == Keys.Right) {
            gridControl1.FocusedView.ZoomView();
            e.Handled = true;
        }
        else if(e.KeyCode == Keys.Left) {
            gridControl1.DefaultView.NormalView();
            e.Handled = true;
        }
    }
}
Print Details
Set the view’s OptionsPrint.PrintDetails property to true to print expanded details.
Enable the OptionsPrint.ExpandAllDetails option to print/export the Grid Control with all master rows expanded.
How to Display Master and Detail Tables in Separate Grid Controls
- How to Display Master-Detail Tables in Separate Grid Controls (GitHub)
- How to Use Two XtraGrid Controls to Display Collections of Persistent Objects (XPO) with a One-to-Many Association
Disable Master-Detail Mode
Set the master view’s EnableMasterViewMode property to false to disable the Master-Detail mode.
Create Master-Detail Dynamically (in Code)
Read the following topic for information and examples: Working with Master-Detail Relationships in Code.
Master-Detail Mode Limitations
- Master-Detail mode is disabled when pixel-based scrolling is enabled. Read the following topic for detailed information: AllowPixelScrolling.
- Master-Detail mode is not supported in large data sources.
- Master-Detail mode is not supported if the Split Presentation option is enabled.
- Only a
GridViewand its descendant views (BandedGridViewandAdvBandedGridView) can be master views.
Examples
- How to: Bind GridControl to a DataBase and Implement Master-Detail Mode at Runtime
- How to: Display Many-to-Many Entity Framework Object Relationship
- How to: Bind GridControl to Database and Implement Master-Detail Mode at Design Time
- How to: Expand and Maximize a Specific Detail
- How to: Hide Expand Buttons for Master Rows with Empty Details
- How to: Implement Card Dragging Between Details
- How to: Replace a View Used to Represent a Specific Master-Detail Relationship
Knowledge Base Articles
- How to: Prevent a User from Opening Certain Detail Levels
- How to: Reorder Detail Views (Tabs)
- How to: Edit Records in Detail View When a Value in Master Row was Changed
- How to: Auto-Expand All Sub-Detail Views when Expanding a Root Master Row
- How to: Insert a New Row into a Detail View and Populate Foreign Keys