Aligning Controls Within Layout Items
- 3 minutes to read
A control can be custom aligned within a layout item if its size is less than the size of the layout item’s client area. The following sections describe the approaches to custom align controls.
Horizontally Aligning the Controls that Support the Auto-Sizing Feature in the Layout Control
Specific controls provide properties that enable the auto-size feature for these controls when they are added to a LayoutControl. When this feature is enabled, the control’s width is changed to fit its contents. The properties are:
- the AutoSizeInLayoutControl property in the RadioGroup and CheckEdit controls.
- the AutoWidthInLayoutControl property in the SimpleButton control.
In auto-size mode, you can custom align the control horizontally within the layout item. This can be accomplished as follows:
- Set the control’s AutoSizeInLayoutControl/AutoWidthInLayoutControl property to true.
- Set the LayoutControlItem.SizeConstraintsType property to SizeConstraintsType.SupportHorzAlignment.
- Set the required alignment via the LayoutControlItem.ControlAlignment property.
Example
The following code shows how to enable the auto-size feature for a CheckEdit within a LayoutControl, and center the CheckEdit within the corresponding layout item.
The auto-size feature is enabled for the CheckEdit control using its BaseCheckEdit.AutoSizeInLayoutControl property. In this mode, the control’s size shrinks to fit its content. This allows the control to be custom aligned within the layout item, using the LayoutControlItem.SizeConstraintsType and LayoutControlItem.ControlAlignment properties.
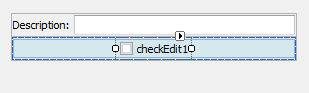
The image below shows the design-time result of the customization. The layout item in which the checkEdit1 control resides is highlighted in blue. The bounds of the checkEdit1 control are indicated by the rectangle at the center of the layout item:
using DevExpress.XtraLayout;

checkEdit1.AutoSizeInLayoutControl = true;
layoutControlItem2.SizeConstraintsType = SizeConstraintsType.SupportHorzAlignment;
layoutControlItem2.ControlAlignment = ContentAlignment.TopCenter;
Aligning Any Control
By default, a layout item’s control fills the layout item’s client area in its entirety. To custom align a control, you need to make the client area’s size larger than the control’s size. This is possible in custom size constraints mode.
To custom align a control within a layout item, do the following:
- Enable custom constraints mode, by setting the LayoutControlItem.SizeConstraintsType to SizeConstraintsType.Custom.
- Remove constraints on the client area’s size via the LayoutControlItem.ControlMaxSize property. To remove limits on the width/height, ensure that the Width/Height attribute is set to 0. Or, you can limit the maximum width/height of the client area by setting the corresponding attribute to a specific value.
- Set the LayoutControlItem.FillControlToClientArea property to false.
Limit the maximum width/height of the control via its Control.MaximumSize.Width/Height property, so that this width/height is less than the client area’s actual width/height.
Note that setting the Width or Height attribute to 0 removes limits on the control’s width/height. So, typically, you need to ensure that these attributes are set to positive values, not 0.
- Set the layout item’s LayoutControlItem.ControlAlignment property to the required alignment.
Example
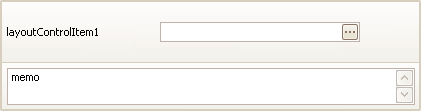
The following code shows how to align a ButtonEdit control horizontally and vertically within a layout item:
using DevExpress.XtraLayout;

// Center the control horizontally and vertically.
layoutControlItem1.SizeConstraintsType = SizeConstraintsType.Custom;
layoutControlItem1.ControlMaxSize = new Size(0, 100);
layoutControlItem1.ControlMinSize = new Size(100, 50);
layoutControlItem1.FillControlToClientArea = false;
layoutControlItem1.Control.MaximumSize = new Size(200, 20);
layoutControlItem1.ControlAlignment = ContentAlignment.MiddleCenter;