How to: Drag Appointments Data from the Grid onto a Scheduler
- 5 minutes to read
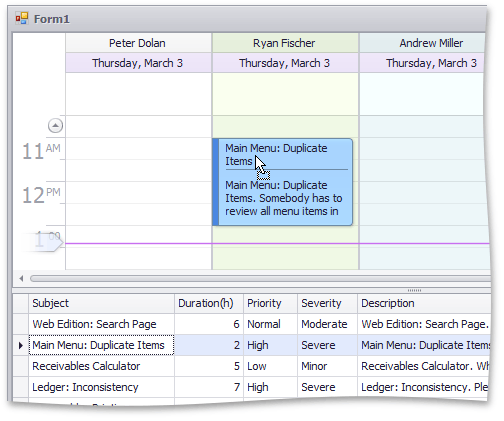
The following example demonstrates how to drag data for appointments from the GridControl and then drop it onto the SchedulerControl. This requires that all the appointment data is initially loaded into the Grid control. When an end-user drags this data and drops it onto a scheduler, a new appointment is created from that data.
To implement a solution for the drag-and-drop functionality, follow the steps below.
Handle the GridControl’s MouseDown Event
The end-user selects a row by clicking in the grid. To obtain the selected row, use the following code that handles the BaseView.MouseDown event. The GridHitInfo object is stored in a variable for subsequent use.
Note
A complete sample project is available at https://github.com/DevExpress-Examples/how-to-drag-appointments-from-gridview-and-drop-them-onto-the-scheduler-control-using-sche-t179722
GridHitInfo downHitInfo;

private void gridViewTasks_MouseDown(object sender, MouseEventArgs e)
{
    GridView view = sender as GridView;
    downHitInfo = null;

    GridHitInfo hitInfo = view.CalcHitInfo(new Point(e.X, e.Y));
    if (Control.ModifierKeys != Keys.None)
        return;
    if (e.Button == MouseButtons.Left && hitInfo.InRow && hitInfo.HitTest != GridHitTest.RowIndicator)
        downHitInfo = hitInfo;
}
Handle the GridControl’s MouseMove Event
The BaseView.MouseMove event is handled to start the drag-and-drop operation. The DoDragDrop method of the GridControl is called.
Note
A complete sample project is available at https://github.com/DevExpress-Examples/how-to-drag-appointments-from-gridview-and-drop-them-onto-the-scheduler-control-using-sche-t179722
private void gridViewTasks_MouseMove(object sender, MouseEventArgs e)
{
    GridView view = sender as GridView;
    if (e.Button == MouseButtons.Left && downHitInfo != null)
    {
        Size dragSize = SystemInformation.DragSize;
        Rectangle dragRect = new Rectangle(new Point(downHitInfo.HitPoint.X - dragSize.Width / 2,
            downHitInfo.HitPoint.Y - dragSize.Height / 2), dragSize);

        if (!dragRect.Contains(new Point(e.X, e.Y)))
        {
            view.GridControl.DoDragDrop(GetDragData(view), DragDropEffects.All);
            downHitInfo = null;
        }
    }
}
Implement the Drag-and-Drop Operation
The data to drag is the SchedulerDragData instance that is created in the custom GetDragData method, which is implemented as follows:
Note
A complete sample project is available at https://github.com/DevExpress-Examples/how-to-drag-appointments-from-gridview-and-drop-them-onto-the-scheduler-control-using-sche-t179722
SchedulerDragData GetDragData(GridView view)
{
    int[] selection = view.GetSelectedRows();
    if (selection == null)
        return null;

    AppointmentBaseCollection appointments = new AppointmentBaseCollection();
    int count = selection.Length;
    for (int i = 0; i < count; i++)
    {
        int rowIndex = selection[i];
        Appointment apt = schedulerStorage.CreateAppointment(AppointmentType.Normal);
        apt.Subject = (string)view.GetRowCellValue(rowIndex, "Subject");
        apt.LabelKey = (int)view.GetRowCellValue(rowIndex, "Severity");
        apt.StatusKey = (int)view.GetRowCellValue(rowIndex, "Priority");
        apt.Start = DateTime.Now;
        apt.Duration = TimeSpan.FromHours((int)view.GetRowCellValue(rowIndex, "Duration"));
        apt.Description = (string)view.GetRowCellValue(rowIndex, "Description");
        appointments.Add(apt);
    }

    return new SchedulerDragData(appointments, 0);
}
Thus, a new appointment is created immediately when the mouse is over the SchedulerControl.
Prompt for Confirmation
When the end-user releases a mouse button and drops the appointment, the SchedulerControl.AppointmentDrop event occurs. Handle this event to show the confirmation dialog, as in the code snippet below.
Note
A complete sample project is available at https://github.com/DevExpress-Examples/how-to-drag-appointments-from-gridview-and-drop-them-onto-the-scheduler-control-using-sche-t179722
private void schedulerControl_AppointmentDrop(object sender, AppointmentDragEventArgs e)
{
    string createEventMsg = "Creating an event at {0} on {1}.";
    string moveEventMsg = "Moving the event from {0} on {1} to {2} on {3}.";

    DateTime srcStart = e.SourceAppointment.Start;
    DateTime newStart = e.EditedAppointment.Start;

    string msg = (srcStart == DateTime.MinValue) ? String.Format(createEventMsg, newStart.ToShortTimeString(), newStart.ToShortDateString()) :
        String.Format(moveEventMsg, srcStart.ToShortTimeString(), srcStart.ToShortDateString(), newStart.ToShortTimeString(), newStart.ToShortDateString());

    if (XtraMessageBox.Show(msg + "\r\nProceed?", Application.ProductName, MessageBoxButtons.YesNo, MessageBoxIcon.Question) == DialogResult.No)
    {
        e.Allow = false;
    }
}
Result
The application is shown in the picture below.