Template Document
- 9 minutes to read
Creating a template is one of the steps required to perform a mail merge with SpreadsheetControl - merged documents are generated based on a template (IWorkbook.GenerateMailMergeDocuments) bound to a data source (IWorkbook.MailMergeDataSource and IWorkbook.MailMergeDataMember).
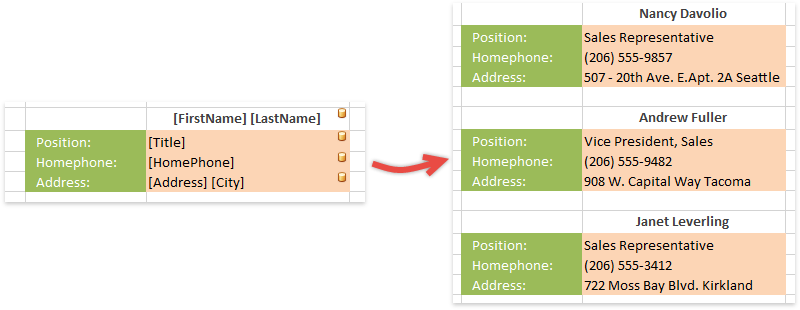
A mail merge template is a workbook with a single worksheet. It contains the information that will be the same in each merged document, as well as the placeholders (mail merge fields) that will be filled with unique data values retrieved from the bound data source in each merged document.
A template also holds special defined names indicating whether data records should be merged into a single worksheet, separate worksheets or separate documents (mail merge mode), and whether the resulting worksheet should have a vertical or horizontal orientation (the document orientation).
Note
Loading the mail merge templates with the ObjectDataSource data source may be unsafe if the data source is contained in a compiled assembly. Use the SpreadsheetControlOptions.DataSourceOptions property and a custom service that implements the IObjectDataSourceValidationService interface to validate an ObjectDataSource contained in the loaded document and prevent the data source from loading.
You can create a master-detail template to generate reports based on data from a hierarchical data source. See the How to: Create a Master-Detail Report example.
In a mail merge template, you can specify criteria for sorting, grouping and filtering the data to be merged (see the How to: Sort Data, How to: Group Data and How to: Filter Data examples).
This topic explains how to create a mail merge template and describes its elements.
- Create a Template
- Insert Fields
- Specify Template Ranges
- Select a Mail Merge Mode
- Set Document Orientation
Create a Template
The easiest way to create a mail merge template is to load the template document into the SpreadsheetControl and modify it using the SpreadsheetControl’s Mail Merge Ribbon UI.
Before you start modifying the template worksheet, switch on the Mail Merge Design View (click the Mail Merge Design View button on the Mail Merge Ribbon page). It is the SpreadsheetControl’s additional mode for displaying a worksheet intended specifically for preparing mail merge templates. In this view, worksheet cells containing mail merge fields are marked with specific icons, and template ranges are highlighted to show the template structure.
Insert Fields
A mail merge field is a placeholder in which a value from the specified data source field will appear in a merged document. When you perform a mail merge, a separate merged document (depending on the mail merge mode used, it can be a cell range, worksheet or workbook) is created for each record of the bound data source. Each merged document is a template copy where mail merge fields are replaced with unique information from a particular row of the data source.
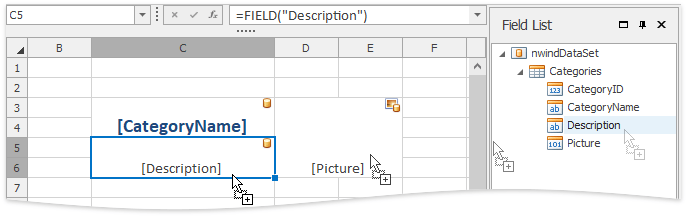
To insert fields into template cells, use the following special functions in cell formulas: FIELD and FIELDPICTURE. Specify the name of the data source field from which values should be inserted in place of a merge field as a function argument. For more information on these functions, see the Mail Merge Functions document.
Note
Since you need to know the column names of the data source to insert mail merge fields, you must first bind the template to the data source.
To insert fields into a template, you can manually add formulas with the mail merge functions to cells, or use the Field List panel. This panel displays the structure of the data source bound to the template and allows you to visually insert mail merge fields into template cells.
Drag-and-drop the required data field from the Field List panel onto a template cell.
- or -
In the template, select the cell in which you wish to insert a mail merge field, and double-click the required data field in the Field List panel.
Note that if you select a cell range in a template and double-click a field containing images in the Field List panel, a formula with the FIELDPICTURE function is inserted into the top left cell of the range, and function arguments are specified so that an image will be scaled to fit the selected range in a merged document while maintaining the aspect ratio.

By default (when the WorksheetView.ShowFormulas option is switched off), template cells containing mail merge fields display data field names enclosed in square brackets. In the Mail Merge Design View, if a mail merge field is used in a cell formula as one of its elements, the entire formula is displayed in the cell (even if the ShowFormulas option is set to false).

Note
When the Mail Merge Design View is activated in the SpreadsheetControl, formula validation does not work - invalid formulas are displayed in worksheet cells instead of being replaced with the corresponding error codes when the ShowFormulas option is disabled.
In the Mail Merge Design View, cells with mail merge fields are marked with database icons.
 - marks fields for data values of different types (numbers, text, date and time values, etc.)
 - marks fields for pictures.
Specify Template Ranges
Besides an ordinary mail merge template that is simply copied for each record of the bound data source, you can also create an advanced template by specifying Detail, Header and Footer ranges.
Detail
When you specify a detail range in a template, only this range (with header and footer ranges, if they are also specified) will be copied for each record of the bound data source and will appear in the resulting document. Mail merge fields are usually placed within the detail range.
You can add nested-level detail ranges within a detail range to create a template for generating a master-detail report based on data from a hierarchical data source. For details, see the How to: Create a Master-Detail Report topic.
Header and Footer
Header and footer ranges can be specified in addition to a detail range. These ranges are placed above and below (if the vertical document orientation is used) all detail range instances in the resulting document if all data records are merged into a single worksheet. In other mail merge modes, the header and footer accompany each detail range copy.
Header and footer ranges do not take effect if a detail range is not specified in the template.
The Mail Merge Ribbon page provides a set of buttons (Detail, Master-Detail, Reset, etc.) to mark up a template. The created template ranges are highlighted in the Mail Merge Design View. In this view, you can also visually move and resize template ranges by dragging them.
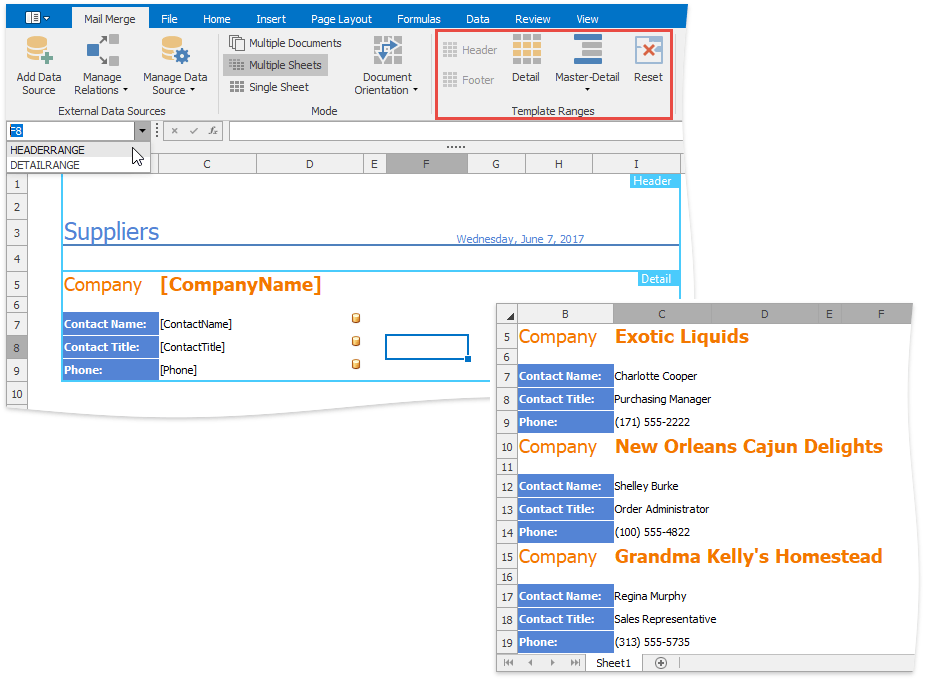
Since a template range is actually a cell range specified by the corresponding defined name (“DETAILRANGE”, “HEADERRANGE” and “FOOTERRANGE”), you can programmatically divide a template into ranges by naming cell ranges. For example, the following code creates the same detail and header ranges in the template as shown in the image above.
using DevExpress.Spreadsheet;
// ...

spreadsheetControl1.Document.LoadDocument("Documents\\MailMergeTemplate.xlsx");
IWorkbook workbook = spreadsheetControl1.Document;
Worksheet template = workbook.Worksheets[0];

// Set a detail range in the template.
Range detail = template.Range["A6:E10"];
detail.Name = "DETAILRANGE";

// Set a header range in the template.
Range header = template.Range["A1:E2"];
header.Name = "HEADERRANGE";
Defined names specifying template ranges are added to the Worksheet.DefinedNames collection of the template worksheet.
Mail Merge Mode
When creating a template, you can specify how the result of the mail merge should be generated by selecting one of the available modes.
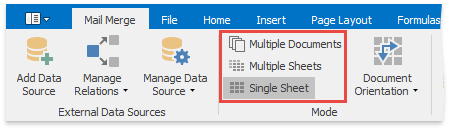
- Multiple Documents - The merged range for each record of the data source is inserted into a separate workbook.
- Multiple Sheets - The merged range for each record of the data source is inserted into a separate worksheet in a single workbook.
- Single Sheet - Merged ranges for all records of the data source are inserted one after the other (vertically or horizontally, depending on the document orientation) into a single worksheet. If a template is divided into ranges, the resulting worksheet will have the following structure: a header, a set of detail ranges repeated for all records of the data source, and a footer. This mode is used by default.
To select a mail merge mode, click the corresponding button on the Mail Merge tab, in the Mode group.
The selected mail merge mode is stored as a defined name in a mail merge template. By default, this defined name does not exist in the template workbook, and the “Single Sheet” mode is used. However, when you specify a mail merge mode explicitly via the SpreadsheetControl UI, the “MAILMERGEMODE” defined name for the “Documents”, “Worksheets” or “OneWorksheet” string constant is automatically added to the IWorkbook.DefinedNames collection of the template workbook. You can also specify a mail merge mode programmatically.
using DevExpress.Spreadsheet;
// ...

spreadsheetControl1.Document.LoadDocument("Documents\\MailMergeTemplate.xlsx");
IWorkbook templateWorkbook = spreadsheetControl1.Document;

// Select the "Multiple Documents" mail merge mode.
templateWorkbook.DefinedNames.Add("MAILMERGEMODE", "\"Documents\"");

// Switch the mail merge mode to "Multiple Sheets".
templateWorkbook.DefinedNames.GetDefinedName("MAILMERGEMODE").RefersTo = "\"Worksheets\"";

// Switch the mail merge mode to "Single Sheet".
templateWorkbook.DefinedNames.GetDefinedName("MAILMERGEMODE").RefersTo = "\"OneWorksheet\"";
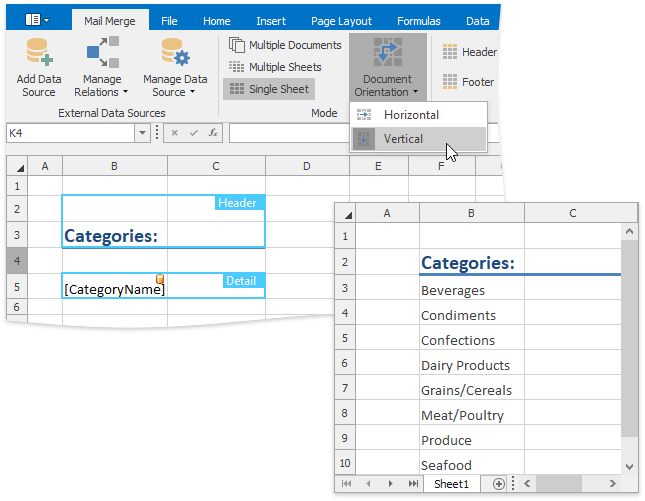
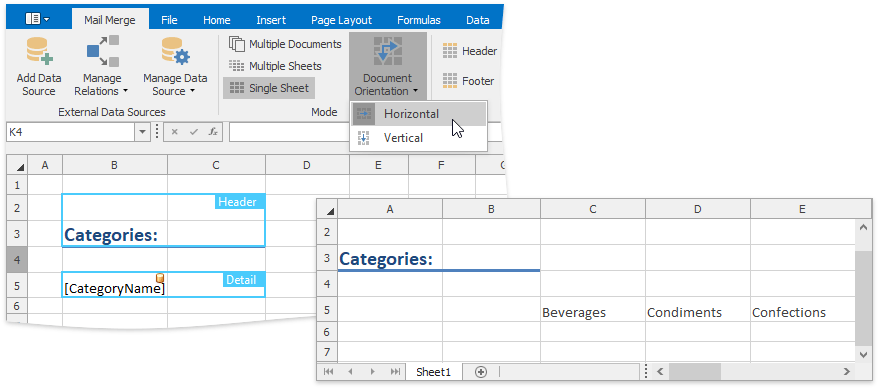
Document Orientation
Set the document orientation to specify how template ranges should be arranged in the resulting worksheet. Header, detail and footer ranges are located one after the other from top to bottom, or from left to right, depending on the document orientation selected.
In the “Single Sheet” mode, detail range copies created for each record of the data source are placed one under the other (in a vertical orientation), or one to the right of the other (in a horizontal orientation) between a header and a footer.
If a template’s detail range includes nested levels, DetailLevel range copies created for records of the corresponding data member are also inserted sequentially (vertically or horizontally) in the resulting worksheet. In a master-detail template, locate each nested-level detail range vertically or horizontally (relative to each other), depending on the document orientation selected.
| Vertical Document Orientation | Horizontal Document Orientation |
|---|---|
 |
 |
The document orientation is saved as a defined name in the IWorkbook.DefinedNames collection of the template workbook. By default, this defined name does not exist and the vertical document orientation is used. If you set the document orientation explicitly (for example, via the SpreadsheetControl UI), the following defined name is added automatically.
| Document Orientation | Name | RefersTo |
|---|---|---|
| Vertical | HORIZONTALMODE | FALSE |
| Horizontal | HORIZONTALMODE | TRUE |