How to: Create a Master-Detail Report
- 4 minutes to read
This tutorial illustrates how to use the SpreadsheetControl’s mail merge functionality to construct a master-detail spreadsheet report and bind it to a two-level Categories-Products hierarchical data source.
It is recommended that you review the How to: Perform a Mail Merge topic first. It will help you learn how to create a mail merge template and bind it to data.
To create the Categories-Products master-detail report, follow the steps below.
Add a Detail Data Table
- Open the application that was created in the How to: Perform a Mail Merge example of the current Mail Merge section. A mail merge template in this application is already bound to the Categories table of the Northwind database. To create a master-detail report, add the Products table to the nwindDataSet‘s schema. To do this, follow the steps below.
- Open the nwindDataSet.xsd designer and expand the Server Explorer pane, which shows all data connections that are currently available in Visual Studio. For this, in the View menu, choose the Server Explorer option or press Ctrl+Alt+S.
In the list of available Data Connections, locate the one that points to the nwind.mdb file, then select the Products data table and drop it onto the designer. This will add the Products table to nwindDataSet.
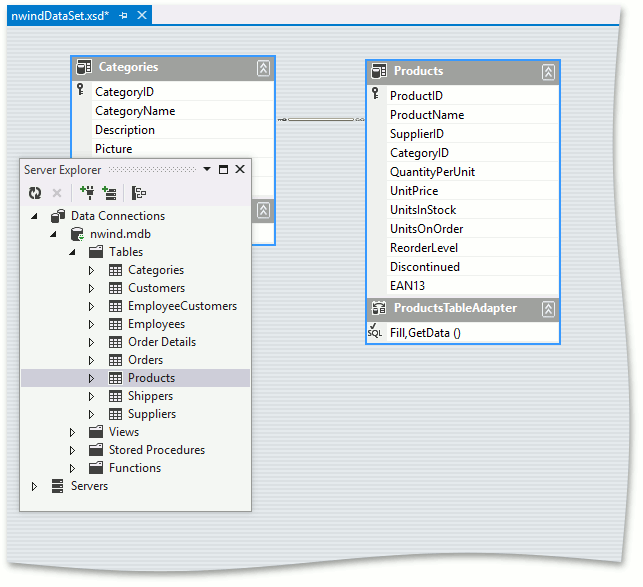
When the Products table is added to the dataset schema, the appropriate master-detail relationship between the Categories and Products tables is automatically created by Visual Studio. To apply these changes, click the Save icon on the toolbar.

Populate the ProductsDataTable table with data from the database using the Fill method of the ProductsTableAdapter object.
Prepare a Master-Detail Template
- Run the application. The mail merge template created in the How to: Perform a Mail Merge example will automatically be loaded into the SpreadsheetControl.
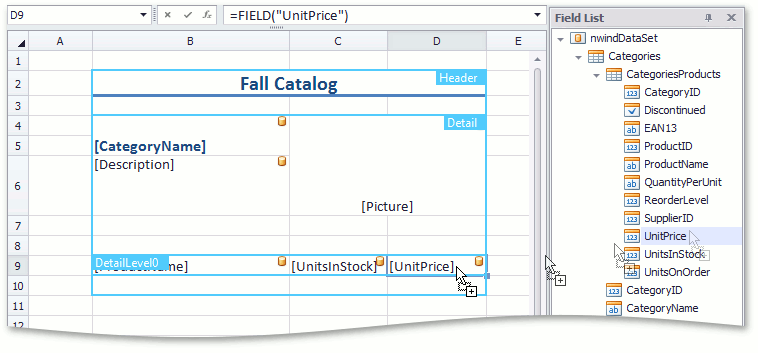
Activate the Mail Merge Design View. Extend the existing detail range (marked Detail in the template) three rows down by dragging its bottom right corner.
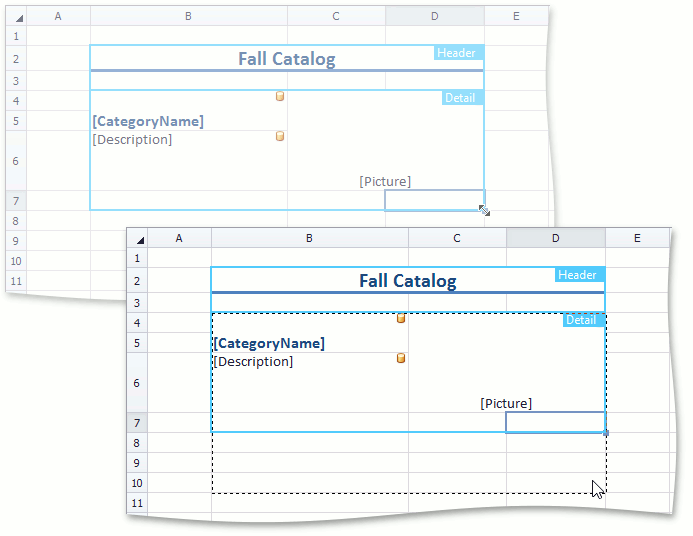
An existing detail range contains fields for the top-level data from the Categories parent table. Add a nested level to the detail range to display the detail-level data from the CategoriesProducts child table.
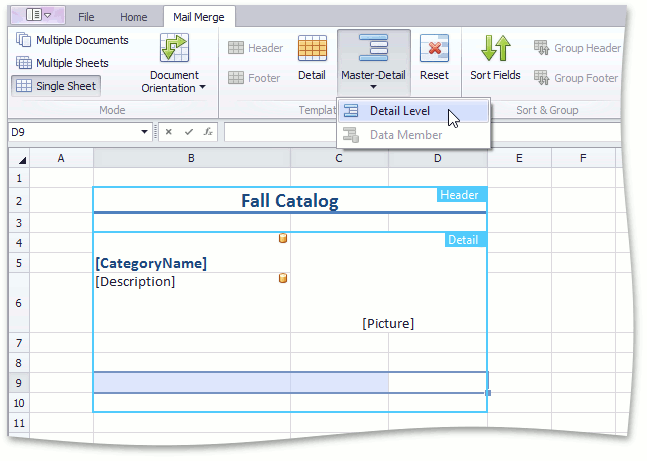
Select the second row from the bottom in the Detail range, click the Master-Detail button, and then click Detail Level in the invoked submenu. The DetailLevel0 range will be created.
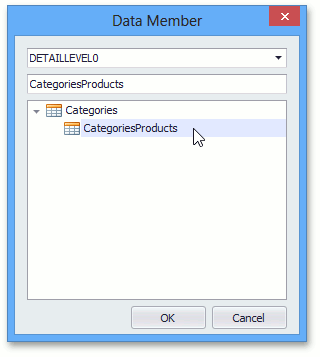
Set the CategoriesProducts table as the data member for this detail level. To do this, select any cell within the DetailLevel0 range, and click Data Member in the Master-Detail submenu. In the invoked dialog, select the CategoriesProducts table for DETAILLEVEL0.
Each DetailLevel range created in the mail merge template is stored as a “DETAILLEVEL(n)” defined name, where (n) is a zero-based nesting level. A data member assigned to a detail level is saved as a “DETAILDATAMEMBER(n)” defined name for a string constant specifying a data member name.
For example, after you have created a nested level within the detail range as described above, the following defined names are added to the Worksheet.DefinedNames collection of the “Sheet1” worksheet.
Name RefersTo DETAILLEVEL0 Sheet1!$B$9:$D$9 DETAILDATAMEMBER0 “CategoriesProducts” Add the ProductName, UnitsInStock and UnitPrice data fields from the CategoriesProducts table into the created detail level range cells.
Note
Note that these fields must be taken from the CategoriesProducts relation, and not from the Products table. Otherwise, the report will display only the first record of the Products table for each category, as many times as there are records in each category.
Enter column names in the last row of the detail range and format it as a header for detail-level data.
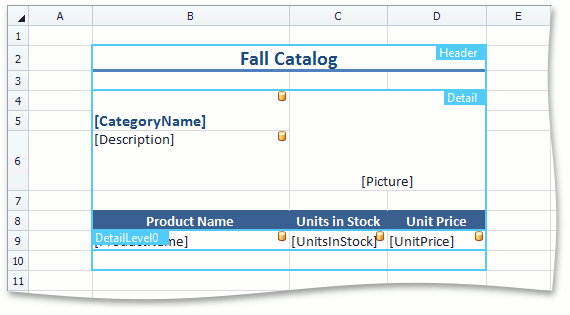
- Finally, select the bottommost row of the detail range and specify the top border for its cells, to visually separate each category in the resulting document.
The master-detail template is now ready. Save it to the MasterDetailTemplate.xlsx file in the Documents folder.
Add the following code to automatically load the created template to the SpreadsheetControl when invoking the application.
private void Form1_Load(object sender, System.EventArgs e) {
    spreadsheetControl1.LoadDocument("Documents\\MasterDetailTemplate.xlsx");
}
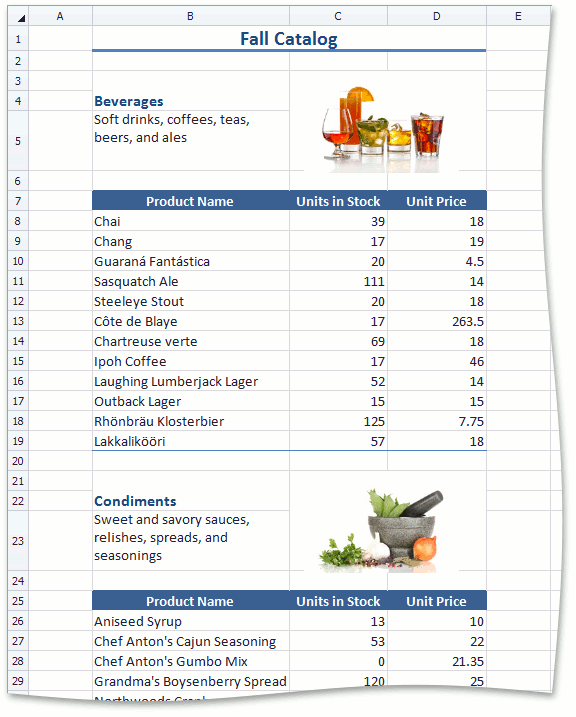
Get the Result
Run the application. Click the Mail Merge Preview button to display the merged document in a preview window, or click the Result button to automatically save the document to a file.
Tip
A complete sample project is available in the DevExpress Code Examples database at https://supportcenter.devexpress.com/ticket/details/t109795/spreadsheet-mail-merge-create-a-master-detail-report.