How To: Create a TileContainer
- 4 minutes to read
Prerequisites
- Create a Windows Forms Application.
- Windows UI applications are generally designed to run in full-screen mode. Modify the main form to meet these requirements. Set the FormBorderStyle property to None and the WindowState property to Maximized.
- Drop a DocumentManager component on the form.
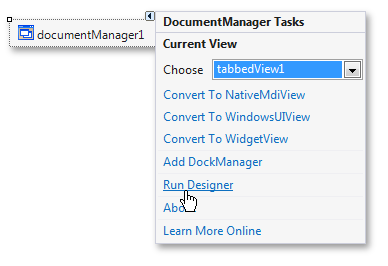
Change the DocumentManager‘s View to WindowsUI View. Click the DocumentManager‘s smart tag and select the Convert To WindowsUIView option.

Creating Tile Container
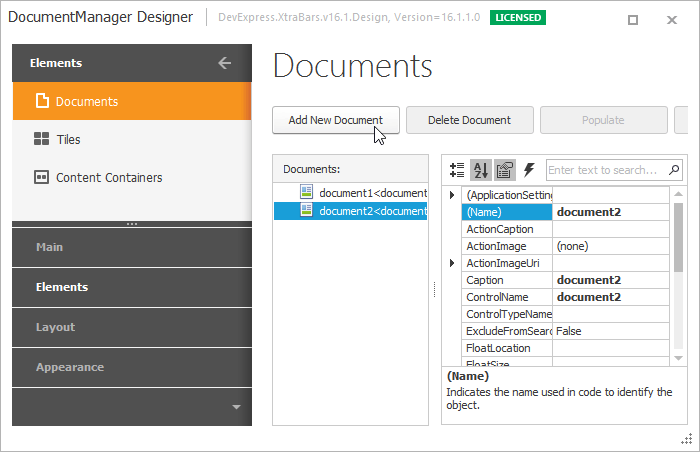
Run the Document Manager Designer.
Switch to the designer’s ‘Documents’ section and add 4 Documents by clicking the corresponding button.
This step can be skipped because TileContainers hold Tiles, not Documents. Documents are added just to help us see how they interact with Tiles.
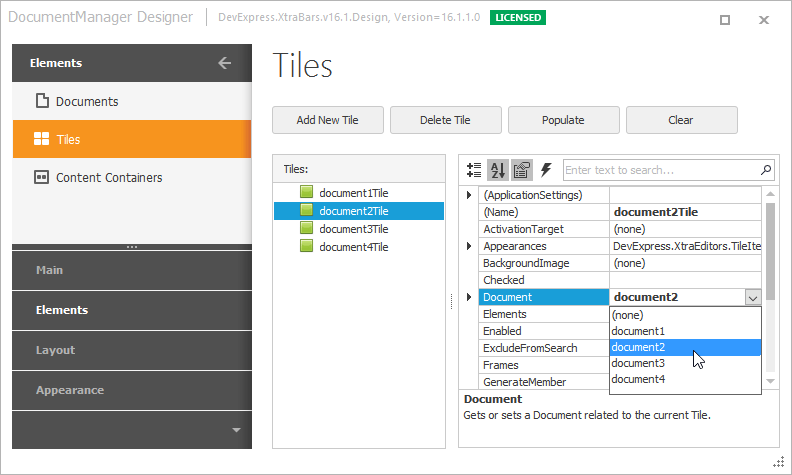
Go to the designer’s ‘Tiles’ page. As you can see, 4 tiles are automatically generated. If you skipped the previous step, create 4 Tiles manually by clicking the ‘Add New Tile’ button.
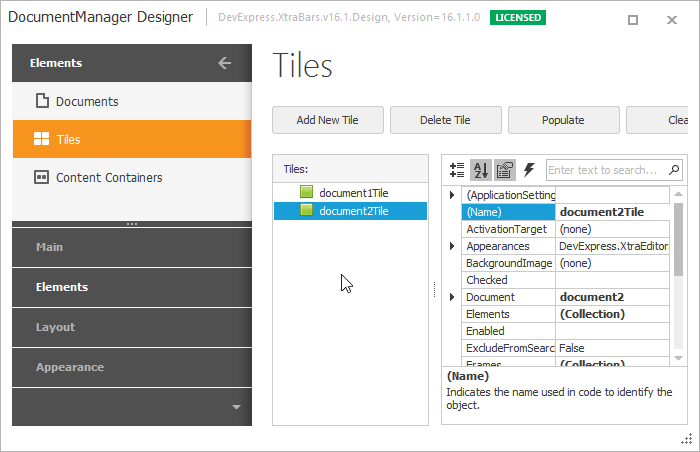
Each tile references the specific Document through the Tile.Document property. You can set this property in the designer’s ‘Tiles’ section in case you create tiles first, and then Documents (not needed for automatically generated tiles).
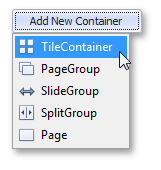
Switch to the designer’s ‘Content Containers’ page. If you have created Documents before, a TileContainer for generated Tiles is already added automatically. If not, create a TileContainer by clicking the ‘Add New Container’ button and selecting the ‘TileContainer’ option from the drop-down list.
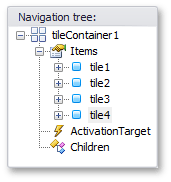
Go to the designer’s ‘Navigation Tree’ section. Here you can see the application’s hierarchy. The topmost container is our TileContainer. It does not yet contain any tiles within (its TileContainer.Items collection is empty). Add Tiles to the TileContainer by dragging them from the ‘Tiles’ panel into the ‘Items’ node. The resulting navigation tree will look like following.
Now, after the application’s hierarchy has been built, go back to the designer’s ‘Tiles’ section and customize your tiles. Set the ItemSize properties for first three tiles to Medium. Also, set their BaseTile.Group properties to Group 1. For the last tile, set its Group property to a different value, for example Group 2. Refer to the Tile Groups and Items article to learn more about tile groups.
The BaseTile.Elements and BaseTile.Frames collections are used to build Tiles’ content and animation respectively. Modifying these collections invokes a Collection Editor dialog where all the job can be done. Elements and frames collections are used in the same way as they are used in the TileControl component. Refer to the Tile Item Structure and Tile Animation topics to learn how to build tile content.
To learn more, see the following online videos:
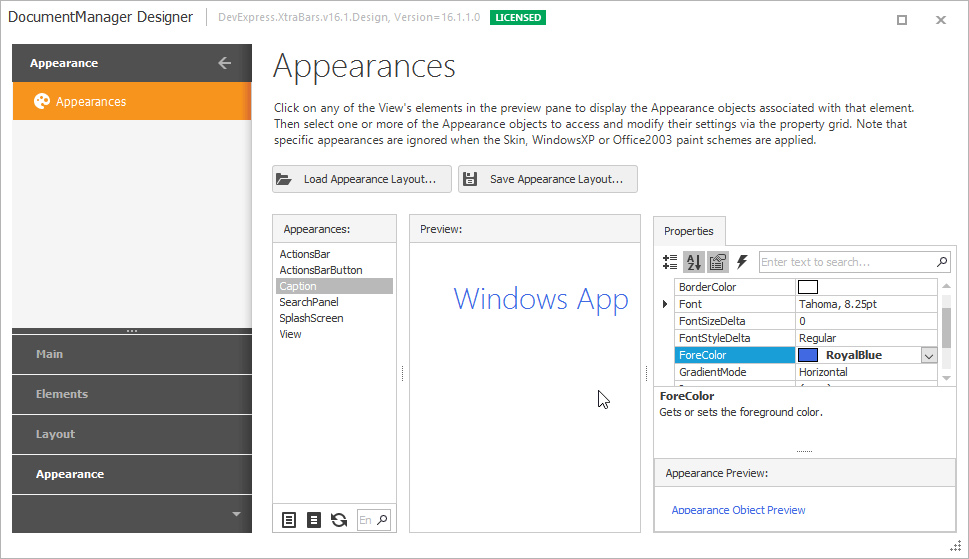
You can also set appearance options in the designer’s ‘Appearances’ page.
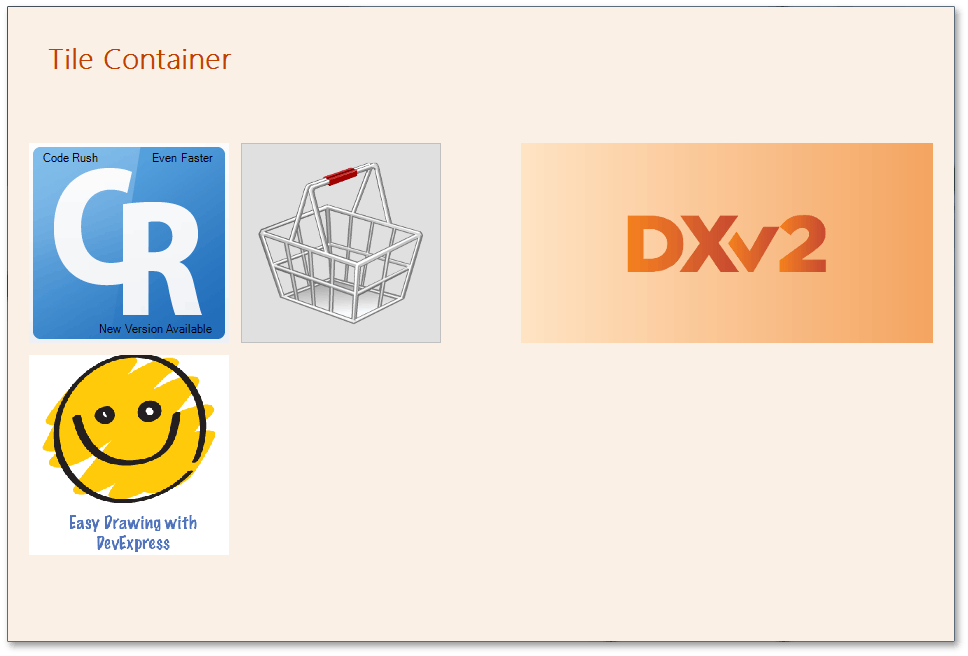
Run the application. The result with customized Tiles and appearance settings is demonstrated in the figure below.
Code
This section demonstrates how to create the example in code. Here, the WindowsUIView.QueryStartupContentContainer event is handled to set an application start-up container.
private void windowsUIView1_QueryStartupContentContainer(object sender, DevExpress.XtraBars.Docking2010.Views.WindowsUI.QueryContentContainerEventArgs e) {
    //Creating the Container
    DevExpress.XtraBars.Docking2010.Views.WindowsUI.TileContainer tileContainer1 = new DevExpress.XtraBars.Docking2010.Views.WindowsUI.TileContainer();
    tileContainer1.Properties.ItemSize = 200;
    tileContainer1.Caption = "Tile Container";
    //Creating Documents
    DevExpress.XtraBars.Docking2010.Views.WindowsUI.Document doc1 = new DevExpress.XtraBars.Docking2010.Views.WindowsUI.Document();
    DevExpress.XtraBars.Docking2010.Views.WindowsUI.Document doc2 = new DevExpress.XtraBars.Docking2010.Views.WindowsUI.Document();
    DevExpress.XtraBars.Docking2010.Views.WindowsUI.Document doc3 = new DevExpress.XtraBars.Docking2010.Views.WindowsUI.Document();
    DevExpress.XtraBars.Docking2010.Views.WindowsUI.Document doc4 = new DevExpress.XtraBars.Docking2010.Views.WindowsUI.Document();
    //Creating and Customizing Tiles
    DevExpress.XtraBars.Docking2010.Views.WindowsUI.Tile tile1 = new DevExpress.XtraBars.Docking2010.Views.WindowsUI.Tile();
    DevExpress.XtraBars.Docking2010.Views.WindowsUI.Tile tile2 = new DevExpress.XtraBars.Docking2010.Views.WindowsUI.Tile();
    DevExpress.XtraBars.Docking2010.Views.WindowsUI.Tile tile3 = new DevExpress.XtraBars.Docking2010.Views.WindowsUI.Tile();
    DevExpress.XtraBars.Docking2010.Views.WindowsUI.Tile tile4 = new DevExpress.XtraBars.Docking2010.Views.WindowsUI.Tile();
    tile1.Group = "Group 1";
    tile1.Properties.ItemSize = DevExpress.XtraEditors.TileItemSize.Medium;
    tile1.Document = doc1;
    tile2.Group = "Group 1";
    tile2.Properties.ItemSize = DevExpress.XtraEditors.TileItemSize.Medium;
    tile2.Document = doc2;
    tile3.Group = "Group 1";
    tile3.Properties.ItemSize = DevExpress.XtraEditors.TileItemSize.Medium;
    tile3.Document = doc3;
    tile4.Group = "Group 2";
    tile4.Document = doc4;
    tileContainer1.Items.AddRange(new DevExpress.XtraBars.Docking2010.Views.WindowsUI.BaseTile[] { tile1, tile2, tile3, tile4 });
    (sender as WindowsUIView).ContentContainers.Add(tileContainer1);
    //Setting a Start-Up Container
    e.ContentContainer = tileContainer1;
}