Binding to OData
- 6 minutes to read
OData V4 is an open protocol initiated by Microsoft. Its RESTful API allows you to publish, read and edit resources defined in a data model using simple HTTP messages. The protocol currently includes three major versions: 2.0, 3.0 and 4.0. This document spotlights versions 4.0 and 2.0 as the most widely used versions. For version 2.0, binding by using Windows Communication Foundation (WCF) services is used.
- Prerequisites
- Binding To OData V4 Services Using the Wizard
- Binding To OData V2 Services Using the Wizard (WCF)
- Binding To OData V4 Services In Code
- Binding To OData V2 Services In Code
Prerequisites
For both v4 and v2 OData sources, start with the following.
- Create a new WinForms application and add a Data Grid (or any other DevExpress data-aware control) onto the form.
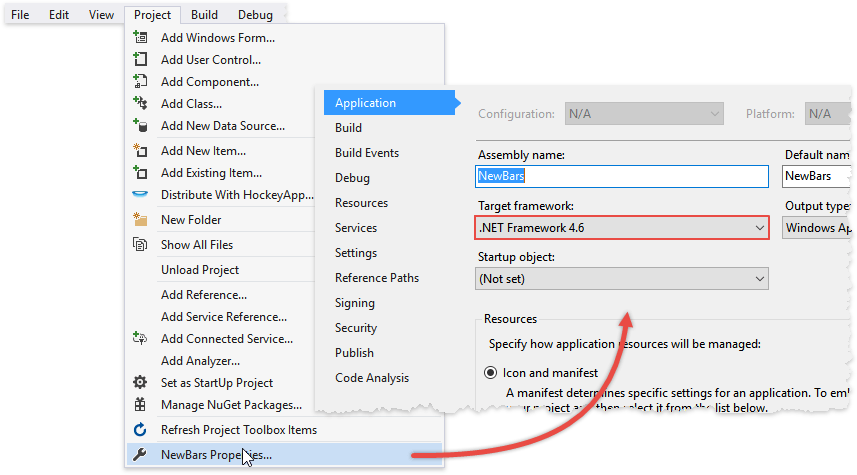
Make sure the target .NET framework of your project is of version 4.5 or higher. To check and modify the target framework version, go to “Project | <Your_Project_Name> Properties”, then use the “Target framework” editor to select a required version.
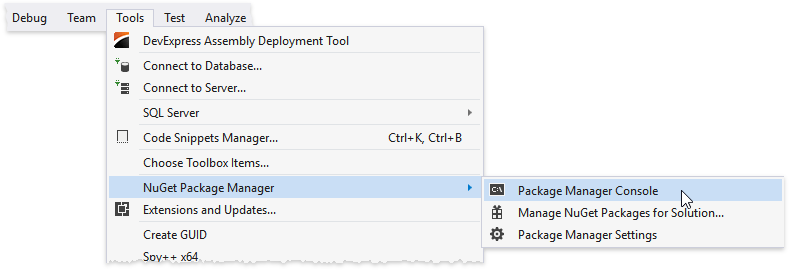
Install the OData Client for .NET NuGet package. To do so, invoke the Package Manager Console as shown below.
Run the following command to install the package.
PM >
Install-Package Microsoft.OData.Client -Version 6.15.0
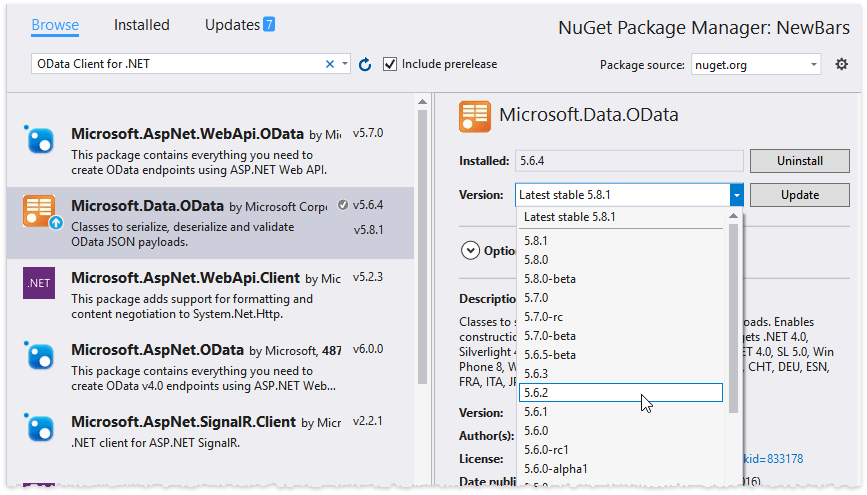
OData v4 and OData v2 use different versions of this package, so you may need to upgrade or downgrade it. To do so, go to “Project | Manage NuGet Packages” and locate the installed package. Select it, then change its version in the package details page, as shown below.
After completing these steps you can proceed to binding your data-aware control to OData v4 or OData v2.
Binding To OData V4 Services Using the Wizard
This section is dedicated to binding DevExpress data-aware controls by utilizing the Data Source Configuration Wizard.
Right click your project in Visual Studio and select “Add | New Item…”, then switch to the “Online” tab. Find and install the “OData v4 Client Code Generator” item template.

Note
This step is required for your first OData v4 application only. Once this VS template has been installed, it will be available for all future projects.
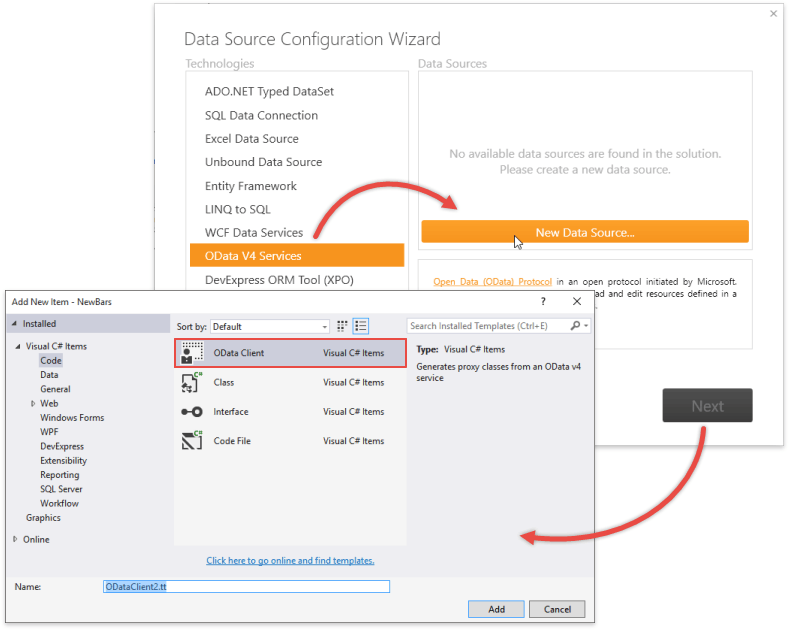
Invoke the wizard and select “OData V4 Services”. Click the “New Data Source…” button and select the “OData Client” option, then click “Add” to proceed.
After the new data source is ready, you will be taken to the .tt file with settings. In this file, locate the MetadataDocumentUri property and set it to a valid service document URI or a local file path. For testing purposes you can utilize any online sample service, e.g. “http://services.odata.org/V4/OData/OData.svc/“ or TripPin Service.
Rebuild the project, then invoke the Data Source Configuration Wizard again. This time, you will see your added Data Source in the list. Select it and click “Next”.

On the next Wizard page, you can select how exactly your data should be connected.
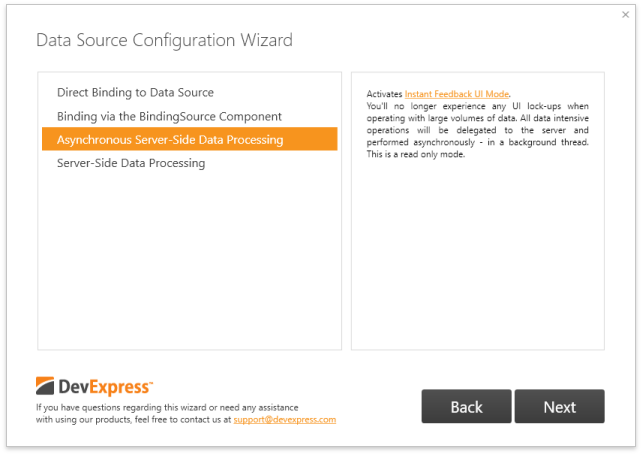
- Direct Binding to Data Source - the data-aware control will bind directly to the data source, without any go-between components involved.
- Binding via the BindingSource Component - a new System.Windows.Forms.BindingSource component will be spawned to transfer data to your data-aware control.
- Asynchronous Server-Side Data Processing - data will be transfered by the ODataInstantFeedbackSource component.
- Server-Side Data Processing - data will be transfered by the ODataServerModeSource component.
Select a required connection mode and click “Next”.
The final Wizard page requires you to enter the data service root URL and a table from which to display data. For server and instant feedback modes, you can also choose a data field that serves as a key expression, and sort all data by another data field.
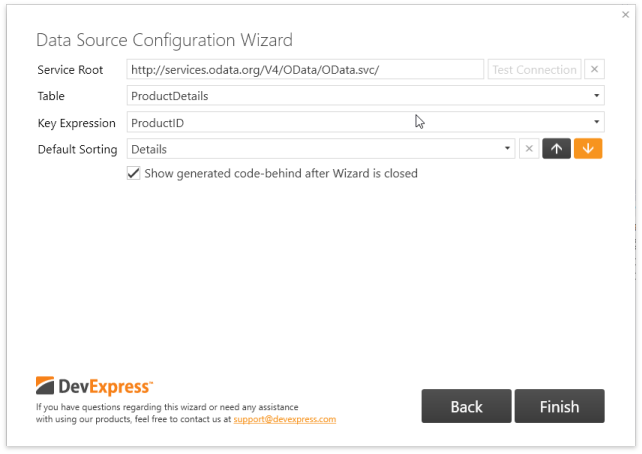
When you enter the URL, click the “Test Connection” button. If its initial red glow is gone and the button becomes disabled, the connection was established successfully.

- After you have filled all required fields, press “Finish”. Your data-aware control is now bound to Open Data.
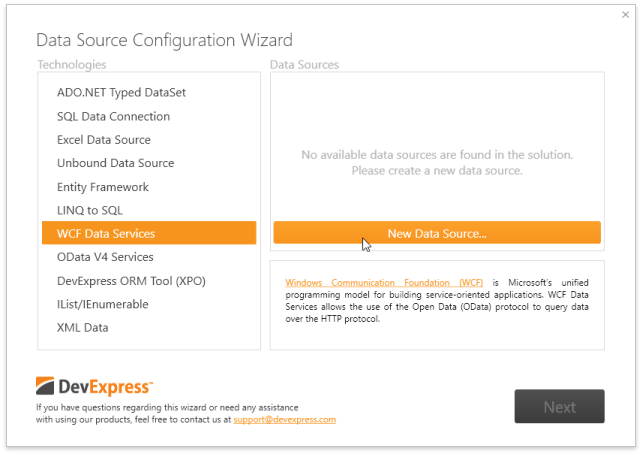
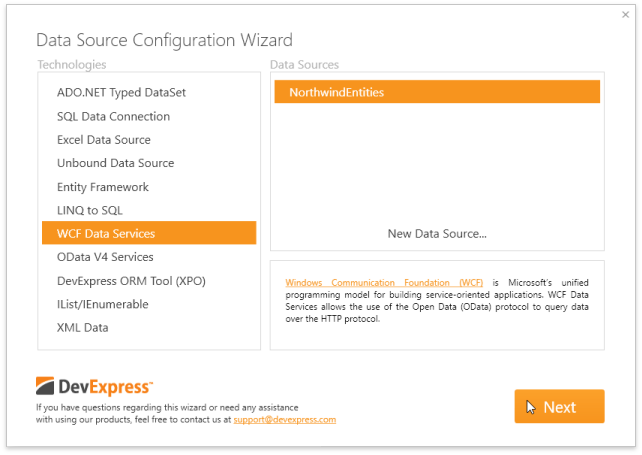
Binding To OData V2 Services Using the Wizard
Invoke the wizard and select “WCF Data Services”. Click the “New Data Source…” button to create a new source or select an existing one from the list.
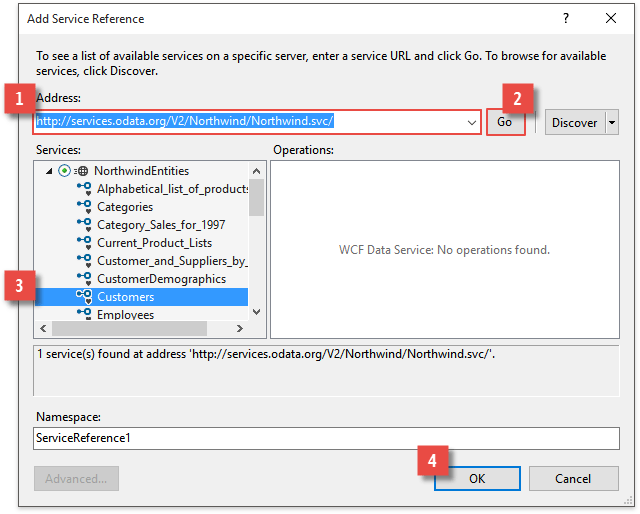
In the “Add Service Reference” dialog that appears on screen, enter the OData service URL and click “Go” to establish a connection (try “http://services.odata.org/V2/Northwind/Northwind.svc/“ for testing purposes). In case of a successful connection, you will see all available services in the “Services” list. Expand a service to browse its data tables, then select the desired service and click “OK”.
Rebuild the project, then invoke the Data Source Configuration Wizard again. You will now see your service in the “Data Sources” list. Select it and click “Next”.
On the next Wizard page, you can select exactly how your data should be connected.
- Direct Binding to Data Source - the data-aware control will bind directly to the data source, without any go-between components involved.
- Binding via the BindingSource Component - a new System.Windows.Forms.BindingSource component will be spawned to transfer data to your data-aware control.
- Asynchronous Server-Side Data Processing - data will be transfered by the WcfInstantFeedbackSource component.
- Server-Side Data Processing - data will be transfered by the WcfServerModeSource component.
Select a required connection mode and click “Next”.
The final Wizard page requires you to enter the data service root URL and a table from which to display data. For server and instant feedback modes, you can also choose a data field that serves as a key expression, and sort all data by another data field.

When you enter the URL, click the “Test Connection” button. If its initial red glow is gone and the button becomes disabled, the connection was established successfully.
- After you have filled all required fields, press “Finish”. Your data-aware control is now bound to Open Data.
Binding To OData V4 Services In Code
The code below illustrates how to bind a Data Grid control to open data directly in code. The grid will bind to an existing “DemoService” service, generated by the OData v4 Client Code Generator. To learn how to bind to open data in Server or Instant Feedback modes, refer to the ODataInstantFeedbackSource and ODataServerModeSource component descriptions.
public MainForm() {
    InitializeComponent();
    gridControl1.DataSource = new ODataDemoProject.DemoService(new System.Uri("http://services.odata.org/V4/OData/OData.svc/")).Categories.ToList();
}
Binding To OData V2 Services In Code
The code below illustrates how to bind to an existing “ServiceReference3” reference directly. To learn about binding in Server or Instant Feedback modes, refer to the WcfInstantFeedbackSource and WcfServerModeSource component descriptions.