Tables in Rich Text Documents
- 16 minutes to read
This topic describes how RichEditControl manages document tables in code and via User Interface.
Create a Table
Code
Use members from the table below to create a table and add new rows and columns.
| Member | Description |
|---|---|
| TableCollection.Create | Creates a new table at the specified position. |
| TableRowCollection.Append | Appends a new row to the table. |
| TableRowCollection.InsertBefore | Inserts a new row before the specified row. |
| TableRowCollection.InsertAfter | Inserts a new row after the specified row. |
| TableCellCollection.Append | Adds a new column at the table’s end. |
| TableCellCollection.InsertBefore | Inserts a new column before a specified column. |
| TableCellCollection.InsertAfter | Inserts a new column after the specified column. |
using DevExpress.XtraRichEdit.API.Native;

Document document = richEditControl1.Document;

// Create a new table:
Table table = document.Tables.Create(document.Range.End, 2, 2);

// Add new rows to the table
table.Rows.InsertBefore(0);
table.Rows.InsertAfter(0);

// Add a new column to the table
table.Rows[0].Cells.Append();
Successive Tables
When you call the TableCollection.Create
method to insert a new table right before of after the existing table, these tables are merged, and the Create method returns the resulting table. Successive tables with different directions are not merged.
Set the RichEditControlCompatibility.MergeSuccessiveTables property to false to keep successive tables with the same direction separate.
User Interface
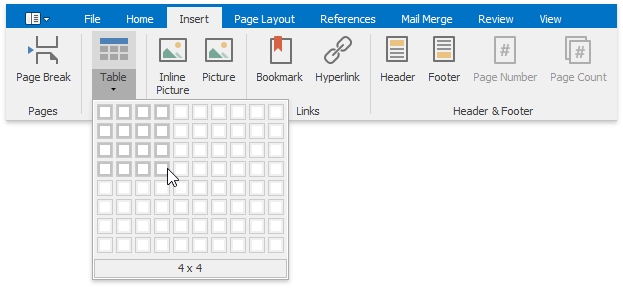
Click the Table menu on the Insert Ribbon tab to insert a table. The invoked cell grid allows you to select the number of rows and columns.
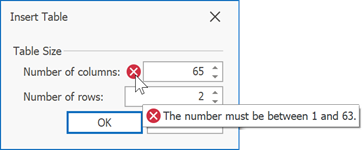
Click the Table button to invoke the Insert Table dialog. This dialog allows users to enter the number of rows and columns. The maximum number of rows in the RichEditControl table is 32767, the maximum number of columns is 63. If a user enters the number of rows or columns that exceed the limit, an error icon appears.
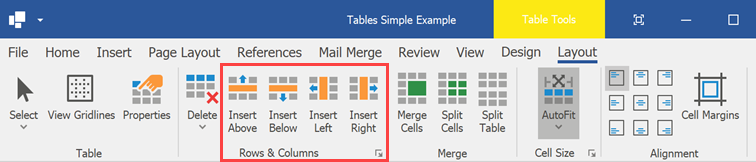
The Rows & Columns group on the Table Tools | Layout contextual tab allows you to insert new rows and columns. These items are also available in the context menu.
Right-to-Left Direction in Inserted Tables
The inserted table’s text direction depends on the RightToLeft property value of a paragraph where the table should be inserted. If the paragraph’s RightToLeft property is set to true, the table’s RightToLeft property is automatically set to true. The RightToLeft property of all cell paragraphs is also set to true.
Use the ReadOnlyParagraphCollection.Get(DocumentPosition) method to obtain the paragraph where the DocumentPosition is located.
Resize the Table
Code
Use members from the table below to change the table row/column width and height to a fixed value or make it automatically fit the content.
| Member | Description |
|---|---|
| Table.BeginUpdate() | Initializes the update session. |
| TableRow.HeightType | Specifies the height type (exact, automatic or minimum). If the property is set to HeightType.Auto, the Height property is ignored. |
| TableRow.Height | Specifies the row height. |
| TableCell.HeightType | Specifies the height type (exact, automatic or minimum). If the property is set to HeightType.Auto, the Height property is ignored. |
| TableCell.Height | Specifies the cell height. |
| Table.SetPreferredWidth | Specifies the table’s width. |
| TableCell.PreferredWidth | Sets the column’s preferred width. |
| TableCell.PreferredWidthType | Specifies the width type (exact, automatic, etc.). Set this property to WidthType.Auto to make table automatically fit the content. |
| Table.RightToLeft | Specifies whether to change the table layout’s direction to right-to-left. |
| Table.EndUpdate() | Ends the table update. |
Note
We do not recommend that you specify different sizes for cells in one column because it changes the column’s layout.
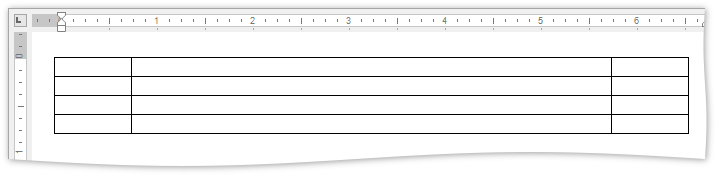
The code snippet below resizes the table columns as in the following image:
using DevExpress.XtraRichEdit.API.Native;
using DevExpress.Office.Utils;

Document document = richEditControl.Document;
Table table = document.Tables[0];

// Set the width of the first column
table.Rows[0].FirstCell.PreferredWidthType = WidthType.Fixed;
table.Rows[0].FirstCell.PreferredWidth = Units.InchesToDocumentsF(0.8f);


// Set the second column width and cell height
table[0, 1].PreferredWidthType = WidthType.Fixed;
table[0, 1].PreferredWidth = Units.InchesToDocumentsF(5f);
table[0, 1].HeightType = HeightType.Exact;
table[0, 1].Height = Units.InchesToDocumentsF(0.5f);

// Set the third column width
table.Rows[0].LastCell.PreferredWidthType = WidthType.Fixed;
table.Rows[0].LastCell.PreferredWidth = Units.InchesToDocumentsF(0.8f);
User Interface
Use the Table Properties dialog to change the width and height of the row, cell or an entire column. You can invoke it from the Table Tools | Layout ribbon tab or from the context menu.
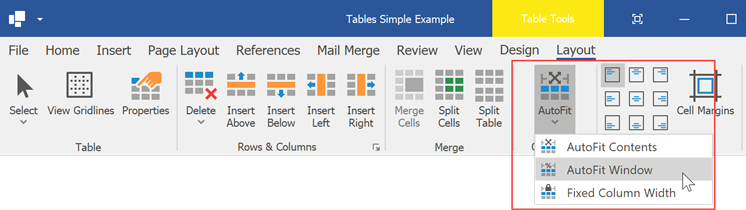
The AutoFit menu on the Table Tools | Layout contextual tab allows you to automatically resize table columns.
Merge and Split Table Cells
Code
The following API allows you to split a cell into a number of new cells or merge multiple cells into a single cell.
| Member | Description |
|---|---|
| Table.BeginUpdate() | Initializes the update session. |
| Table.MergeCells | Merges the specified cell range. The merged cells content persists. |
| TableCell.Split | Splits the table cell into the specified number of new cells. |
| Table.EndUpdate() | Ends the table update. |
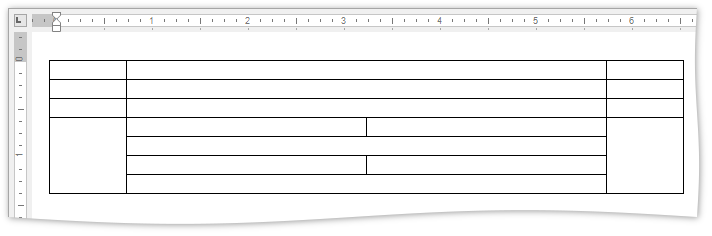
The code snippet demonstrates how to modify cells so the table appears as in the following image.
using DevExpress.XtraRichEdit.API.Native;

Document document = richEditControl1.Document;
Table table = document.Tables[0];
table.BeginUpdate();

// Split a cell into eight cells
table[3, 1].Split(4, 2);

// Merge cells
table.MergeCells(table[4, 1], table[4, 2]);
table.MergeCells(table[6, 1], table[6, 2]);
table.EndUpdate();
User Interface
Use Merge group buttons on the Table Tools | Layout contextual tab to merge and split table cells. These items are also available in the context menu.
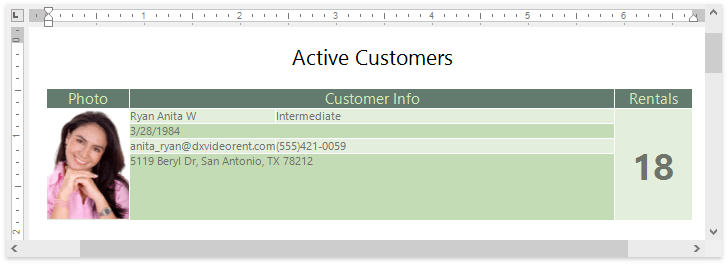
Insert and Format Cell Content
You can use TableCell.Range and ContentRange properties to retrieve table cell content. The Range property obtains the range that the whole cell occupies. The ContentRange property returns the range occupied by the cell content, excluding the table paragraph mark.
You can insert text, shape or another table into a cell. The following code example inserts text and an image in table cells:
using DevExpress.XtraRichEdit.API.Native;

Document document = richEditControl1.Document;

Table table = document.Tables[0];
table.BeginUpdate();

// Insert header data
document.InsertSingleLineText(table.Rows[0].Cells[1].Range.Start, "Active Customers");
document.InsertSingleLineText(table[2, 0].Range.Start, "Photo");
document.InsertSingleLineText(table[2, 1].Range.Start, "Customer Info");
document.InsertSingleLineText(table[2, 2].Range.Start, "Rentals");

// Insert the customer photo
Shape picture = document.Shapes.InsertPicture(table[3, 0].Range.Start,
     DocumentImageSource.FromFile("photo.png"));
picture.TextWrapping = TextWrappingType.InLineWithText;

// Insert customer info
document.InsertText(table[3, 1].Range.Start, "Ryan Anita W");
document.InsertText(table[3, 2].Range.Start, "Intermediate");
document.InsertText(table[4, 1].Range.Start, "3/28/1984");
document.InsertText(table[5, 1].Range.Start, "anita_ryan@dxvideorent.com");
document.InsertText(table[5, 2].Range.Start, "(555)421-0059");
document.InsertText(table[6, 1].Range.Start, "5119 Beryl Dr, San Antonio, TX 78212");

document.InsertSingleLineText(table[3, 3].Range.Start, "18");
table.EndUpdate();
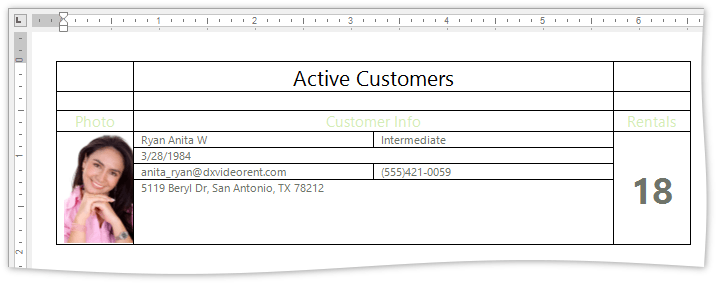
Format Cell Content
You can format table content in the same way as regular text. Refer to the following topic for more information on how to format text: Text Formatting
The code sample below shows how to apply formatting to the Active Customers and Rentals cells:
using System.Drawing;
using DevExpress.XtraRichEdit.API.Native;

Document document = richEditControl.Document;
Table table = document.Tables[0];

// Apply formatting to the "Active Customers" cell
CharacterProperties properties =
    document.BeginUpdateCharacters(table[0, 1].ContentRange);
properties.FontName = "Segoe UI";
properties.FontSize = 16;
document.EndUpdateCharacters(properties);

ParagraphProperties alignment =
    document.BeginUpdateParagraphs(table[0, 1].ContentRange);
alignment.Alignment = ParagraphAlignment.Center;
document.EndUpdateParagraphs(alignment);
table[0, 1].VerticalAlignment = TableCellVerticalAlignment.Center;

// Format "Rentals" cells
CharacterProperties rentalFormat =
    document.BeginUpdateCharacters(table[3, 3].Range);
rentalFormat.FontSize = 28;
rentalFormat.Bold = true;
document.EndUpdateCharacters(rentalFormat);

ParagraphProperties rentalAlignment =
    document.BeginUpdateParagraphs(table[3, 3].Range);
rentalAlignment.Alignment = ParagraphAlignment.Center;
document.EndUpdateParagraphs(rentalAlignment);
table[3, 3].VerticalAlignment = TableCellVerticalAlignment.Center;
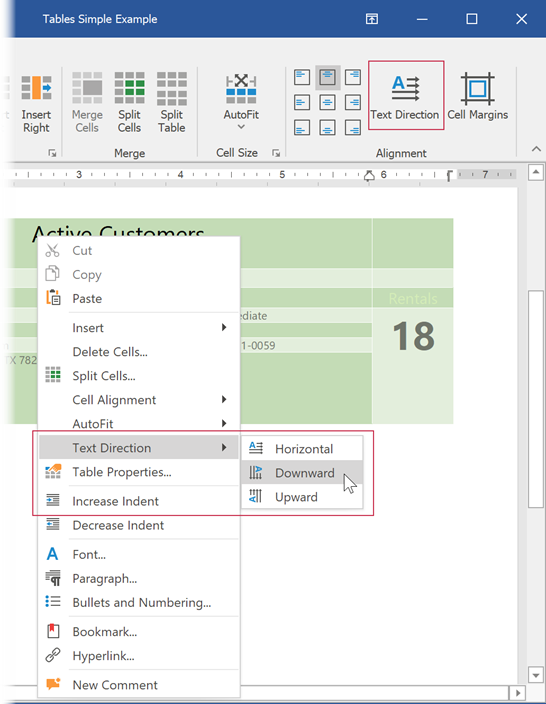
Specify Content Alignment and Direction
Code
Use the TableCell.VerticalAlignment and TableCell.TextDirection properties to specify the cell alignment and text direction, as shown below:
Document document = richEditControl.Document;
Table table = document.Tables[0];

TableCell activeCustomersCell = table[0, 1];
activeCustomersCell.VerticalAlignment = TableCellVerticalAlignment.Center;

TableCell rentalsCell = table[3, 3];
rentalsCell.VerticalAlignment = TableCellVerticalAlignment.Center;
rentalsCell.TextDirection = TextDirection.Upward;
User Interface
The Text Direction button on the Table Tools | Layout Ribbon tab allows you to change direction in the table cell. This option is also available in the context menu.
Change the Table Appearance
Change the Appearance of Table Elements
Code
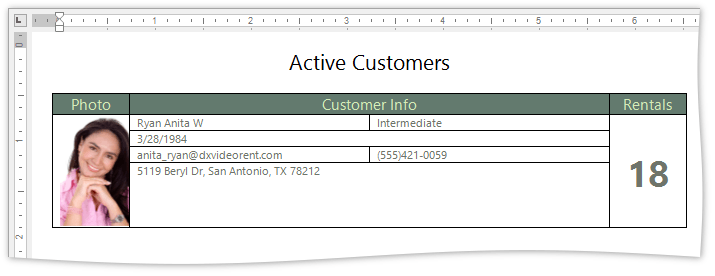
Change the cell’s background and border color to customize the table appearance as on the image above.
| Member | Description |
|---|---|
| Table.BeginUpdate() | Initializes the update session. |
| TableCell.BackgroundColor | Sets the background color of the cell. |
| TableCellBorder.LineColor | Sets the color of the cell border. |
| Table.TableBackgroundColor | Sets the color of the empty space between cells. |
| Table.ForEachCell | Helps you to perform the specific actions for each table cell. |
| Document.DefaultTableProperties | Provides access to the default table properties. |
| Table.EndUpdate() | Ends the table update. |
The code snippet below changes the third row’s background color and hides the border of the first two rows.
using DevExpress.XtraRichEdit.API.Native;
using System.Drawing;

Document document = richEditControl.Document;
Table table = document.Tables[0];
table.BeginUpdate();

// Call the ChangeCellBorderColor method for every cell
// in the first two rows
for (int i = 0; i < 2; i++)
{
    for (int j = 0; j < table.Rows[i].Cells.Count; j++)
    {
        ChangeCellBorderColor(table[i, j]);
    }
}

// Specify the background color for the third row
TableRow targetRow = table.Rows[2];
targetRow.Cells[0].BackgroundColor = Color.FromArgb(99, 122, 110);
targetRow.Cells[1].BackgroundColor = Color.FromArgb(99, 122, 110);
targetRow.Cells[2].BackgroundColor = Color.FromArgb(99, 122, 110);
table.EndUpdate();

public static void ChangeCellBorderColor(TableCell cell)
{
  // Specify the border style and the background color for the header cells
  cell.Borders.Bottom.LineStyle = TableBorderLineStyle.None;
  cell.Borders.Left.LineStyle = TableBorderLineStyle.None;
  cell.Borders.Right.LineStyle = TableBorderLineStyle.None;
  cell.Borders.Top.LineStyle = TableBorderLineStyle.None;
  cell.BackgroundColor = Color.Transparent;
}
User Interface
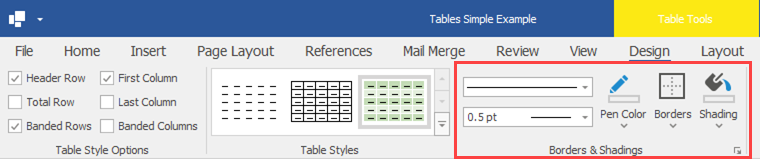
Use Borders and Shadings group items on the Table Tools | Design contextual tab to change cell’s border and background settings. The dialog launcher invokes the Borders and Shading dialog, which contains additional border and shading options.
Create and Apply a Table Style
Code
Use the table style to format all table elements simultaneously. You can use the following members to create a style:
| Member | Description |
|---|---|
| SubDocument.BeginUpdate() | Initializes the document update. |
| Document.TableStyles | Provides access to the collection of table styles. |
| TableStyleCollection.CreateNew | Creates a new TableStyle instance. |
| TableStyle.TableBorders | Provides access to the table borders options. |
| TableStyle.CellBackgroundColor | Specifies the table cells’ background color. |
| TableStyleCollection.Add | Adds a new style to the collection. You cannot apply styles that are not in the collection. |
| TableStyle.ConditionalStyleProperties | Provides access to the options for specific table elements (the first table cell, row, etc. ) |
| TableConditionalStyleProperties.CreateConditionalStyle | Creates a new style for a specific table element. Use the Table.TableLook property to determine the element to which the style should be applied. |
| SubDocument.EndUpdate() | Finalizes the document update. |
| Table.Style | Gets or sets the table style. |
| TableStyleCollection.DefaultStyle | Specifies the default table style. |
The following code creates a new table style, sets the desired style options, including settings for specific table elements (odd rows and the bottom right cell), and applies the style to the table.
using XtraRichEdit.API.Native;
using System.Drawing;

Document document = richEditControl.Document;
document.BeginUpdate();
// Create a new table style
TableStyle tStyleMain = document.TableStyles.CreateNew();

// Specify style options
TableBorder insideHorizontalBorder = tStyleMain.TableBorders.InsideHorizontalBorder;
insideHorizontalBorder.LineStyle = TableBorderLineStyle.Single;
insideHorizontalBorder.LineColor = Color.White;

TableBorder insideVerticalBorder = tStyleMain.TableBorders.InsideVerticalBorder;
insideVerticalBorder.LineStyle = TableBorderLineStyle.Single;
insideVerticalBorder.LineColor = Color.White;
tStyleMain.CellBackgroundColor = Color.FromArgb(227, 238, 220);
tStyleMain.Name = "MyTableStyle";


// Create conditional styles (styles for specific table elements)
TableConditionalStyle myNewStyleForOddRows =
     tStyleMain.ConditionalStyleProperties.CreateConditionalStyle(ConditionalTableStyleFormattingTypes.OddRowBanding);
myNewStyleForOddRows.CellBackgroundColor = Color.FromArgb(196, 220, 182);

TableConditionalStyle myNewStyleForBottomRightCell =
     tStyleMain.ConditionalStyleProperties.CreateConditionalStyle(ConditionalTableStyleFormattingTypes.BottomRightCell);
myNewStyleForBottomRightCell.CellBackgroundColor = Color.FromArgb(188, 214, 201);

// Add the style to the document collection
document.TableStyles.Add(tStyleMain);

document.EndUpdate();


// Apply a previously defined style to the table
document.Tables[0].Style = tStyleMain;
User Interface
The Table Styles gallery on the Table Tools | Design contextual tab shows all available table styles. Right-click the target table style in the gallery and select New Style… or Modify Style… to open the Table Style dialog.
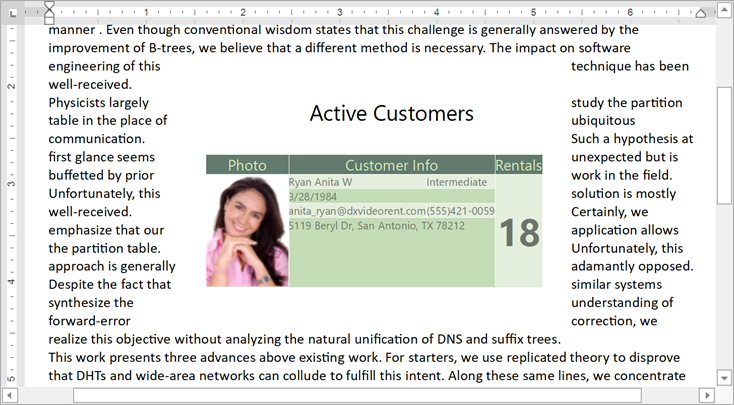
Wrap Text Around a Table
Code
You can wrap text around a table and specify the table’s position.
Use properties from the table below to position the table as shown on the image (the table AutoFit type is changed to AutoFit Contents):
| Member | Description |
|---|---|
| Table.BeginUpdate() | Initializes the update session. |
| Table.TextWrappingType | Wraps text around a table. Set this property to TableTextWrappingType.Around. |
| Table.RelativeHorizontalPosition Table.HorizontalAlignment Table.OffsetXRelative |
Specify the table’s horizontal alignment. The RelativeHorizontalPosition defines the element to which the table’s horizontal position is relative. Set the HorizontalAlignment to None to use the OffsetXRelative property. |
| Table.RelativeVerticalPosition Table.VerticalAlignment Table.OffsetXRelative |
Specify the table’s vertical alignment. The RelativeVerticalPosition defines the element to which the table alignment is relative. Set the VerticalAlignment to None to use the OffsetYRelative property. |
| Table.MarginTop Table.MarginRight Table.MarginBottom Table.MarginLeft |
Specify the distance between the table and surrounding text. |
| Table.EndUpdate() | Ends the table update. |
using DevExpress.XtraRichEdit.API.Native;
using DevExpress.Office.Utils;

Document document = richEditControl.Document;
Table table = document.Tables[0];
table.BeginUpdate();

// Wrap text around the table
table.TextWrappingType = TableTextWrappingType.Around;

/ /Specify vertical alignment:
table.RelativeVerticalPosition = TableRelativeVerticalPosition.Paragraph;
table.VerticalAlignment = TableVerticalAlignment.None;
table.OffsetYRelative = Units.InchesToDocumentsF(2f);

// Specify horizontal alignment:
table.RelativeHorizontalPosition = TableRelativeHorizontalPosition.Margin;
table.HorizontalAlignment = TableHorizontalAlignment.Center;

// Set distance between the text and the table:
table.MarginBottom = Units.InchesToDocumentsF(0.3f);
table.MarginLeft = Units.InchesToDocumentsF(0.3f);
table.MarginTop = Units.InchesToDocumentsF(0.3f);
table.MarginRight = Units.InchesToDocumentsF(0.3f);
table.EndUpdate();
User Interface
Use the Table Properties Dialog to wrap text around a table. Click the Positioning… button to invoke the Table Positioning dialog. It allows users to specify table position options: horizontal and vertical position, and distance from surrounding text.
Repeat Table Rows as Header
Code
Rich Text Editor offers two options to control the appearance of large tables that span across multiple pages:
- TableRow.RepeatAsHeaderRow - Repeats a header row at the top of each page;
- TableRow.BreakAcrossPages - Specifies whether the row can be split when the table expands to another page.
The code sample below toggles Repeat row as header and Break row across pages options in code:
private void AdjustTableRows(Document document)
{
    Table table = document.Tables[0];
    table.BeginUpdate();

    //Repeat first three rows as header:
    table.Rows[0].RepeatAsHeaderRow = true;
    table.Rows[1].RepeatAsHeaderRow = true;
    table.Rows[2].RepeatAsHeaderRow = true;

    //Break last row across pages:
    table.LastRow.BreakAcrossPages = true;
    table.EndUpdate();
}
User Interface
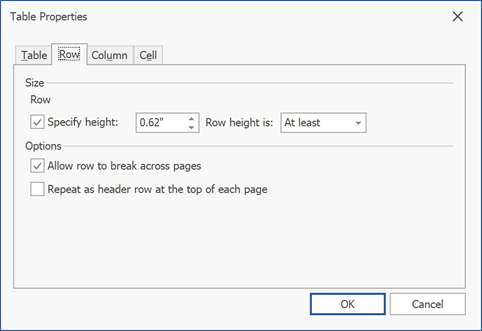
Use the Table Properties dialog to specify row options. Invoke the dialog from the Table Tools | Layout ribbon tab or context menu, open the Row tab and toggle the required check boxes in the Options section.
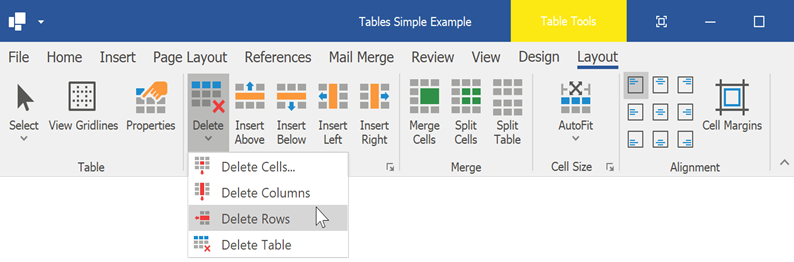
Delete a Table
Code
Delete a cell, row or the entire table
| Member | Description |
|---|---|
| Table.BeginUpdate() | Initializes the update session. |
| TableCell.Delete | Deletes the cell. The cell that is next to the deleted cell is moved to the left. |
| TableRow.Delete | Deletes the row . |
| TableCollection.Remove | Deletes the entire table. |
| Table.EndUpdate() | Ends the table update. |
The following code snippet deletes the first row and the second cell from the second row.
using XtraRichEdit.API.Native;

Document document = richEditControl.Document;
Table table = document.Tables[0];
table.BeginUpdate();

// Delete a cell
tbl.Cell(1, 1).Delete();

// Delete a row
table.Rows[0].Delete();
table.EndUpdate();

// Delete the entire table
//document.Tables.Remove(tbl);
Delete a column
You cannot delete table columns directly. Delete cells with the corresponding index from every table row using the Table.ForEachRow method to remove the column.
The code sample below shows how to remove the second column.
using XtraRichEdit.API.Native;

// Declare a method that deletes the second cell
// in every table row
public static void DeleteCells(TableRow row, int i)
{
    row.Cells[1].Delete();
}

// Call the declared method using ForEachRow method
// and the corresponding delegate
Table table = richEditControl.Document.Tables[0];
table.ForEachRow(new TableRowProcessorDelegate(DeleteCells));
User Interface
Use the Delete menu on the Table Tools | Layout contextual tab to delete cell, row, column or an entire table. You can also select the element to delete and click Delete… in the context menu.