Add and Customize the Ribbon Gallery Skin Selector
- 4 minutes to read
This article explains how to allow end-users to select skins at runtime using the embedded Toolbar and Menu Skin Selector.
Add the Ribbon Gallery Skin Selector
A Ribbon provides an In-Ribbon gallery (SkinRibbonGalleryBarItem objects) to allow end-users to change application skins at runtime. In this gallery, skin items are grouped into “Standard Skins”, “Bonus Skins” and “Theme Skins” categories.

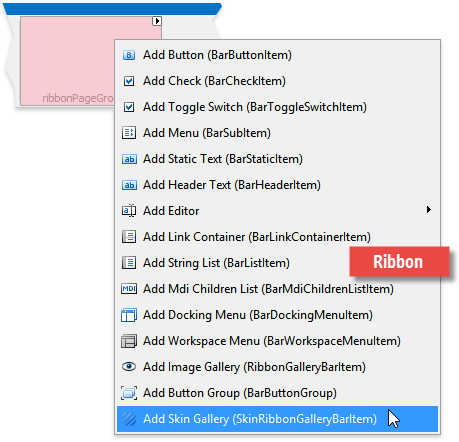
To add a Ribbon skin gallery, right-click a RibbonPageGroup and select “Add Skin Gallery (SkinRibbonGalleryBarItem)”.
Once you add a required skin item, there is no need to manually implement its functionality. Click a gallery item to automatically apply the corresponding skin.
Since a Ribbon skin gallery is an automatically populated in-Ribbon gallery, you can easily access its items and groups to modify them – as explained below.
Hide Specific Items And Groups
The steps below describe how to hide individual skins.
Create a string array that contains unwanted skin names. These names can be full (e.g., “Office 2016 Colorful”) or partial (e.g., “2007”).
Define a custom method that will iterate through skin items and hide unwanted ones.
private void HideSkins(string[] skinsToHide) { for(var i = 0; i < skinRibbonGalleryBarItem1.Gallery.Groups.Count; i++) { var group = skinRibbonGalleryBarItem1.Gallery.Groups[i]; if(group == null) { continue; } for(var j = 0; j < group.Items.Count; j++) { var item = group.Items[j]; if(item == null) { continue; } foreach(var skin in skinsToHide) { if(item.Caption.Contains(skin)) { item.Visible = false; } } } } }Use the form or UserControl Load event handler to call your method.
To hide an entire skin group, use the code sample below.
void ucRibbon_Load(object sender, EventArgs e) {
    skinRibbonGalleryBarItem1.Gallery.Groups.Remove(skinRibbonGalleryBarItem1.Gallery.Groups.OfType<GalleryItemGroup>()
            .First(x => String.Equals(x.Caption, "Bonus Skins")));
}
Remove Item Grouping
To remove item grouping, add a new gallery group and populate it with all existing gallery items. Then, you can remove all gallery groups except for your new custom group – as illustrated in the code sample below.
void ucRibbon_Load(object sender, EventArgs e) {
    RemoveGrouping();
}

void RemoveGrouping() {
    GalleryItemGroup group = new GalleryItemGroup() { Caption = "Available Skins" };
    skinRibbonGalleryBarItem1.Gallery.Groups.Insert(0, group);
    foreach(var item in skinRibbonGalleryBarItem1.Gallery.GetAllItems()) {
        skinRibbonGalleryBarItem1.Gallery.Groups[0].Items.Add(item);
    }
    while(skinRibbonGalleryBarItem1.Gallery.Groups.Count > 1)
        skinRibbonGalleryBarItem1.Gallery.Groups.Remove(skinRibbonGalleryBarItem1.Gallery.Groups.Last());
}
Change Captions and Icons Manually
To change captions and glyphs of items within a Ribbon skin gallery, iterate through gallery items and modify GalleryItem.Caption, GalleryItem.Hint, GalleryItem.Image and GalleryItem.HoverImage properties. Optionally, specify the GalleryItem.Description property to set the item subtitle string.
void ucRibbon_Load(object sender, EventArgs e) {
CustomizeItems(skinRibbonGalleryBarItem1);
}
void CustomizeItems(SkinRibbonGalleryBarItem target) {
foreach(var item in target.Gallery.GetAllItems()) {
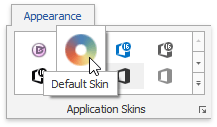
if(item.Caption == "DevExpress Dark Style") {
item.Caption = item.Hint = "Default Skin";
item.Description = "The default skin";
item.Image = DevExpress.Images.ImageResourceCache.Default.GetImage("office2013/miscellaneous/colors_16x16.png");
item.HoverImage = DevExpress.Images.ImageResourceCache.Default.GetImage("office2013/miscellaneous/colors_32x32.png");
}
}
}
The figure below shows the result.
Change Skin Captions Using a Localizer
You can use Localizer objects instead of renaming skin items manually. See the How To: Localize Bar and Ribbon Skin Items article to learn more.