How To: Use Gauges for In-Place Editing
- 7 minutes to read
DevExpress data-aware controls like Data Grid and Tree List allow your end-users to edit data using embedded editors from the Editors library. Since gauges are not part of the Editors library, in-place editing using gauges is not supported out-of-the-box. However, you can manually embed gauges into data cells by using the RepositoryItemAnyControl object. This example demonstrates how to do that.
- Create a sample WinForms application and drop a Data Grid onto the main form.
Add a new class that will define your sample data.
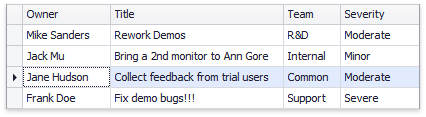
using System.Collections.Generic; using System.ComponentModel.DataAnnotations; namespace GridGaugeEditor { public class Task { public string Owner { get; set; } public string Title { get; set; } public Team Team { get; set; } public Severity Severity { get; set; } } public class SampleTaskList { static public List<Task> GetSampleTaskList() { return new List<Task> { new Task() { Owner ="Mike Sanders", Team = Team.ResAndDev, Title = "Rework Demos", Severity = Severity.Moderate }, new Task() { Owner = "Jack Mu", Team = Team.Internal, Title ="Bring a 2nd monitor to Ann Gore", Severity = Severity.Minor}, new Task() { Owner = "Jane Hudson", Team = Team.Common, Title ="Collect feedback from trial users", Severity = Severity.Moderate}, new Task() { Owner="Frank Doe", Team = Team.Support, Title = "Fix demo bugs!!!", Severity = Severity.Severe} }; } } public enum Team { Common = 1, [Display(Name = "R&D")] ResAndDev = 2, Support = 3, Internal = 4 } public enum Severity { Minor = 3, Moderate = 2, Severe = 1 } }Bind your Data Grid to this sample data. To do so, specify the Grid Control’s GridControl.DataSource property.
protected override void OnLoad(EventArgs e) { base.OnLoad(e); gridControl1.DataSource = SampleTaskList.GetSampleTaskList(); gridControl1.MainView.PopulateColumns(); }Run the application to ensure your data is loaded correctly.
- To visualize the “Severity” field, drop a Gauge Control onto the form. When you do so, the Preset Manager will pop up automatically. Apply the “ElectricLights” preset to create a state indicator gauge that displays red, yellow and green lights.
- Resize your gauge as required and set its visibility (the Visible property) to false.
Add a method that will create a new RepositoryItemAnyControl with the required gauge control within and use this object as the in-place editor for the target grid column.
To replace the default combo box editor for the existing column, use the following code.
protected override void OnLoad(EventArgs e) { //. . . CreateGaugeEdit(gridView1.Columns["Severity"], gaugeControl1); }If you run the application, you will notice that the “Severity” column is now populated with gauges, which receive their values automatically.

Providing Custom Gauge Values
The steps above demonstrate the most simple scenario - gauges are used to replace default in-place editors for a column that is already populated. At the same time, cell values for this column contain integer enumerator values acceptable to your gauges.
If your in-place gauges should display custom values, you will need to process these values manually. For instance, in the example above, you could create a new unbound column with gauges instead of replacing the existing “Severity” column. For this scenario, repeat the first six steps from the sequence above and then do the following.
Create an unbound column and use the custom CreateGaugeEdit method to set this column’s in-place editor.
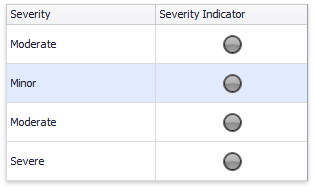
protected override void OnLoad(EventArgs e) { //. . . //Add a new unbound column GridColumn colGauge = new GridColumn(); colGauge.Caption = "Severity Indicator"; colGauge.FieldName = "SeverityGauge"; colGauge.UnboundType = DevExpress.Data.UnboundColumnType.Object; colGauge.Visible = true; gridView1.Columns.Add(colGauge); CreateGaugeEdit(gridView1.Columns["SeverityGauge"], gaugeControl1); }Since an unbound column provides no cell values by default, all gauges will display the same gray indicator if you now run the application.
To supply your gauges with values, first create a separate class that implements required interfaces declared in the DevExpress.XtraGauges.Win.Base namespace. There are three of these interfaces:
- IValueProvider - a mandatory interface that provides values to gauges;
- IColorSchemeProvider - an optional interface that allows you to apply different color schemes to individual gauges;
- IImageColorProvider - an optional interface that allows you to colorize gauge image indicators.
The State indicator gauge that you created supports neither color schemes nor images, so your custom value class will look like the following.
Handle the ColumnView.CustomUnboundColumnData event. In this event handler, you need to retrieve the current record severity and pass it to a new instance of you custom SeverityGaugeEditValue class. By doing so, you will pass this severity value to a gauge.
Run the application to see the final result.

Notice that you only have to pass a value to a gauge. It is not required to manually bind this value to the StateIndicator.StateIndex property of a state indicator gauge. Similarly, if you have an analog gauge, you do not have to explicitly bind this value with a scale value. This happens because gauges implement the DevExpress.XtraEditors.CustomEditor.IAnyControlEdit interface out-of-the-box and thus, process the edit value automatically. On the other hand, this behavior supports only simple gauges with one scale or one image indicator. For more complex scenarios (e.g., a gauge with two scales that display values of two separate data fields) you will have to create your own DevExpress.XtraEditors.CustomEditor.IAnyControlEdit interface implementation.
The code above makes use of the IValueProvider interface only. To see a more complex example with gauges that utilize all three I…Provider interfaces, explore the following demo: