Ribbon Runtime Customization
- 4 minutes to read
Overview
Users can use the Customization Form to customize commands in the Ribbon UI. To invoke the Customization Form, right-click the Ribbon control and select Customize Ribbon in the pop-up menu.
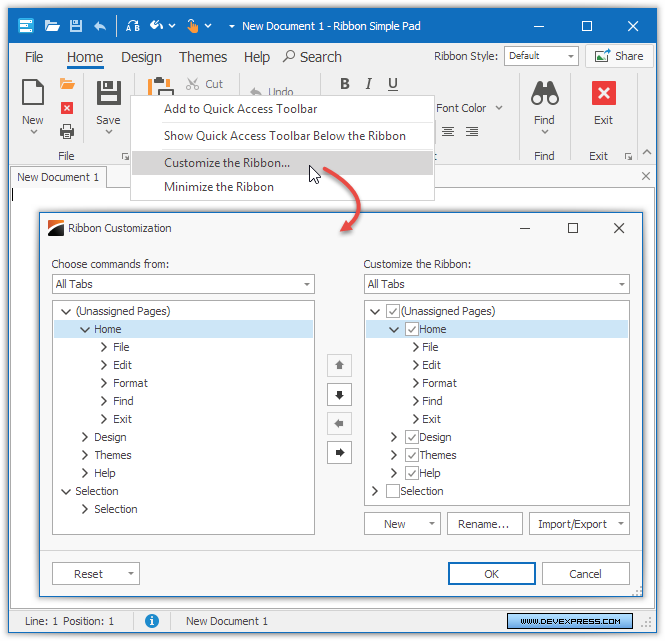
The Customization Form displays available items and the original layout on the left. On the right, the form displays the actual layout and items in the ribbon. Users can reorder, remove, and rename items in the ribbon, and create custom groups, tabs, etc.
Note
The Customize the Ribbon... command is not displayed in the context menu when the Ribbon controls are merged.
How to Enable the Customization Form
Enable the RibbonControl.AllowCustomization option to allow users to invoke the Customization Form. To show the form in code, call the RibbonControl.ShowCustomizationForm method.
End-User Capabilities
Users can complete the following tasks via the Customization Form:
Task | Actions |
|---|---|
Add a new page | Click New and select New Tab in the drop-down menu. |
Add a new group | Select a page on the right, click New and select New Group in the drop-down menu. |
Hide a page or page group | Select a page or page group on the right and click the left arrow button. |
Rename a page or page group | Select a page or page group on the right and click Rename. |
Add a command to a custom group (users cannot add commands to original groups) |
|
Re-arrange pages and groups |
|
Import or export a custom layout | Click Import/Export and select an option in the drop-down menu: import or export the layout. |
Restore the original layout | Click Reset and select an option in the drop-down menu: reset the selected page or the entire ribbon. In the latter case, the layout is restored instantly. For more information, see RibbonControl.SetCurrentLayoutAsDefault. |
Options
The RibbonControl.OptionsCustomizationForm property provides access to settings that affect the form’s appearance and behavior:
AllowBarSubItems - Gets or sets whether users can customize a sub-menu’s items via the Customization Form.
AllowEditBarItemPopups - Gets or sets whether users can edit a pop-up menu’s items via the Customization Form.
AllowLinkCustomization - Gets or sets whether users can hide bar items via the Customization Form‘s context menu.
AllowToolbarCustomization - Gets or sets whether the Ribbon Customization Window should display items from the Quick Access Toolbar.
FormIcon - Gets or sets the Customization Form‘s icon.
Auto-Save Layout
The ribbon can automatically save the layout to an XML file when the form closes. The layout will be automatically restored at the next application startup.
Enable the RibbonControl.AutoSaveLayoutToXml option to save the layout to an XML file when the user closes the form. The RibbonControl.AutoSaveLayoutToXmlPath property specifies the file’s location.
Important
A saved layout cannot be restored if the Items count in the saved layout does not match the number of Items in the Ribbon control.
How to Customize the Form
The RibbonControl.CustomizationFormShowing event fires when the form is about to be displayed and allows you to customize the form. The CustomizatoinForm event argument provides access to a RibbonCustomizationForm object that specifies the form.
The code below shows how to change the form’s caption.
using DevExpress.XtraBars.Ribbon;

private void ribbonControl1_CustomizationFormShowing(object sender, CustomizationFormShowingEventArgs e) {
    // Specify the form's caption.
    e.CustomizationForm.Text = "Customization Form";
}
The code below shows how to customize the form’s buttons.
using DevExpress.XtraBars.Ribbon;

private void ribbonControl1_CustomizationFormShowing(object sender, CustomizationFormShowingEventArgs e) {
    e.CustomizationForm = new MyCustomizationForm(sender as RibbonControl);
}

class MyCustomizationForm : RibbonCustomizationForm {
    public MyCustomizationForm() : base(null) {
    }
    public MyCustomizationForm(RibbonControl ribbonControl) : base(ribbonControl) {
    }

    protected override void InitDialogBase() {
        base.InitDialogBase();

        // Hide the Import/Export button.
        ImportButton.Visible = false;

        // Change the Rename button's caption and width.
        RenameButton.Text = "Umbenennen...";
        RenameButton.Width += 10;
    }
}