Scrolling
- 5 minutes to read
This walkthrough is a transcript of the Row Scrolling video available on the DevExpress YouTube Channel.
In this tutorial, you will learn about the various vertical scrolling modes in a grid View, including the following:
- The default scrolling mode when the View is scrolled one row at a time;
- Pixel scrolling mode that provides a smooth View scrolling experience;
- Touch scrolling mode.
- Postponed scrolling and target indication using vertical scrolling tooltips.
The tutorial will also describe the API that you can use to scroll the View or respond to end-user scrolling operations.
Default Scrolling Mode
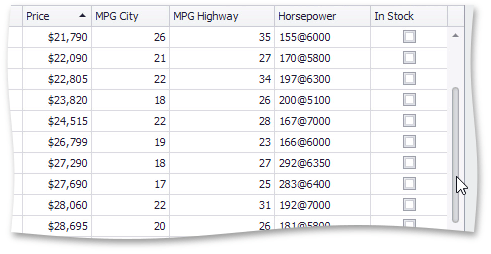
When you scroll the View vertically, you can notice how the first row in the View is always fully displayed. In other words, the default scrolling step is one row. The same happens when you group data. The View is scrolled one row at a time.
Pixel Scrolling Mode
To enable pixel scrolling, access the grid View’s properties, expand GridView.OptionsBehavior and set GridOptionsBehavior.AllowPixelScrolling to true.
![]()
Run the application now to see that scrolling is now smooth thus allowing for rows to be partially visible. The same happens with the grouped View.
![]()
Vertical Scrollbar Visibility
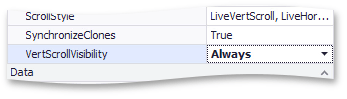
Now notice that if you collapse all group rows, the vertical scrollbar automatically disappears as it’s no longer needed. The behavior is also customizable. Set the View’s GridView.VertScrollVisibility property to ScrollVisibility.Always to reserve space for the scrollbar even if scrolling is not required.
This is a classic scrollbar representation and many modern applications use a touch-enabled scrollbar version.
Touch Scrolling Mode
To change the scrollbar style, go to code, make sure to reference the XtraEditors namespace and then set the WindowsFormsSettings.ScrollUIMode option to ScrollUIMode.Touch in the Form’s constructor.
using DevExpress.XtraEditors;

public Form1() {
    WindowsFormsSettings.ScrollUIMode = ScrollUIMode.Touch;
    // ...
}
This mode implies that you scroll using gestures, and the scrollbar simply indicates the current position and then automatically fades out. If you are using the mouse, it will also appear when the pointer moves over the grid so you can scroll the grid by dragging the scrollbar thumb too.
Horizontal Scrolling
If the GridOptionsView.ColumnAutoWidth setting is disabled, Grid columns can occupy more space than the control provides. In these cases, a horizontal scroll bar appears. You can use the following settings to modify this scroll bar and/or manually scroll the View.
GridView.HorzScrollVisibility - allows you to show and hide the scroll bar.
GridView.HorzScrollStep - allows you to change the horizontal scroll speed.
GridView.MakeColumnVisible(GridColumn) - scrolls the View left or right to make the given column visible on-screen.
Postponed Scrolling Mode
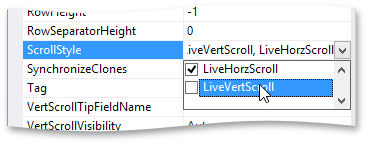
The next thing to try is postponed vertical scrolling. First, disable pixel scrolling and then remove the ScrollStyleFlags.LiveVertScroll flag from the GridView.ScrollStyle property value.
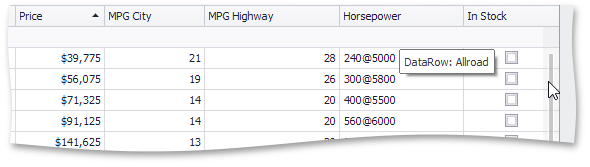
In this mode, the View is updated only after you have released the scrollbar thumb. While you are still scrolling, a tooltip indicates the target position. If the View is grouped, tooltips will display group row values along with data row indexes.
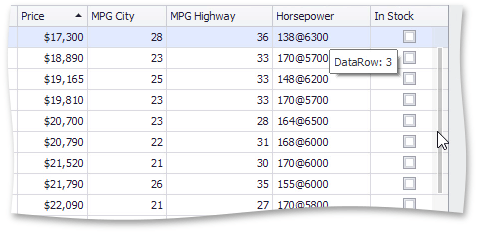
In the grid View’s properties, set the GridView.VertScrollTipFieldName property to Name.
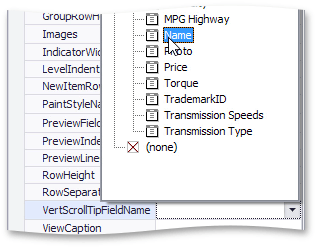
Now the data row tooltip will show values from the specified field instead of record indexes.
Responding to End-User Scrolling Operations
Now take a look at vertical scrolling API. The code will update the status bar with the current price range every time you scroll the View.
Return to design time, access grid View events and handle the GridView.TopRowChanged event, which fires when the View is scrolled vertically. The handler simply calls the UpdateStatus method, which is also called in Form’s Load handler.
The method first obtains the top visible row’s handle by converting from the current top visible index. Then, use this row handle as a parameter when obtaining the price in that top row. Similarly, obtain the price value in the bottom row. To get the bottom row’s handle, call a separate method.
In that method, enumerate visible indexes starting with the top visible index and stop the cycle if the index goes up to the GridView.RowCount value indicating that you’ve reached the last visible row. In the cycle body, use the GridView.IsRowVisible method to determine whether the currently processed row is within the grid’s visible area. Quit the enumeration if you reach a row that’s below the current scroll range. The row handle where the cycle stopped specifies the last visible row and thus it is the method’s return value.
Finally, in the UpdateStatus method change the scrollbar text to display the two price values – form the top and bottom rows.
private void UpdateStatus() {
    int topRowHandle = gridView1.GetVisibleRowHandle(gridView1.TopRowIndex);
    double topRowPrice = Convert.ToDouble(gridView1.GetRowCellValue(topRowHandle, colPrice));
    double bottomRowPrice = Convert.ToDouble(gridView1.GetRowCellValue(getLastVisibleRowHandle(), colPrice));
    siStatus.Caption = string.Format("Showing prices: {0:c0} - {1:C0}", topRowPrice, bottomRowPrice);
}

private void gridView1_TopRowChanged(object sender, EventArgs e) {
    UpdateStatus();
}

private int getLastVisibleRowHandle() {
    int rowHandle = 0;
    for (int visibleIndex = gridView1.TopRowIndex + 1; visibleIndex < gridView1.RowCount; visibleIndex++) {
        rowHandle = gridView1.GetVisibleRowHandle(visibleIndex);
        if (gridView1.IsRowVisible(rowHandle) == RowVisibleState.Hidden)
            break;
    }
    return rowHandle - 1;
}
Run the application. Enable the live scrolling mode again to see status bar text change while you’re scrolling.
Scrolling the View in Code
Now create three button titles Make Row Visible, Move Focus and Change Top Row to explore different ways of scrolling the view in code.
The first handler will use the GridView.MakeRowVisible method to scroll to the last data row in the View. The second simply sets focus to the same row using the ColumnView.FocusedRowHandle property. The third handler uses the GridView.TopRowIndex property to try and scroll the View to the last visible row.
private void barButtonMakeRowVisible_ItemClick(object sender, ItemClickEventArgs e) {
    gridView1.MakeRowVisible(gridView1.DataRowCount - 1);
}

private void barButtonMoveFocus_ItemClick(object sender, ItemClickEventArgs e) {
    gridView1.FocusedRowHandle = gridView1.DataRowCount - 1;
}

private void barButtonTopRow_ItemClick(object sender, ItemClickEventArgs e) {
    gridView1.TopRowIndex = gridView1.RowCount;
}
When you run the application you’ll see that all three methods will scroll the View to the bottom.