Tutorial: Entity Framework Data
- 5 minutes to read
This walkthrough is a transcript of the Entity Framework Data video available on the DevExpress YouTube Channel.
In this tutorial, you’ll learn how to bind a grid control to an Entity Framework data source, how to use Data Annotation Attributes to change the way data is presented and managed by the grid, and how to post cell value changes back to the data source.
Starting Point
Start with a project that has a Windows Form and an empty GridControl on it. The solution also includes an Entity Framework model named Model1 by default. You can double-click it to see its visual representation on the diagram. For this tutorial, use a modified version of the AdventureWorks database. It contains only one table with just a few fields in it.
For information on creating and modifying Entity Framework models, please refer to the Microsoft’s Entity Framework Documentation.
Binding to Entity Framework Data Source
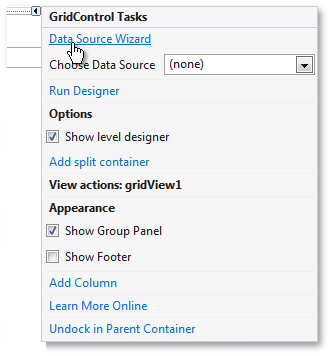
The easiest way to bind the Entity Framework model to the grid control is by using the Data Source Configuration Wizard. Invoke the grid control’s smart tag and click the Data Source Wizard.
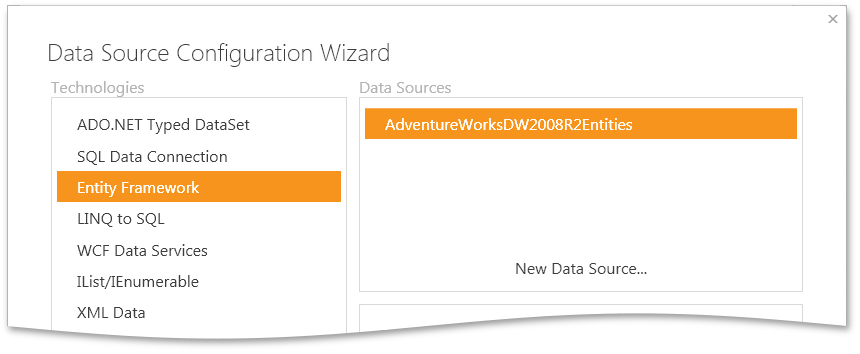
Choose the Entity Framework technology and select the existing data connection or create a new one. In this tutorial, use the existing connection to the sample Microsoft AdventureWorksDW2008R2 database. Click Next to proceed.
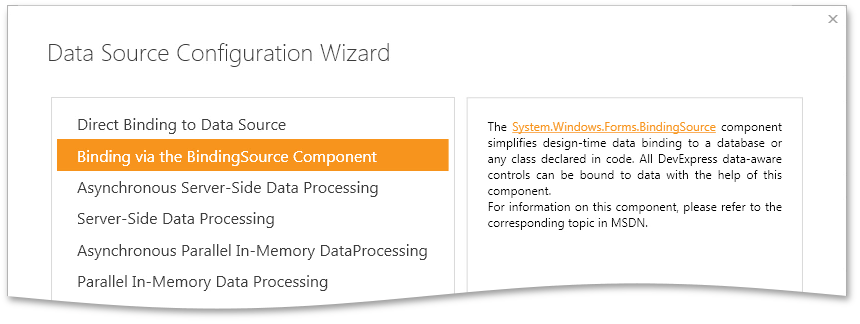
On the next page, you will be asked to choose the desired binding mode. Choose the Binding using Binding Source component option and click Next.
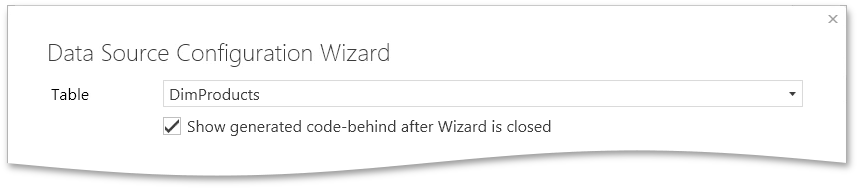
Finally, select the table to be shown within your grid control.
Result of Binding to Entity Framework Data
The grid control is now bound to the EF data and all the required code is already generated. You can see the automatically generated code in the .CS file. Now run the app to see the result.

Here are some observations about how grid displays its bound data.
- Simple numeric formatting is applied to the Price field, but it would make more sense to use Currency formatting.
- The Description field contains lengthy values, so it will be hard to edit them inside grid cells.
- The grid is smart enough to assign a special editor to columns bound to date-time fields.
- Column names are simply derived from field names.
- There are obviously no data validation rules applied to the grid.
Applying Data Annotation Attributes
All that default behavior can be changed using the GridControl settings. One more way to do this is by changing data field attributes or Data Annotation Attributes. This may come in handy when you have multiple controls bound to the same data source. This way, you don’t have to set up the same rules. See how this works.
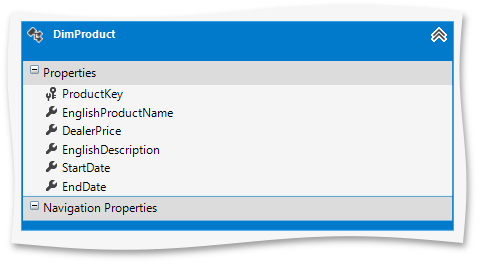
Open the DimProducts.cs file that contains the data model for your table. Here you can see all available data fields, declared as properties of the DimProduct class.
public partial class DimProduct
{
    public int ProductKey { get; set; }
    public string EnglishProductName { get; set; }
    public Nullable<decimal> DealerPrice { get; set; }
    public string EnglishDescription { get; set; }
    public Nullable<System.DateTime> StartDate { get; set; }
    public Nullable<System.DateTime> EndDate { get; set; }
}
Add data attributes to these properties and see how this changes grid behavior.
Note
Note that your application should reference the System.ComponentModel.DataAnnotations library to do so.
For the EnglishProductName field, add the Required attribute. This will not permit end-users to set empty values to this column’s cells.
[Required]
public string EnglishProductName { get; set; }
Run the application to make sure that empty values are no longer allowed.

For the DealerPrice field, add the DataType attribute to indicate that these integer values should be treated as currency data. Additionally, apply the Range attribute to set the minimum and maximum allowed values.
[DataType(DataType.Currency), Range(200, 5000)]
public Nullable<decimal> DealerPrice { get; set; }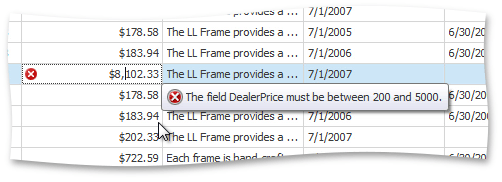
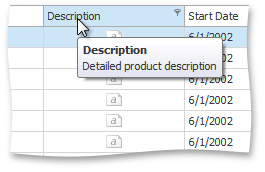
For the EnglishDescription field, use the DataType attribute to change the data type from simple to multiline text. The Display attribute will specify the Name and Description for the column.
[DataType(DataType.MultilineText), Display(Name = "Description", Description = "Detailed product description")]
public string EnglishDescription { get; set; }
Run the application to see updated captions used for the column header and its tooltip. Also, notice that cells now use the MemoEdit, since you specified the data type to be multiline text.
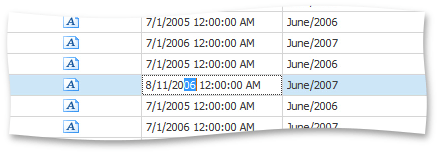
Finally, for the StartDate and EndDate columns, apply different formatting and editing rules. The first date will be treated as a simple text value. The second column’s data will remain as a date-time object, but the formatting will change to display the full month, name and year.
[DataType(DataType.Text)]
public Nullable<System.DateTime> StartDate { get; set; }
[DisplayFormat(DataFormatString = "MMMM/yyyy")]
public Nullable<System.DateTime> EndDate { get; set; }
Launch the app and see that no special editor is now displayed in the StartDate column. The EndDate column kept the editor, but the formatting has changed.
To learn more about all existing data attributes, see the this MSDN article.
Posting Data Back to the Data Source
To make sure that cell value changes in the grid control are posted back to the data source, you need to add a few lines of code. Save the changes when the grid raises the ColumnView.RowUpdated event. You need access the data source context, thus you must change the variable’s scope so it’s available to all methods in the Form class. In the handler, all you need to do is call the SaveChanges method.
DXApplication.AdventureWorksDW2008R2Entities dbContext;

private void gridView1_RowUpdated(object sender, DevExpress.XtraGrid.Views.Base.RowObjectEventArgs e) {
    dbContext.SaveChanges();
}
Now run the application and change the value in the Dealer Price column. Move focus to another row to ensure that the ColumnView.RowUpdated event is raised. Then, close the application and run it again. You will see that the value has been saved.