Lesson 2 - Creating Views
- 7 minutes to read
In the previous step, the Scaffolding Wizard created ViewModels for your context. Now you need to create Views that will be related to these ViewModels.
Main View
The main application View is your main application form. To build its content, drop any appropriate content container (NavigationFrame, DocumentManager, XtraTabControl etc) and a RibbonControl that will contain buttons to open a module.
Tip
The type of the chosen content container will affect which service you will need to use later. If you drop no content container at all, you will need to use the WindowedDocumentManagerService and all modules will be opened as separate forms.
For instance, you have chosen the Document Manager. In this case, your main View will look like following.
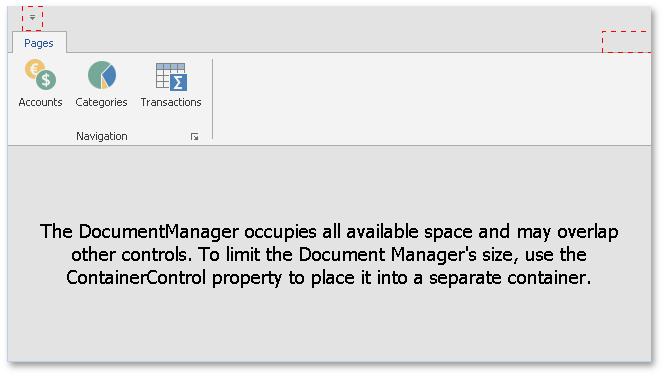
Leave all ribbon items as fakes - you will provide their functionality in the next step.
Finally, drop the MvvmContext component on the form and in its smart-tag select the main ViewModel, associated with this View. The main ViewModel, generated by the Scaffolding Wizard, will be called <Your_DbContext_Name>ViewModel. For instance, MyDbContextViewModel. Its functionality will be described later.
Detail Views
ViewModels for Account, Transaction and Category entities generated in the previous step already have the basic functionality - creating new records, adding and removing existing ones, etc. Now create a related View for each of these ViewModels.
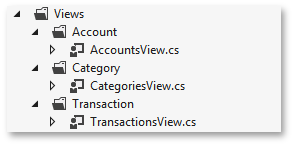
Add a new Views solution folder with three sub-folders: Account, Category and Transaction. Place a new UserControl to each of these folders - these will be your detailed Views (see the following figure).
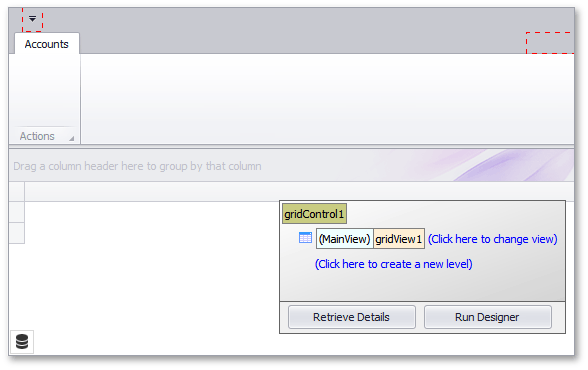
Open the AccountView user control and create a simple UI - the GridControl to display accounts and the RibbonControl to perform easy operations (adding, creating, modifying and removing accounts). You should end up with something like this:
Similar to the main View, drop the MvvmContext component onto the user control and set the AccountCollectionViewModel as the related ViewModel.
Important
The Scaffolding Wizard will generate two ViewModels for each table, stored within the DbContext. For instance, for the Transactions table it will generate TransactionsViewModel and TransactionsCollectionViewModel. The first ViewModel is designed to work with a single transaction object and is appropriate for use in edit forms created later. The second ViewModel works with the entire transactions collection and should be used here in the detailed View.
Now you need to add items to your RibbonControl. Unlike in the main ViewModel, here you can generate items automatically. Your auto-generated AccountCollectionViewModel is derived from the parent CollectionViewModel that declares basic methods to work with collections - add new object, refresh the collection, edit the current object, etc. This functionality is placed within Commands. As was described in the MvvmContext topic, the MvvmContext component is able to retrieve commands from a ViewModel and add corresponding buttons to the RibbonControl. To do so, invoke the component smart-tag and click the ‘Retrieve Commands’ link.
This will retrieve four commands - New, Edit, Refresh and Delete. For each of them a corresponding RibbonControl item will be created. Rebuild the solution and these auto-generated items will automatically receive appropriate images from the Image Gallery and Context-Dependent Images.
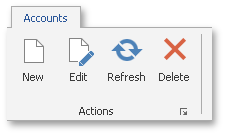
If you need to modify or remove any of these auto-added commands, click the Edit… link that will replace the Retrieve Commands link once you’ve clicked it. For instance, you can remove the ‘Refresh’ command and its corresponding ribbon item.
If you inspect the CollectionViewModel, you will see that this ViewModel declares more commands than just these four ones that were added to the Ribbon Control. The reason why all remaining commands were not added is because they are marked with the specific Display Data Annotation Attribute, which ‘hides’ this command from the Commands Editor.
[Display(AutoGenerateField = false)] public void Close() { if(DocumentOwner != null) DocumentOwner.Close(this); }To ‘open’ this command for the Editor, replace false with true or simply remove the entire attribute. When you do so, the ‘Close’ command should appear in the Commands Editor and you will be able to generate a ribbon item for it.
Further CollectionViewModel inspection will reveal that some commands like ‘Edit’ and ‘Delete’ are followed by corresponding boolean ‘Can…’ properties. In POCO ViewModels, such properties act as CanExecute conditions that specify whether or not the related command is available at the moment, and therefore whether or not the UI element bound to this command is currently enabled.
public bool CanEdit(TProjection projectionEntity) { return projectionEntity != null && !IsLoading; }This is a reasonable approach since you should not be able to click buttons like ‘Edit’ if no collection object (e.g., a specific transaction) is currently selected. This means the Scaffolding Wizard takes care of these details as well and you will not need to implement this logic manually.
- Repeat the previous steps to create the similar detail Views for CategoriesCollection and TransactionsCollection ViewModels.
Edit Form Views
Since your detail Views contain buttons that allow you to modify collection records, you will need edit forms for each collection. The process is absolutely identical to the creation of detailed forms.
Add a related UserControl to each of the ‘Views’ folder’s sub-folders.

- Drop the MvvmContext component onto each user control. Set the related ViewModel (AccountViewModel, CategoryViewModel and TransactionViewModel) as the child ViewModel for each of these components.
- The layout of your edit forms will be similar to main application Views, so add a RibbonControl and DataLayoutControl components to your form. Set the Dock property for your DataLayoutControl to Fill.
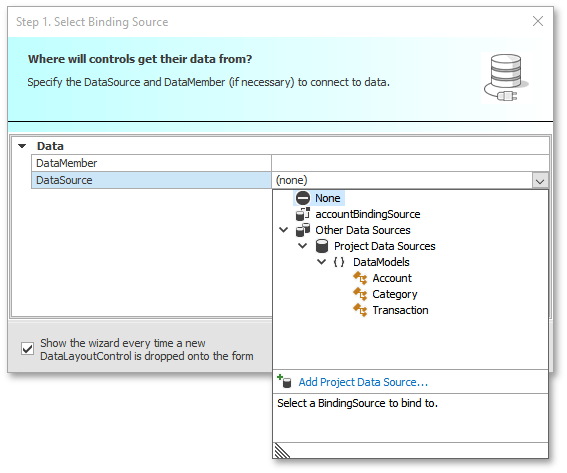
After you add a DataLayoutControl, it will automatically invoke the data source selector dialog (see the figure below). Use it to bind the DataLayoutControls for each user control to related models - Account, Category and Transaction. Refer to the Data Layout Control documentation to learn more.
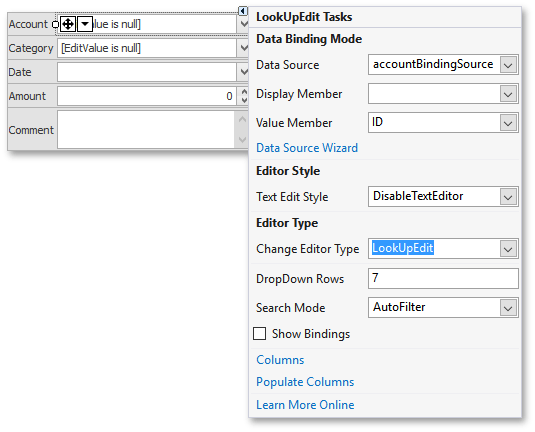
After the DataLayoutControl has added editors according to the selected data sources, you can change the editor type for the selected property. To do so, select the required editor at design time, invoke its smart-tag and use the ‘Change Editor Type’ drop-down list to choose the desired editor (see the following figure). For instance, you can use the SpinEdit control for all ‘Amount’ fields and the LookUpEdit control to allow your end-users to select required account and\or category from the drop-down list when editing transactions.
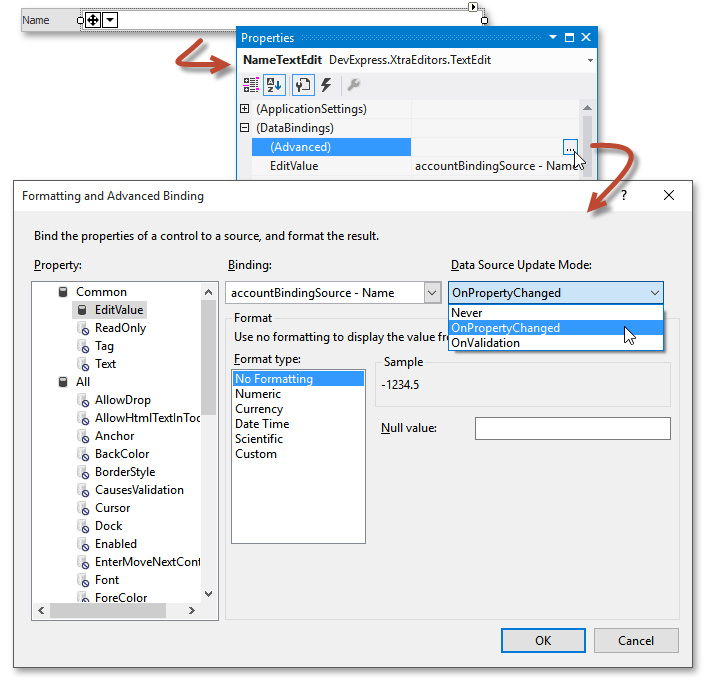
Make sure your DataLayoutControl’s text boxes use the OnPropertyChanged data source update mode for their bindings. Otherwise, when you create new/modify existing records, your changes will be saved only after the editor loses focus. To change this behavior, select your text edits, then go to the DataBindings section in Visual Studio’s Properties window, expand it and click the ellipsis button (‘…’) in the ‘(Advanced)’ row. This will invoke the ‘Formatting and Advanced Binding’ dialog where you can select the OnPropertyChanged data source update mode in the corresponding drop-down menu. The figure below illustrates this process.
You can also manually change this setting directly in the Designer.cs code as shown below.
//Make sure the DataSourceUpdateMode is set to OnPropertyChanged this.NameTextEdit.DataBindings.Add(new System.Windows.Forms.Binding("EditValue", this.accountBindingSource, "Name", true, System.Windows.Forms.DataSourceUpdateMode.OnPropertyChanged)); this.AmountTextEdit.DataBindings.Add(new System.Windows.Forms.Binding("EditValue", this.accountBindingSource, "Amount", true, System.Windows.Forms.DataSourceUpdateMode.OnPropertyChanged));- Add Ribbon items that will manage your collection entries. To do so, populate the Ribbon with required commands, as you did so with detailed Views before.
The following figure illustrates an approximate result of what you should get (the edit form for Account model is shown).

Now, when Views of all required types are ready, you can proceed to the next part - navigation.