Fields in Rich Text Documents
- 13 minutes to read
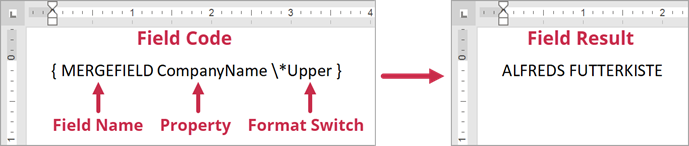
A Field is a placeholder used to insert text and graphics into a document.
A field code includes the following elements:
- Field Name
- The field name. Refer to the following article for a list of all available fields: Field Codes.
- Property
- Instruction or variable used in a field. This is an optional element.
- Switch
- An optional parameter that allows you to modify a field result. A switch starts with a backslash followed by a switch argument. A field can have its own set of switches that specify the field’s behavior. You can also use format switches to define formats for numeric, text, date, and time fields. Refer to the following section for a list of supported format switches: Format Switches.
A field in the document consists of two ranges—CodeRange and ResultRange. Use the Field.Range property to obtain the total range the field occupies.
Supported Field Types
Non-MailMerge
Regular fields used to insert simple data (for example, DATE, TIME, or PAGE). The Non-MailMerge field results are shown after the update.
MailMerge
Fields used in the mail merge process. You should bind a document to a data source to obtain MailMerge field values. Execute mail merge to evaluate MailMerge field values and display them in the document.
Mixed
Fields that do not require a data source to obtain their values (CREATEDATE, DOCVARIABLE, IF, and INCLUDEPICTURE). They are substituted with the resulting values during mail merge.
Formula
The = (Formula) field is a code that uses mathematical formulas and numeric field values to calculate a number. The formula field syntax:
{={NUMERIC FIELD} Operator {NUMERIC FIELD}}
The RichEditControl supports the following operators in the formula field:
- Addition (+)
- Subtraction (-)
- Multiplication (*)
- Division (/)
- Powers and Roots (^)
- Equal to (=)
- Less than (<)
- Less than or equal to (<=)
- Greater than (>)
- Greater than or equal to (>=)
- Not equal to (<>)
You can change the field’s numeric format. Refer to the following topic for a list of available numeric format switches: Numeric Format Switch.
Insert Fields
Fields are stored in the FieldCollection collection. The SubDocument.Fields property allows you to access the field collection. Call the FieldCollection.Create method to insert a new field. You can add fields to any SubDocument—the main document body, headers, footers, text boxes, comments, footnotes, and endnotes. Use the following API to access the content of these document parts:
| Document part | Member |
|---|---|
| Main document body | SubDocument.BeginUpdate–SubDocument.EndUpdate |
| Header | Section.BeginUpdateHeader–Section.EndUpdateHeader |
| Footer | Section.BeginUpdateFooter–Section.EndUpdateFooter |
| Comment | Comment.BeginUpdate–Comment.EndUpdate |
| Footnote and Endnote | Note.BeginUpdate–Note.EndUpdate |
| Text Box | TextBox.Document |
Create a Field
The code snippet below uses the SYMBOL field to add a check mark (✔) to the document:
using DevExpress.XtraRichEdit;
using DevExpress.XtraRichEdit.API.Native;
//...

// Access a document.
Document document = richEditControl1.Document;

// Start to edit the document.
document.BeginUpdate();

// Create the "SYMBOL" field.
document.Fields.Create(document.Range.Start, "SYMBOL 252 \\f Wingdings \\s 28");

// Finalize to edit the document.
document.EndUpdate();

// Update all fields in the main document body.
document.Fields.Update();

// Save the document to the file.
document.SaveDocument("Result.docx", DocumentFormat.OpenXml);
Create a Field from a Range
The code sample below inserts text and converts it to the SYMBOL field.
using DevExpress.XtraRichEdit;
using DevExpress.XtraRichEdit.API.Native;
//...

// Access a document.
Document document = richEditControl1.Document;

// Start to edit the document.
document.BeginUpdate();

// Append text.
document.AppendText("SYMBOL 0x54 \\f Wingdings \\s 24");

// Convert inserted text to a field.
document.Fields.Create(document.Paragraphs[0].Range);

// Update all fields.
document.Fields.Update();

// Finalize to edit the document.
document.EndUpdate();

// Save the result
document.SaveDocument("Result.docx", DocumentFormat.OpenXml);
Modify Fields
Call the SubDocument.GetText method and pass the field’s CodeRange or ResultRange as a parameter to retrieve the field code or value. Use the SubDocument.InsertText method to add text to a field code or a result.
Determine a Field Type and Modify a Field
The following code snippet specifies a custom date and time format for all DATE fields in the document:
using DevExpress.XtraRichEdit;
using DevExpress.XtraRichEdit.API.Native;
//...

// Access a document.
Document document = richEditControl1.Document;
// ...
// Check all fields in the document.
for (int i = 0; i < document.Fields.Count; i++)
{
    // Access a field code.
    string fieldCode = document.GetText(document.Fields[i].CodeRange);
    // Check whether a field code is "DATE".
    if (fieldCode == "DATE")
    {
        // Set the document position to the end of the field code range.
        DocumentPosition position = document.Fields[i].CodeRange.End;
        // Specify a date and time format for the field.
        document.InsertText(position, @" \@ ""M/d/yyyy HH:mm:ss""");
    }
}
// Update all fields in the main document body.
document.Fields.Update();
Retrieve a Field Result
The code sample below checks all field results and inserts “Empty Value!” if the field result is empty:
using DevExpress.XtraRichEdit;
using DevExpress.XtraRichEdit.API.Native;
using System.Drawing;

Document document = richEditControl.Document;
foreach (Field field in document.Fields) {
    string strResult = document.GetText(field.ResultRange);

    if (strResult == "") {
        document.InsertText(field.ResultRange.Start, "Empty Value!");
    }
}
Update Fields
Most fields are updated automatically when the document is saved or printed, or during the mail merge operation. Use the following methods to update document fields on demand:
| Method | Description |
|---|---|
| Field.Update | Updates a field. |
| FieldCollection.Update | Updates all fields in specific parts of the document (main body, text box, header, footer, comment, footnote, and endnote). |
| Document.UpdateAllFields | Updates all fields in the document. |
The code sample below updates all fields in the document:
using DevExpress.XtraRichEdit;
using DevExpress.XtraRichEdit.API.Native;
//...

// Access a document.
Document document = richEditControl1.Document;
//...
// Update all fields in the document.
document.UpdateAllFields();
If the field’s Field.Locked property is true, this field is not updated. You can set the FieldOptions.UpdateLockedFields option to UpdateLockedFields.Always to update locked fields.
Update DOCVARIABLE Fields
Use the FieldOptions.UpdateDocVariablesBeforePrint and FieldOptions.UpdateDocVariablesBeforeCopy field options to specify whether to update the DOCVARIABLE field before the document is printed or before the field is copied. When the DOCVARIABLE field is updated, the RichEditControl.CalculateDocumentVariable event fires. Handle this event to analyze DOCVARIABLE field switches and arguments, and specify how to calculate a field result.
The RichEditControl.CalculateDocumentVariable event does not occur for a locked DOCVARIABLE field, and the field value remains unchanged. Set the FieldOptions.UpdateLockedFields option to the UpdateLockedFields.DocVariableOnly value to update locked DOCVARIABLE fields.
Tip
Refer to the following GitHub examples for more information on how to use the DOCVARIABLE fields:
Suppress Field Updates for Loaded Documents
The Rich Text Editor updates all document fields when it loads a document. You can cancel the DATE, TIME, and DOCVARIABLE field updates. Handle the RichEditControl.BeforeImport event and define the UpdateFieldOptions options within the event handler to specify whether to update these fields.
The following example demonstrates how to cancel the update of the DATE, TIME, and DOCVARIABLE document fields for all document formats:
using DevExpress.XtraRichEdit;
using DevExpress.XtraRichEdit.Import;
//...

// Handle the BeforeImport event.
richEditControl1.BeforeImport += richEditControl1_BeforeImport;

// Load a document from the file.
richEditControl1.LoadDocument("FirstLook.docx");

private static void richEditControl1_BeforeImport(object sender, BeforeImportEventArgs e)
{

    // Cancel the DATE, TIME, and DOCVARIABLE fields' update.
    UpdateFieldOptions updateFieldOptions = ((DocumentImporterOptions)e.Options).UpdateField;
    updateFieldOptions.Date = false;
    updateFieldOptions.Time = false;
    updateFieldOptions.DocVariable = false;
}
Replace Fields with Field Values
You can unlink a field to convert the field result to text or graphics. Unlinked fields cannot be updated. Use the following methods to unlink document fields:
| Method | Description |
|---|---|
| Field.Unlink | Replaces the field with the field value. |
| FieldCollection.Unlink | Replaces all fields with their values in a specific document part (main body, header, footer, comment, text box, footnote, or endnote). |
| Document.UnlinkAllFields | Replaces all document fields with field values. |
The following example unlinks all fields in text boxes:
using DevExpress.XtraRichEdit;
using DevExpress.XtraRichEdit.API.Native;
//...

// Access a document.
Document document = richEditControl1.Document;

// Check all shapes in the document.
foreach (Shape shape in document.Shapes)
{
    // Check whether the shape is a text box.
    if (shape.ShapeFormat.HasText)
    {
        // Access text box content.
        SubDocument textBoxDocument = shape.ShapeFormat.TextBox.Document;
        //...
        // Unlink all fields in the text box.
        textBoxDocument.Fields.Unlink();
    }
}
Show Field Codes
Use the Field.ShowCodes property to display field codes for specific fields instead of field results.
The code snippet below displays field codes for all fields in the main document body:
using DevExpress.XtraRichEdit;
using DevExpress.XtraRichEdit.API.Native;
//...

// Access a document.
Document document = richEditControl1.Document;

// Load a document from the file.
document.LoadDocument("MailMergeSimple.docx", DocumentFormat.OpenXml);

// Check all fields in the main document body.
for (int i = 0; i < document.Fields.Count; i++)
{
    // Show field codes.
    document.Fields[i].ShowCodes = true;
}
Specify Field Options
Use the RichEditControl.Options.Fields property to specify field options. These options define the appearance and behavior of the document fields.
The code snippet below demonstrates how to specify field options.
using DevExpress.XtraRichEdit;
using DevExpress.XtraRichEdit.API.Native;
//...

// Specify field options.
FieldOptions fieldOptions = richEditControl1.Options.Fields;
fieldOptions.HighlightMode = FieldsHighlightMode.Always;
fieldOptions.HighlightColor = System.Drawing.Color.LightSalmon;
fieldOptions.UseCurrentCultureDateTimeFormat = true;
fieldOptions.ThrowExceptionOnInvalidFormatSwitch = true;
fieldOptions.UpdateFieldsInTextBoxes = true;

// Access a document.
Document document = richEditControl1.Document;

// Insert a text box in the document.
Shape myTextBox = document.Shapes.InsertTextBox(document.Range.Start);

// Access text box content.
SubDocument textBoxDocument1 = myTextBox.ShapeFormat.TextBox.Document;

// Create the "DATE" field.
textBoxDocument.Fields.Create(textBoxDocument.Range.Start, "DATE");

// Update the field.
textBoxDocument.Fields.Update();
Remove Fields
Call the SubDocument.Delete method and pass the field range to remove the field from the document.
The following example removes all fields from the document:
using DevExpress.XtraRichEdit;
using DevExpress.XtraRichEdit.API.Native;
//...

// Access a document.
Document document = richEditControl1.Document;
//...
// Remove all fields from the collection
for (int i = document.Fields.Count-1; i >= 0; i--)
{
    document.Delete(document.Fields[i].Range);
}
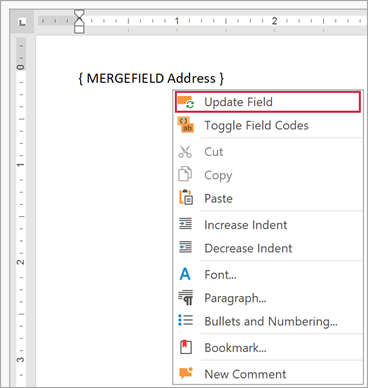
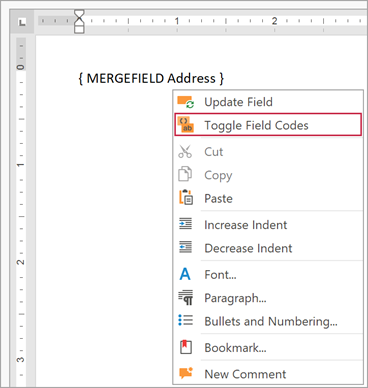
Manage Fields in the User Interface
The Rich Text Editor UI includes the following commands that allow you to manage fields:
- Update Field
Updates the field result. Right-click the field code and select the Update Field command in the field’s context menu.
- Toggle Field Codes
Toggles between the field code and field result. Right-click the field code and select the Toggle Field Codes command in the field’s context menu.
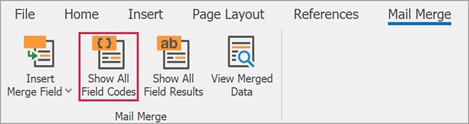
- Show All Field Codes
Shows all field codes in the document. Click the Show All Field Codes button on the Mail Merge ribbon tab.
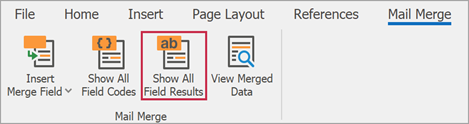
- Show All Field Results
Shows all field results in the document. Click the Show All Field Results button on the Mail Merge ribbon tab.
You can also use the following shortcuts to interact with fields:
| Shortcut | Description |
|---|---|
| CTRL+F9 | Inserts an empty field. |
| F9 | Updates the selected field. |
| ALT+F9 | Switches between all field codes and their results. |
| CTRL+F11 | Locks a field. |
| CTRL+SHIFT+F11 | Unlocks a field. |
| CTRL+SHIFT+F9 | Replaces a field with the field value (unlinks a field). |
MERGEFIELD Display Modes
When you click the Show All Field Results button, the MERGEFIELD field is displayed as a placeholder.

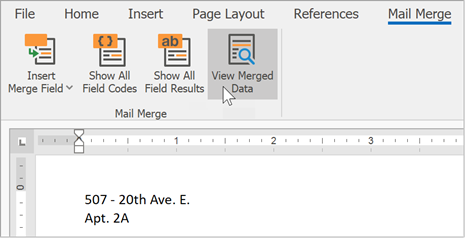
Click the View Merged Data button to display the MERGEFIELD code result.
Restrict Field Operations
You can use the DocumentCapabilitiesOptions.Fields property to specify whether the document recognizes fields and allows you to manage fields. Set this property to DocumentCapability.Hidden or DocumentCapability.Disabled to restrict field operations in the document and hide or disable field commands in the Rich Text Editor UI.
The code snippet below restricts field operations and disables field commands in the Rich Text Editor UI:
using DevExpress.XtraRichEdit;
using DevExpress.XtraRichEdit.API.Native;

//...
// Disable document fields.
richEditControl1.Options.DocumentCapabilities.Fields = DocumentCapability.Disabled;