How to: Create a Custom Link to Print a ListView Control
- 7 minutes to read
This topic explains how to create your own link to print specific objects that do not provide the IPrintable interface, or the appropriate printing link exists in the XtraPrinting Library.
The Printing Links technology implemented in XtraPrinting Library enables you to generate reports for any given object, even if it has no visual representation - for instance, a dataset. To accomplish this, you need a Link to print a specific object. This Link should be inherited from the base Link class. Once implemented, the Link can be used to print the object in any of your projects, without the need to write any new code.
We’ll examine the steps to create your own Link to print a standard ListView control.
Step 1. Create a New Project and Provide Mandatory Declarations
Start a new Windows Control Library project in Microsoft Visual Studio. Implement the following code to declare a new link in the UserLinks namespace, then override the standard Link class constructors and the Link.CreateDocument method.
using DevExpress.XtraPrinting;
using DevExpress.XtraPrintingLinks;
// ...

namespace UserLinks {
    public class ListLink : DevExpress.XtraPrinting.Link {
        private ListView listView = null;


        public ListView ListViewControl { get { return listView; } set { listView = value; }
        }

        public ListLink(System.ComponentModel.IContainer container) : base(container) {
        }

        public ListLink() : base() {
        }

        public ListLink(PrintingSystem ps) : base(ps) {
        }

        public override void CreateDocument(PrintingSystem ps) {
            if (listView == null) return;
            if (listView.Items.Count == 0) return;
            BrickGraphics gr = ps.Graph;
            base.CreateDocument(ps);
        }
    }
}
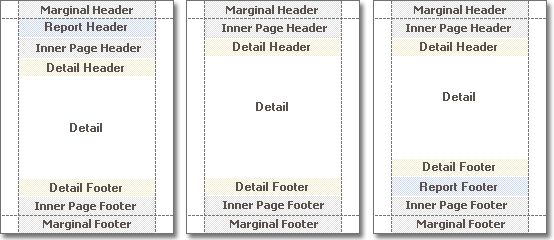
Step 2. Create Custom Report Sections
You don’t need to provide methods for all possible page areas. At a minimum, the Detail area creation method is enough.
The report page sections are shown in the following picture:
2.1. MarginalHeader Page Section
The following code creates the content for the report’s page section in the marginal header area. It displays the current month and date.
protected override void CreateMarginalHeader(BrickGraphics gr) {
    gr.Modifier = BrickModifier.MarginalHeader;
    string format = "Printed on {0:MMMM, dd}";
    PageInfoBrick brick = gr.DrawPageInfo(PageInfo.DateTime, format, Color.Black,
    new RectangleF(0, 0, 0, 20), BorderSide.None);
    brick.Alignment = BrickAlignment.Far;
    brick.AutoWidth = true;
}
2.2. ReportHeader Page Section
The following code creates the content for the report header section.
protected override void CreateReportHeader(BrickGraphics gr) {
    gr.Modifier = BrickModifier.ReportHeader;
    TextBrick textBrick;
    gr.BackColor = Color.White;
    gr.StringFormat = new BrickStringFormat(StringFormatFlags.NoWrap | StringFormatFlags.LineLimit);
    gr.StringFormat = gr.StringFormat.ChangeAlignment(StringAlignment.Center);
    Rectangle r = new Rectangle(0, 0, 200, 30);
    gr.Font = new Font("Arial", 16);
    textBrick = gr.DrawString("ListView Report", Color.Red, r, BorderSide.None);
    textBrick.StringFormat.ChangeAlignment(StringAlignment.Center);
}
2.3. DetailHeader Page Section
The following code creates the content for the detail header report section.
protected override void CreateDetailHeader(BrickGraphics gr) {
    if (listView.View != View.Details)
        return;
    gr.Modifier = BrickModifier.DetailHeader;
    gr.Font = listView.Font;
    gr.BackColor = SystemColors.Control;
    gr.ForeColor = SystemColors.ControlText;
    gr.StringFormat = new BrickStringFormat(StringFormatFlags.NoWrap);
    gr.StringFormat = gr.StringFormat.ChangeAlignment(StringAlignment.Near);
    gr.DrawString("Name", gr.ForeColor, listView.Items[0].Bounds, BorderSide.All);
}
2.4. Detail Page Section
The following code adds ListView items to the Detail section.
protected override void CreateDetail(BrickGraphics gr) {
    gr.StringFormat = new BrickStringFormat(StringFormatFlags.NoWrap |
        StringFormatFlags.LineLimit);

    gr.StringFormat = gr.StringFormat.ChangeLineAlignment(StringAlignment.Near);

    for (int i = 0; i < listView.Items.Count; i++) {
        gr.Font = listView.Items[i].Font;
        gr.BackColor = listView.Items[i].BackColor;
        gr.ForeColor = listView.Items[i].ForeColor;
        gr.DrawString(listView.Items[i].Text, gr.ForeColor, listView.Items[i].Bounds,
            BorderSide.None);
    }
}
2.5. DetailFooter Page Section
The following code creates the content for the detail footer report section using the ListView settings. It displays the number of items in the ListView control.
protected override void CreateDetailFooter(BrickGraphics gr) {
    gr.Modifier = BrickModifier.DetailFooter;
    gr.Font = listView.Font;
    gr.BackColor = SystemColors.Control;
    gr.ForeColor = SystemColors.ControlText;
    gr.StringFormat = new BrickStringFormat(StringFormatFlags.NoWrap);
    gr.StringFormat = gr.StringFormat.ChangeAlignment(StringAlignment.Far);
    gr.DrawString("Total Items: " + Convert.ToString(listView.Items.Count), gr.ForeColor,
        new Rectangle(0, 0, 60 + listView.Items[0].Bounds.Width, listView.Items[0].Bounds.Height),
        BorderSide.All);
}
2.6. ReportFooter Page Section
The following code creates the content for the report footer section.
protected override void CreateReportFooter(BrickGraphics gr) {
    gr.Modifier = BrickModifier.ReportFooter;

    gr.StringFormat = new BrickStringFormat(StringFormatFlags.NoWrap |
        StringFormatFlags.LineLimit);
    gr.StringFormat = gr.StringFormat.ChangeLineAlignment(StringAlignment.Far);

    gr.Font = listView.Font;

    gr.DrawString("Created by John Smith", gr.ForeColor, new Rectangle(0, 0, 200, 30),
        BorderSide.None);
}
2.7. MarginalFooter Page Section
The following code creates the content for the report’s page section in the marginal footer area. It displays the page number and total number of pages in the report.
protected override void CreateMarginalFooter(BrickGraphics gr) {
    gr.Modifier = BrickModifier.MarginalFooter;
    string format = "Page {0} of {1}";
    PageInfoBrick brick = gr.DrawPageInfo(PageInfo.NumberOfTotal, format, Color.Black,
        new RectangleF(0, 0, 0, 20), BorderSide.None);
    brick.Alignment = BrickAlignment.Far;
    brick.AutoWidth = true;
}
Step 3. Use a Custom Link in Your Application
A custom link is now finished, and once the assembly is correctly referenced, you can use the custom printing link in your application as follows:
using DevExpress.XtraPrinting;
using DevExpress.XtraPrintingLinks;
using UserLinks;
// ...

    ListLink myLink = new ListLink(printingSystem1);
    myLink.ListViewControl=listView1;
    myLink.ShowPreview();
Tip
A complete sample project is available in the DevExpress Code Examples database at http://www.devexpress.com/example=E21.