How to: Create a Gantt Chart Application
- 8 minutes to read
Note
Watch the Video DevExpress WinForms Scheduler: The Gantt View
Tip
A complete sample project is available in the DevExpress Code Examples database at http://www.devexpress.com/example=E3574.
To create an application to enable the Gantt View functionality, follow the instructions below.
- Create a New Project
- Create a Database
- Bind Data to the Scheduler
- Specify the ResourceTree Settings
- Modify the Table Adapter Settings
- Post Appointment Data Back to the Database
- Post Appointment Dependencies Data Back to the Database
- Save the Appointment Identifier
- Final Adjustment
- Result
Steps 1-4. Create a New Project.
- Create a new Visual C# Windows project.
- Drop the SplitContainerControl from the DX.19.1: Navigation & Layout tab in the Toolbox onto the form. Click Dock in Parent Container smart tag to fill the form.
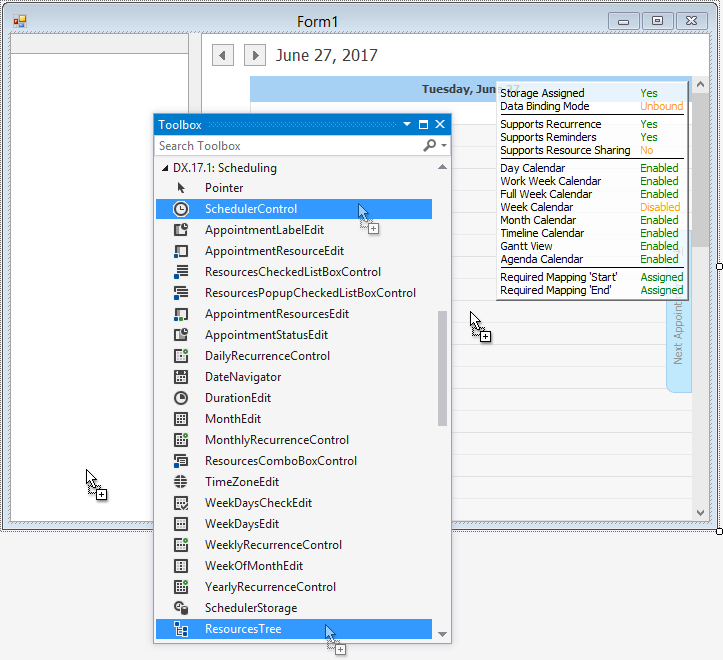
- Drop the SchedulerControl control from the DX.19.1: Scheduling tab in the Toolbox onto the right panel of the SplitContainer. Use the smart tag to dock it to fill the container.
- Drop the ResourcesTree control from the DX.19.1: Scheduling tab in the Toolbox onto the left panel of the SplitContainer. Click its smart tag and select Dock in Parent Container.
Steps 5-9. Create a Database.
In the Tools menu of the Visual Studio IDE select Connect to Database…. The Add Connection dialog is invoked.
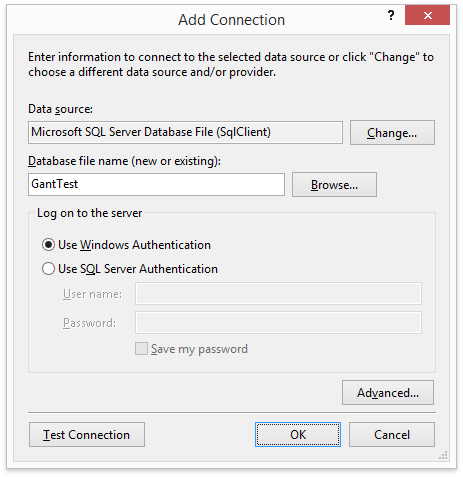
Type in a name of the new database file - GantTest, as illustrated in the picture above. Click OK to create a new database and a connection.
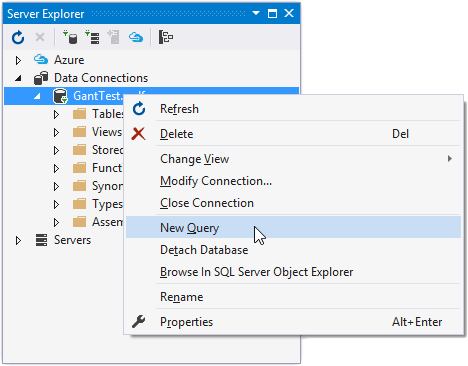
In the Server Explorer window right-click the newly created data connection and select New Query to open a Query editor window that allows you to enter and execute scripts for this database.
Switch to the form with the SchedulerControl, select the Scheduler Control, and click the smart tag icon at the top right of the control (
 ) to display its actions list. Click the Create Sample Database for Gantt View item to invoke a window that contains SQL script. Click the Copy to Clipboard and Close button.
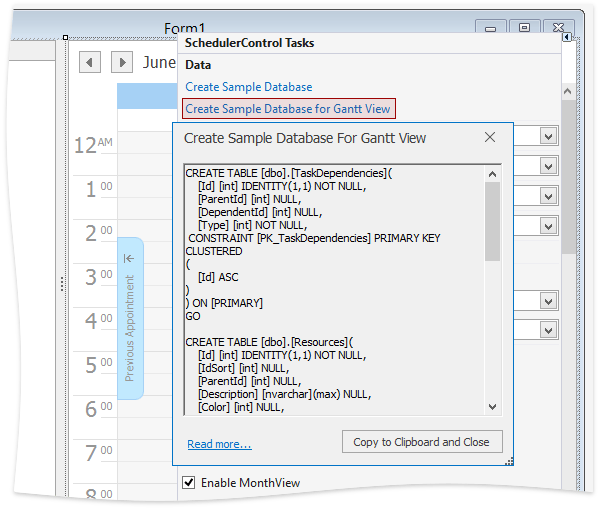
Switch to the SQLQuery window and paste the script in a window. Click Execute

- Next, fill the Resource table with sample data. To do this, copy the script from the Hierarchical Resource Specifics document starting from SET IDENTITY_INSERT. Delete the content of the previous script in the query window, paste the new one and click Execute.
Steps 10-15. Bind a SchedulerControl to a database.
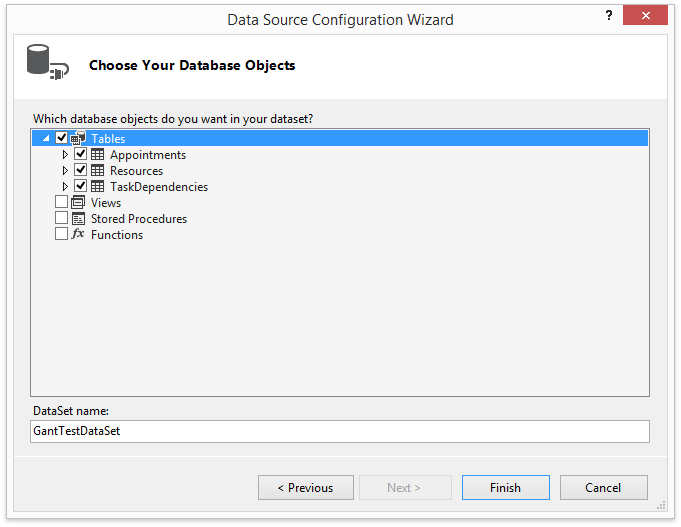
Use the Project/Add New Data Source menu command in Visual Studio to invoke a Data Source Configuration wizard. Specify the database connection string and include tables for resources, appointments and dependencies (Resources, Tasks and TaskDependencies tables in our example). Specify the name for the dataset - GantTestDataSet.
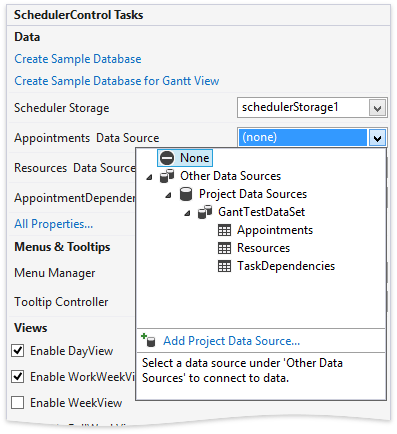
Click the Scheduler control’s smart tag and specify the Appointments table in the GantTestDataSet as the Appointments Data Source.
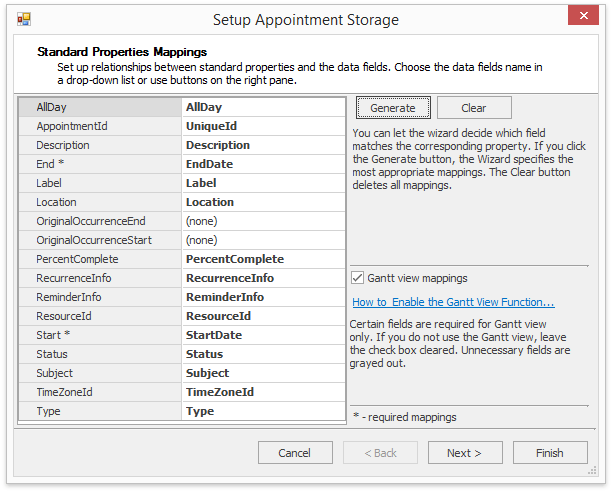
The Mappings Wizards (Setup Appointment Storage dialog) is invoked automatically. Select the Gantt view mappings checkbox to map fields containing the appointment identifier and Percent Complete value. Use Clear and Generate buttons to generate mappings automatically.
The picture below illustrates the Mappings Wizard window for appointment mappings.
Afterwards you can also click the Mappings Wizard… link for the data source to invoke the wizard to make sure that all required mappings are specified.
Click the Scheduler control’s smart tag and specify the Resources table in the GantTestDataSet as the Resources Data Source.
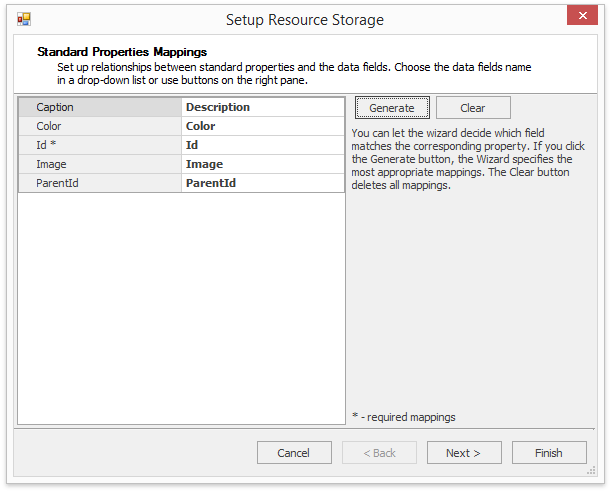
The picture below illustrates the Wizard window invoked for resource mappings. The ParentID field contains the identifier of the parent resource node for the current resource node. It is used to build a resource tree.
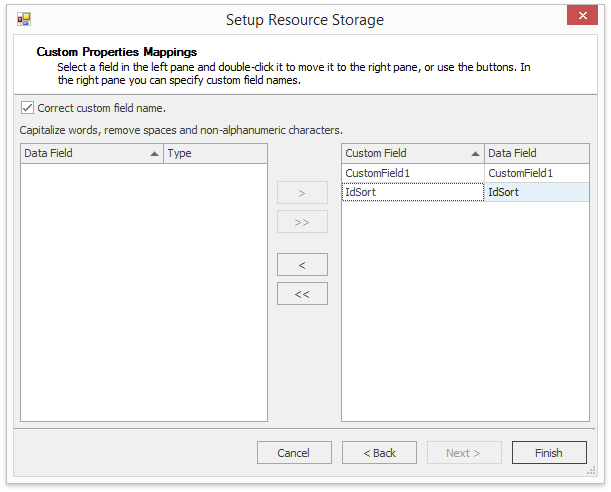
Click the Mappings Wizard… link for Resources data source and then Next to navigate to Custom Properties Mapping dialog. Map IdSort field to a corresponding custom property of a resource as illustrated below.
Click the Scheduler control’s smart tag and specify the TaskDependencies table in the GantTestDataSet as the AppointmentDependencies Data Source.
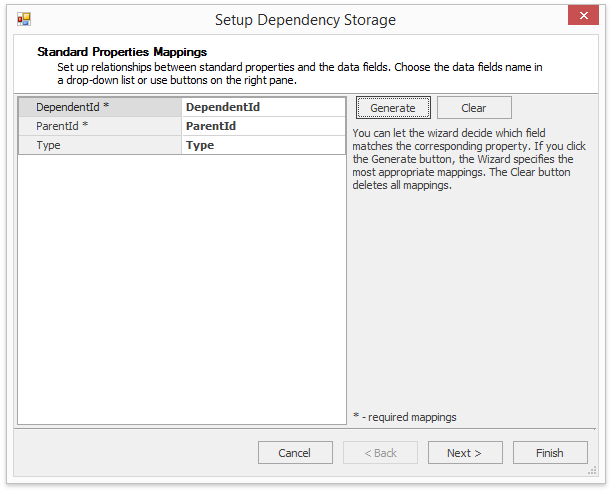
The picture below illustrates the Wizard window invoked for dependency mappings. For more information on dependencies review the Dependencies article.
Steps 16-17. Adjust ResourcesTree settings
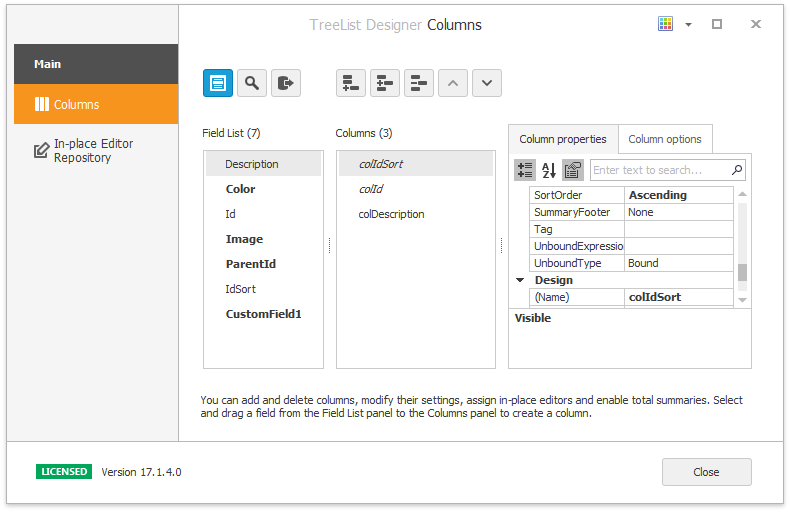
In Visual Studio Designer, open the ResourcesTree control’s smart tag and click Run Designer. The Tree List Designer is invoked. Double-click IdSort, Id and Description fields in the field list to add them to the list of displayed columns.
If the field list is empty, set the Scheduler Control combo box in the ResourcesTree control’s smart tag to (none), then to the schedulerControl1 again. This action forces the Resource Tree to retrieve field names form the SchedulerControl.
Move the IdSort field to the top of the list so it becomes the principal sort field, specify its sort order and hide the IdSort and Id fields by setting their Visible property to false.
Step 18. Modify Table Adapter settings.
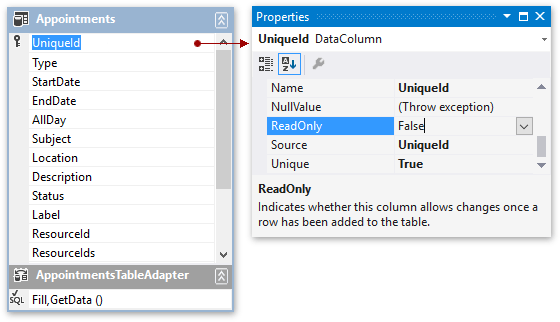
In this example, table adapters are created automatically using Visual Studio wizards. This technique ensures that all Insert, Update and Delete statements are generated automatically and the identity fields are treated properly. Nevertheless, XtraScheduler specifics require modification of the data set, as shown in the following picture.
- Set the Read-Only property to false for identity fields in the Appointments and TaskDependencies tables: namely, for the UniqueId field in the Appointments table and for the Id field in the TaskDependencies table.
Step 19. Add code that writes modified appointments back to the database.
Note
A complete sample project is available at https://github.com/DevExpress-Examples/how-to-create-gantt-chart-using-the-scheduler-bound-to-ms-sql-server-database-e3574
    schedulerStorage1.AppointmentsInserted += new PersistentObjectsEventHandler(schedulerStorage1_AppointmentsInserted);
    schedulerStorage1.AppointmentsChanged += new PersistentObjectsEventHandler(schedulerStorage1_AppointmentsChanged);
    schedulerStorage1.AppointmentsDeleted += new PersistentObjectsEventHandler(schedulerStorage1_AppointmentsDeleted);
private void schedulerStorage1_AppointmentsChanged(object sender, PersistentObjectsEventArgs e) {
    CommitTask();
}

private void schedulerStorage1_AppointmentsDeleted(object sender, PersistentObjectsEventArgs e) {
    CommitTask();
}
private void schedulerStorage1_AppointmentsInserted(object sender, PersistentObjectsEventArgs e) {

    CommitTask();
    schedulerStorage1.SetAppointmentId(((Appointment)e.Objects[0]), id);
}
void CommitTask() {

    appointmentsTableAdapter.Update(gantTestDataSet);
    this.gantTestDataSet.AcceptChanges();
}
Step 20. Add code that writes modified appointment dependencies back to the database.
Note
A complete sample project is available at https://github.com/DevExpress-Examples/how-to-create-gantt-chart-using-the-scheduler-bound-to-ms-sql-server-database-e3574
    schedulerStorage1.AppointmentDependenciesInserted += new PersistentObjectsEventHandler(schedulerStorage1_AppointmentDependenciesInserted);
    schedulerStorage1.AppointmentDependenciesChanged += new PersistentObjectsEventHandler(schedulerStorage1_AppointmentDependenciesChanged);
    schedulerStorage1.AppointmentDependenciesDeleted += new PersistentObjectsEventHandler(schedulerStorage1_AppointmentDependenciesDeleted);
private void schedulerStorage1_AppointmentDependenciesChanged(object sender, PersistentObjectsEventArgs e) {
    CommitTaskDependency();
}

private void schedulerStorage1_AppointmentDependenciesDeleted(object sender, PersistentObjectsEventArgs e) {
    CommitTaskDependency();
}

private void schedulerStorage1_AppointmentDependenciesInserted(object sender, PersistentObjectsEventArgs e) {
    CommitTaskDependency();
}
void CommitTaskDependency() {
    taskDependenciesTableAdapter.Update(this.gantTestDataSet);
    this.gantTestDataSet.AcceptChanges();
}
Step 21. Add code to ensure that an appointment has the same Id in the Scheduler storage and in the database.
Since the data source has an auto incremented identity field, you should not commit the internal identifier to fill this field. The AppointmentStorage.CommitIdToDataSource property is used to specify this behavior. Instead, provide code to obtain the identity value from the data source and set the PersistentObject.Id property for the newly inserted appointment. This operation should be accomplished in the RowUpdated event of the appointment table adapter.
If AppointmentStorage.CommitIdToDataSource property is set to false, the appointment identifier for a new appointment is not sent to the data source. You should manually synchronize the appointment identifier assigned in the database and the identifier value in the appointment data source bound to the Scheduler.
The code snippet below accomplishes the following. After appointment data are committed to the database, it updates the table adapter so its appointment data contains the same identifier as the one that has been auto-generated in the database.
Note
A complete sample project is available at https://github.com/DevExpress-Examples/how-to-create-gantt-chart-using-the-scheduler-bound-to-ms-sql-server-database-e3574
    schedulerStorage1.Appointments.CommitIdToDataSource = false;
    this.appointmentsTableAdapter.Adapter.RowUpdated += new SqlRowUpdatedEventHandler(appointmentsTableAdapter_RowUpdated);
int id = 0;
private void appointmentsTableAdapter_RowUpdated(object sender, SqlRowUpdatedEventArgs e) {
    if (e.Status == UpdateStatus.Continue && e.StatementType == StatementType.Insert) {
        id = 0;
        using (SqlCommand cmd = new SqlCommand("SELECT @@IDENTITY", appointmentsTableAdapter.Connection)) {
            id = Convert.ToInt32(cmd.ExecuteScalar());
            e.Row["UniqueId"] = id;
        }
    }
}
Step 22. Adjust the Scheduler control for better appearance.
Set the Scheduler control’s SchedulerControl.ActiveViewType to GanttView.Type,the SchedulerControl.GroupType property to Resource,the TimelineView.ShowResourceHeaders property to true and the CellsAutoHeightOptions.Enabled property to true.
Note
A complete sample project is available at https://github.com/DevExpress-Examples/how-to-create-gantt-chart-using-the-scheduler-bound-to-ms-sql-server-database-e3574
schedulerControl1.ActiveViewType = SchedulerViewType.Gantt;
schedulerControl1.GroupType = SchedulerGroupType.Resource;
schedulerControl1.GanttView.CellsAutoHeightOptions.Enabled = true;
// Hide unnecessary visual elements.
schedulerControl1.GanttView.ShowResourceHeaders = false;
schedulerControl1.GanttView.NavigationButtonVisibility = NavigationButtonVisibility.Never;
// Disable user sorting in the Resource Tree (clicking the column will not change the sort order).
colDescription.OptionsColumn.AllowSort = false;
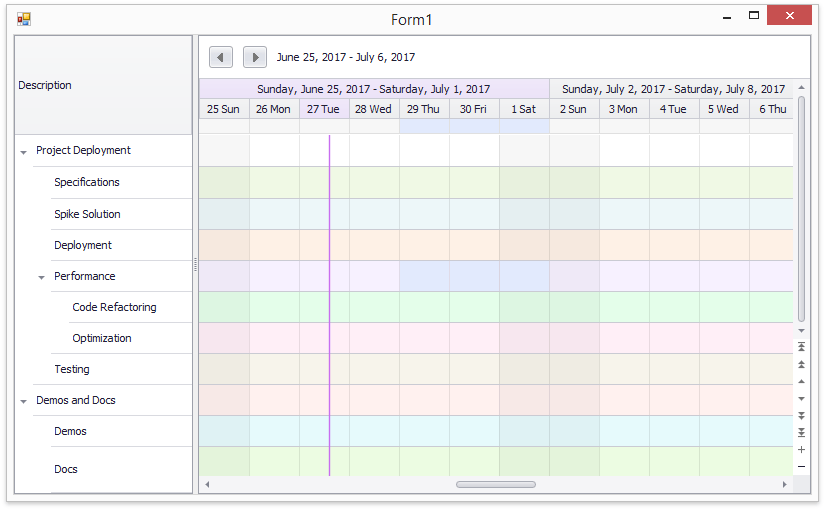
Step 23. Run the project.
Observe the application screen as shown below.