Automatic Filtering Row
- 3 minutes to read
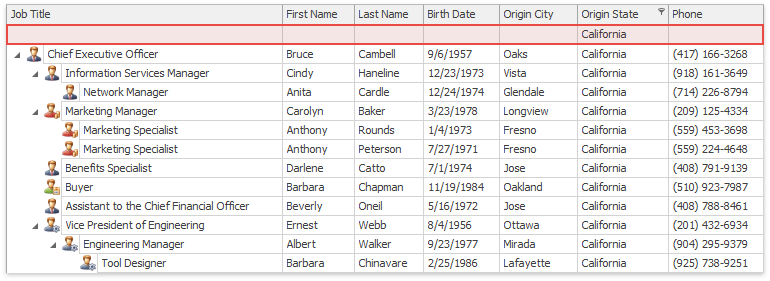
The automatic filtering row allows end-users to filter Tree List records on-the-fly, without invoking the Filter Editor dialog. This row is displayed above regular Tree List nodes.
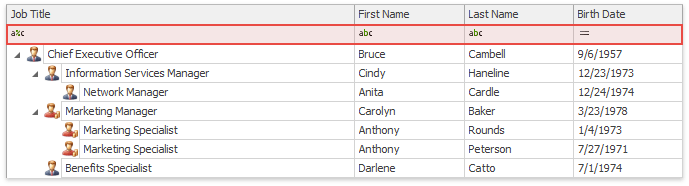
Each cell of the automatic filtering row displays two elements.
- A selector for setting the required filter condition. The set of conditions available for a column depends on the type of data this column displays.
- An editor that allows end-users to enter a value for filtering column data.

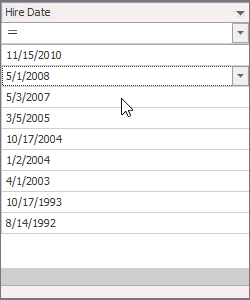
The following animation illustrates how end-users can work with the auto-filter row.
Enable Automatic Filtering Row
Use the TreeListOptionsView.ShowAutoFilterRow property (accessible from TreeList.OptionsView) to enable the automatic filtering row.
API
The table below enumerates public API related to the automatic filtering row.
Property | Description |
|---|---|
Specifies whether or not the auto-filtering row’s condition selector is visible. | |
Specifies the filter criteria operator for this column (“Equals”, “Like”, “Greater”, etc.). | |
If this setting is enabled, Tree List will filter its records immediately as end-users modify the filter condition. Otherwise, filtering will not be applied until a user presses the Enter key or moves focus to another cell. | |
Call this method from code to invoke the automatic filtering row popup menu for a specific column. | |
Methods that allow you to retrieve the currently applied auto-filtering row condition and apply a new one from code. | |
Clears all data filtering applied through the automatic filtering row. |
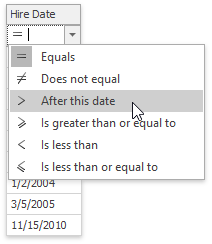
To modify items within the filter condition selector menu, handle the TreeList.PopupMenuShowing event. The code below illustrates how to change the condition text from “Is greater than” to “After this date” for all DateTime columns.
Automatic Filtering Row node ID returns the value of the static TreeList.AutoFilterNodeId property. You can use that to check whether a processed node belongs to the Automatic Filtering Row.
void treeList1_NodeCellStyle(Object sender, DevExpress.XtraTreeList.GetCustomNodeCellStyleEventArgs e) {
    if (e.Node.Id == TreeList.AutoFilterNodeId)
        e.Appearance.BackColor = Color.Green;
}
using System.Linq;

private void TreeList1_PopupMenuShowing(object sender, PopupMenuShowingEventArgs e) {
    if (e.Menu.MenuType == Menu.TreeListMenuType.AutoFilter && (sender as TreeList).FocusedColumn.ColumnType == typeof(DateTime)) {
        var item = e.Menu.Items.Where(x => object.Equals(x.Tag, ColumnAutoFilterCondition.Greater)).FirstOrDefault();
        if (item != null) item.Caption = "After this date";
    }
}
Automatic Filtering Row Without the Condition Selector
Prior to version 17.1, the automatic filtering row had no condition selector. You can switch back to this type of automatic filtering by disabling the TreeListOptionsFilter.AllowAutoFilterConditionChange or WindowsFormsSettings.AllowAutoFilterConditionChange properties. Alternatively, you can set the WindowsFormsSettings.DefaultSettingsCompatibilityMode property to the v16 value.
For columns that utilize CheckEdit, LookUpEdit and ImageComboBoxEdit controls as in-place editors, filtering values will be compared with cell values using the “Equals” operator. For other columns, the “Like” operator is applied.