Getting Started
- 3 minutes to read
This tutorial describes how to create a Windows 10 Scheduler that displays appointments and allows users to manage them.
Adding the SchedulerControl
Run Microsoft Visual Studio 2017.
Create a new Blank App (Universal Windows) project. If prompted, select the target and minimum platform versions that your application should support.
Note
UWP applications that use DevExpress Win10 App Controls require Windows 10 Fall Creators Update (10.0; Build 16299) or newer.
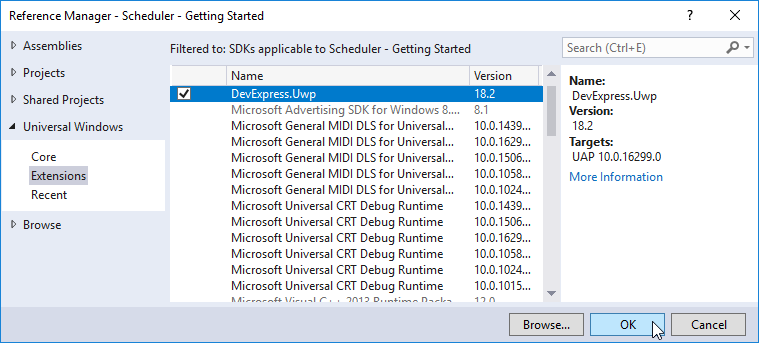
Add a reference to the DevExpress.Uwp SDK. To do this, right-click References in the Solution Explorer and select Add Reference in the invoked context menu. Select the Extensions subgroup in the invoked Reference Manager dialog window and choose the DevExpress.Uwp SDK.
Open the MainPage.xaml. Add a reference to the DevExpress.UI.Xaml.Scheduler namespace.
<Page xmlns:Scheduler="using:DevExpress.UI.Xaml.Scheduler"
...
Add the SchedulerControl.
<Page xmlns:Scheduler="using:DevExpress.UI.Xaml.Scheduler"
    x:Class="Scheduler_Getting_Started.MainPage"
    xmlns="http://schemas.microsoft.com/winfx/2006/xaml/presentation"
    xmlns:x="http://schemas.microsoft.com/winfx/2006/xaml"
    xmlns:local="using:Scheduler_Getting_Started"
    xmlns:d="http://schemas.microsoft.com/expression/blend/2008"
    xmlns:mc="http://schemas.openxmlformats.org/markup-compatibility/2006"
    mc:Ignorable="d">

    <Grid Background="{ThemeResource ApplicationPageBackgroundThemeBrush}">
        <Scheduler:SchedulerControl />
    </Grid>
</Page>
Binding to Data
You need to bind the Scheduler to data to display appointments and allow users to manage them.
Create a View Model.
using System;
using System.Collections.Generic;
using System.Collections.ObjectModel;

public class WorkAppointment {
    public long Id { get; set; }
    public bool AllDay { get; set; }
    public DateTime Start { get; set; }
    public DateTime End { get; set; }
    public int LabelId { get; set; }
    public string Subject { get; set; }
    public string Description { get; set; }
    public string Location { get; set; }
    public string RecurrenceInfo { get; set; }
}
public class SchedulerViewModel {
    public virtual DateTime Start { get; set; }

    ObservableCollection<WorkAppointment> appointments = new ObservableCollection<WorkAppointment>();
    public IEnumerable<WorkAppointment> Appointments { get { return appointments; } }

    public SchedulerViewModel() {
        Init();
    }

    void Init() {
        Start = DateTime.Today;
        appointments.Add(new WorkAppointment() {
            Start = DateTime.Now,
            End = DateTime.Now.AddHours(1),
            LabelId = 1,
            Subject = "Sample Appointment"
        });
        appointments.Add(new WorkAppointment() {
            Start = DateTime.Today,
            AllDay = true,
            LabelId = 3,
            Subject = "Sample AllDay Appointment"
        });
    }
}
Define data context and rebuild the application.
<Page xmlns:Scheduler="using:DevExpress.UI.Xaml.Scheduler"
    x:Class="Scheduler_Getting_Started.MainPage"
    xmlns="http://schemas.microsoft.com/winfx/2006/xaml/presentation"
    xmlns:x="http://schemas.microsoft.com/winfx/2006/xaml"
    xmlns:local="using:Scheduler_Getting_Started"
    xmlns:d="http://schemas.microsoft.com/expression/blend/2008"
    xmlns:mc="http://schemas.openxmlformats.org/markup-compatibility/2006"
    mc:Ignorable="d">
    <Page.DataContext>
        <local:SchedulerViewModel/>
    </Page.DataContext>
    <Grid Background="{ThemeResource ApplicationPageBackgroundThemeBrush}">
        <Scheduler:SchedulerControl />
    </Grid>
</Page>
Bind the Calendar.AppointmentsSource property of the Scheduler’s Calendar to data and specify Calendar.AppointmentMappings to map appointment properties to the data source fields.
    <Scheduler:SchedulerControl>
        <Scheduler:Calendar AppointmentsSource="{Binding Appointments}">
            <Scheduler:Calendar.AppointmentMappings>
                <Scheduler:AppointmentMappings
                    Id="Id"
                    AllDay="AllDay"
                    Start="Start"
                    End="End"
                    LabelId="LabelId"
                    Subject="Subject"
                    Description="Description"
                    Location="Location"
                    RecurrenceRule="RecurrenceInfo">
                </Scheduler:AppointmentMappings>
            </Scheduler:Calendar.AppointmentMappings>
        </Scheduler:Calendar>
    </Scheduler:SchedulerControl>
Customizing the Scheduler
Use the SchedulerControl.Start property to specify the Scheduler’s start date.
<Scheduler:SchedulerControl Start="{Binding Start}">Use the SchedulerControl.Views property to limit the available views to Day View, Full Week View and Month View. Set the WeekView’s IsActive property to true to specify it as the initial view.
    <Scheduler:SchedulerControl Start="{Binding Start}">
        <Scheduler:SchedulerControl.Views>
            <Scheduler:DayView Caption="Day View" />
            <Scheduler:WeekView Caption="Week View" IsActive="True" />
            <Scheduler:MonthView Caption="Month View" />
        </Scheduler:SchedulerControl.Views>
Access the DayView.TimeRulers collection and set a new TimeRuler. Enable the ShowMinutes and AlwaysShowTimeDesignator options for a more detailed time ruler.
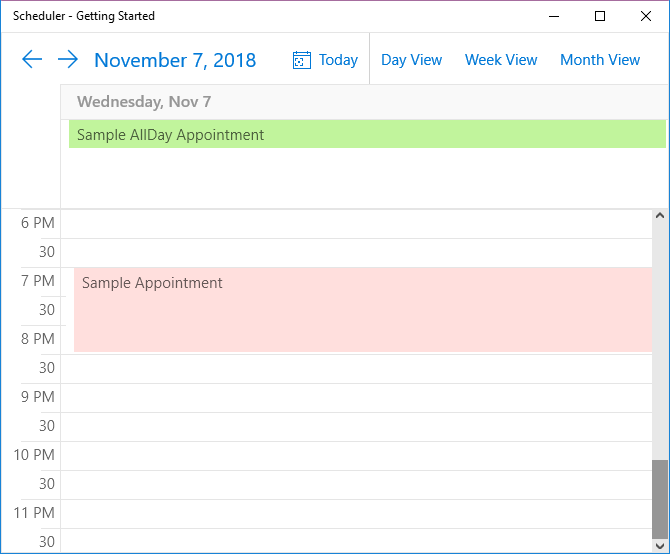
            <Scheduler:DayView Caption="Day View" >
                <Scheduler:DayView.TimeRulers>
                    <Scheduler:TimeRulerCollection>
                        <Scheduler:TimeRuler ShowMinutes="True" AlwaysShowTimeDesignator="True" />
                    </Scheduler:TimeRulerCollection>
                </Scheduler:DayView.TimeRulers>
            </Scheduler:DayView>
The XAML should look like the following:
    <Scheduler:SchedulerControl Start="{Binding Start}">
        <Scheduler:SchedulerControl.Views>
            <Scheduler:DayView Caption="Day View" >
                <Scheduler:DayView.TimeRulers>
                    <Scheduler:TimeRulerCollection>
                        <Scheduler:TimeRuler ShowMinutes="True" AlwaysShowTimeDesignator="True" />
                    </Scheduler:TimeRulerCollection>
                </Scheduler:DayView.TimeRulers>
            </Scheduler:DayView>
            <Scheduler:WeekView Caption="Week View" IsActive="True" />
            <Scheduler:MonthView Caption="Month View" />
        </Scheduler:SchedulerControl.Views>
        <Scheduler:Calendar AppointmentsSource="{Binding Appointments}">
            <Scheduler:Calendar.AppointmentMappings>
                <Scheduler:AppointmentMappings
                        Id="Id"
                        AllDay="AllDay"
                        Start="Start"
                        End="End"
                        LabelId="LabelId"
                        Subject="Subject"
                        Description="Description"
                        Location="Location"
                        RecurrenceRule="RecurrenceInfo">
                </Scheduler:AppointmentMappings>
            </Scheduler:Calendar.AppointmentMappings>
        </Scheduler:Calendar>
    </Scheduler:SchedulerControl>
Run the application to see the result.