How to: Bind a Scheduler to Data via ObjectDataProvider (legacy)
- 7 minutes to read
Note
You are viewing documentation for the legacy WPF Scheduler control. If you’re starting a new project, we strongly recommend that you use a new control declared in the DevExpress.Xpf.Scheduling namespace. If you decide to upgrade an existing project in order to switch to the updated scheduler control, see the Migration Guidelines document.
This document demonstrates how to bind a scheduler control to a collection of custom objects that implement the IBindingList interface, although the scheduler control can be bound to a variety of other data sources. In this tutorial, we will use the ObjectDataProvider object to bind scheduler storage to the data source directly in the XAML markup.
- Step 1. Create Appointment Object Class
- Step 2. Create Data Source Object
- Step 3. Use ObjectDataProvider for Binding to Data
- Step 4. Specify Mappings
- Result
Step 1. Create Appointment Object Class
- Create a new WPF Application project in Visual Studio 2010.
- Add the SchedulerControl object to your project.
- Create a new class item in Visual Studio. Call it CustomEvent.
- Define a CustomEvent class, which will contain all the necessary properties for an appointment in the AppointmentStorage collection: start, end (beginning and ending scheduled times), subject, description, location, status (specifying the appointment status), eventType (specifying the appointment’s recurrence type), label (specifying the appointment label), allday, recurrenceinfo, reminderinfo. This set of properties will be used in default mappings to uniform the number and types of parameters used when data is transported from the datasource to the scheduler storage and vice versa.
using System;

namespace WpfApplication1 {
    public class CustomEvent {
        DateTime start;
        DateTime end;
        string subject;
        int status;
        string description;
        long label;
        string location;
        bool allday;
        int eventType;
        string recurrenceInfo;
        string reminderInfo;

        public DateTime StartTime { get { return start; } set { start = value; } }
        public DateTime EndTime { get { return end; } set { end = value; } }
        public string Subject { get { return subject; } set { subject = value; } }
        public int Status { get { return status; } set { status = value; } }
        public string Description { get { return description; } set { description = value; } }
        public long Label { get { return label; } set { label = value; } }
        public string Location { get { return location; } set { location = value; } }
        public bool AllDay { get { return allday; } set { allday = value; } }
        public int EventType { get { return eventType; } set { eventType = value; } }
        public string RecurrenceInfo { get { return recurrenceInfo; } set { recurrenceInfo = value; }}
        public string ReminderInfo { get { return reminderInfo; } set { reminderInfo = value; } }
    }
}
Step 2. Create Data Source Object
- Create the CustomEventProvider class to be a data source to be bound to the scheduler control.
Define the following methods.
- The CreateEvent method will create the CustomEvent class instance to represent a particular appointment in the data source. Time interval for each appointment will be specified randomly.
The GetCustomEvents method will return the CustomEvent object collection. This method will call the CreateEvent method, then generate a subject, status and label for each created appointment, and add the CustomEvent object to the collection. This collection will be used as a datasource for the scheduler control. Proceed to the next step to learn how to bind scheduler storage to this method via ObjectDataProvider.
Note
In this example, each appointment subject is formed from an element of the Users array and one of the prefixes: meeting, travel or phone call.
public class CustomEventProvider {
    static readonly Random Rnd = new Random();
    static string[] Users = new string[] {"Peter Dolan", "Ryan Fischer", "Andrew Miller",
                                        "Tom Hamlett", "Jerry Campbell", "Carl Lucas",
                                        "Mark Hamilton", "Steve Lee"};

    public static BindingList<CustomEvent> GetCustomEvents() {
        BindingList<CustomEvent> result = new BindingList<CustomEvent>();
        int count = Users.Count();
        for (int i = 0; i < count; i++) {
            string subjPrefix = Users[i] + "'s ";
            result.Add(CreateEvent(subjPrefix + "meeting",  2, 5));
            result.Add(CreateEvent(subjPrefix + "travel", 3, 6));
            result.Add(CreateEvent(subjPrefix + "phone call", 0, 10));
        }
        return result;
    }

    static CustomEvent CreateEvent(string subject, int status, int label) {
        CustomEvent apt = new CustomEvent();
        apt.Subject = subject;
        int rangeInMinutes = 60 * 24;
        apt.StartTime = DateTime.Today + TimeSpan.FromMinutes(Rnd.Next(0, rangeInMinutes));
        apt.EndTime = apt.StartTime + TimeSpan.FromMinutes(Rnd.Next(0, rangeInMinutes / 4));
        apt.Status = status;
        apt.Label = label;
        return apt;
    }
}
Step 3. Use ObjectDataProvider for Binding to Data
Provide the AppointmentStorage with data returned by the CustomEventProvider.GetCustomEvents method. To do this, use ObjectDataProvider in XAML.
- Add the WpfApplication1 namespace and set the local prefix for it to provide the capability to refer to the CustomEventProvider class.
- Create the ObjectDataProvider object.
- Set the ObjectDataProvider.ObjectType property to CustomEventProvider to specify the data source object type.
- Set the ObjectDataProvider.MethodName property to GetCustomEvents to call the CustomEventProvider.GetCustomEvents method and bind the AppointmentStorage to its results.
<Window x:Class="WpfApplication1.MainWindow"
        xmlns="http://schemas.microsoft.com/winfx/2006/xaml/presentation"
        xmlns:x="http://schemas.microsoft.com/winfx/2006/xaml"
        xmlns:dxsch="http://schemas.devexpress.com/winfx/2008/xaml/scheduler"
        xmlns:local="clr-namespace:WpfApplication1"
        Title="MainWindow" Height="350" Width="525">
    <Grid>
        <dxsch:SchedulerControl ActiveViewType="Day">
            <dxsch:SchedulerControl.Storage>
                <dxsch:SchedulerStorage>
                    <dxsch:SchedulerStorage.AppointmentStorage>
                        <dxsch:AppointmentStorage>

                            <!--...-->

                            <dxsch:AppointmentStorage.DataSource>
                                <ObjectDataProvider ObjectType="{x:Type local:CustomEventProvider}"
                                                    MethodName="GetCustomEvents"/>
                            </dxsch:AppointmentStorage.DataSource>
                        </dxsch:AppointmentStorage>
                    </dxsch:SchedulerStorage.AppointmentStorage>
                </dxsch:SchedulerStorage>
            </dxsch:SchedulerControl.Storage>
        </dxsch:SchedulerControl>
    </Grid>
</Window>
Step 4. Specify Mappings
Specify mappings of the appointment standard properties to appropriate properties of the CustomEvent object. To do this, use the AppointmentMapping object accessed via the AppointmentStorage.Mappings property.
<dxsch:AppointmentStorage.Mappings>
    <dxsch:AppointmentMapping
        Start="StartTime"
        End="EndTime"
        AllDay="AllDay"
        Description="Description"
        Label="Label"
        Location="Location"
        Subject="Subject"
        RecurrenceInfo="RecurrenceInfo"
        ReminderInfo="ReminderInfo"
        Status="Status"
        Type="EventType"/>
</dxsch:AppointmentStorage.Mappings>
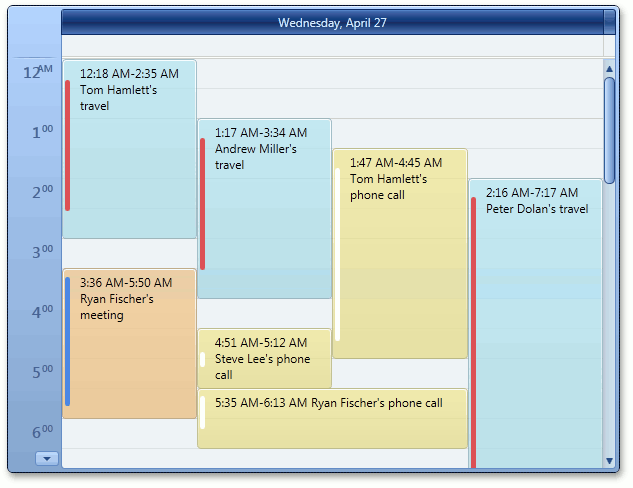
Result
Run the project. The following image shows the resulting scheduler control at runtime.
See Also
Tip
A complete sample project is available in the DevExpress Code Examples database at https://supportcenter.devexpress.com/ticket/details/e3187/how-to-bind-a-scheduler-to-data-via-objectdataprovider.