Tables
- 11 minutes to read
This topic describes how RichEditControl manages document tables both in code and in the User Interface.
Table API
Using the Table API, you can create a complex table as shown on the image from scratch. To do that, perform the following actions.
-
Create the new empty table with a given number of cells and, if necessary, extend it by adding new rows and columns.
-
Change the table row/column width and height to a fixed value or make it automatically fit the content.
-
The table cells can be split into a number of new ones or merged into a single cell.
-
Insert any desired content to the table cells from text strings to floating objects and tables.
Customize the Table Appearance
Change the background or border color of particular cells or create a table style to quickly format the entire table.
Delete Necessary Table Elements
If necessary, remove a row, cell or a column, or delete the table completely.
Create the Table
Create the table as on the image below using members from the table.
| Member | Description |
|---|---|
| TableCollection.Create | Creates a new table at the specified position within the document. |
| TableRowCollection.Append | Adds a new row to the end of the table. |
| TableRowCollection.InsertBefore | Inserts a new row before the specified one. |
| TableRowCollection.InsertAfter | Inserts a new row before the given one. |
| TableCellCollection.Append | Adds a new column at the table’s end. |
| TableCellCollection.InsertBefore | Inserts a new column before a given one. |
| TableCellCollection.InsertAfter | Inserts a new column after the specified one. |
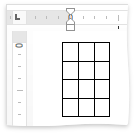
The following code creates a new 2x2 table and expands it by adding a new column and two rows.
Note
A complete sample project is available at https://github.com/DevExpress-Examples/tables-simple-example-t472346.
'Create a new table and specify its layout type
Dim table As Table = document.Tables.Create(document.Range.End, 2, 2)

'Add new rows to the table
Dim newRowBefore As TableRow = table.Rows.InsertBefore(0)
Dim newRowAfter As TableRow = table.Rows.InsertAfter(0)

'Add a new column to the table
Dim newLastColumn As TableCell = table.Rows(0).Cells.Append()
Resize and Reorder the Table
To resize and reorder table rows and columns, use the following API.
| Member | Description |
|---|---|
| TableRow.Height | Specifies the height of a given row. |
| TableRow.HeightType | Specifies how the row height should be determined. |
| TableCell.Height | Specifies the height of a given cell. |
| TableCell.HeightType | Specifies how the cell height should be determined. |
| Table.SetPreferredWidth | Sets the preferred width for the table. |
| TableCell.PreferredWidth | Sets the preferred width value for the table column. |
| TableCell.PreferredWidthType | Determines the preferred width value. |
| Table.RightToLeft | Specifies whether to change the table layout’s direction to right-to-left. |
Note
We do not recommend setting different size to several cells within one column. It changes the layout of the whole column.
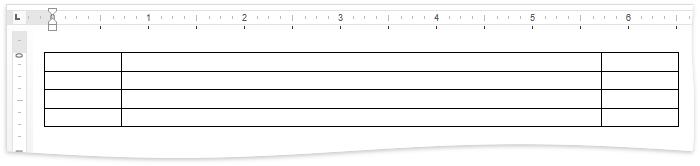
The code snippet below resizes the table columns so it appears as on the following image.
Note
A complete sample project is available at https://github.com/DevExpress-Examples/tables-simple-example-t472346.
'Set the width of the first column
table.Rows(0).FirstCell.PreferredWidthType = WidthType.Fixed
table.Rows(0).FirstCell.PreferredWidth = DevExpress.Office.Utils.Units.InchesToDocumentsF(0.8F)


'Set the second column width and cell height
table(0, 1).PreferredWidthType = WidthType.Fixed
table(0, 1).PreferredWidth = DevExpress.Office.Utils.Units.InchesToDocumentsF(5F)
table(0, 1).HeightType = HeightType.Exact
table(0, 1).Height = DevExpress.Office.Utils.Units.InchesToDocumentsF(0.5F)

'Set the third column width
table.Rows(0).LastCell.PreferredWidthType = WidthType.Fixed
table.Rows(0).LastCell.PreferredWidth = DevExpress.Office.Utils.Units.InchesToDocumentsF(0.8F)
Merge and Split Table Cells
The following API allows you to split and merge the specific table cells.
| Member | Description |
|---|---|
| Table.MergeCells | Merges a specified cell range. The merged cells content will persist. |
| TableCell.Split | Splits the specified table cell into the desired number of new cells. |
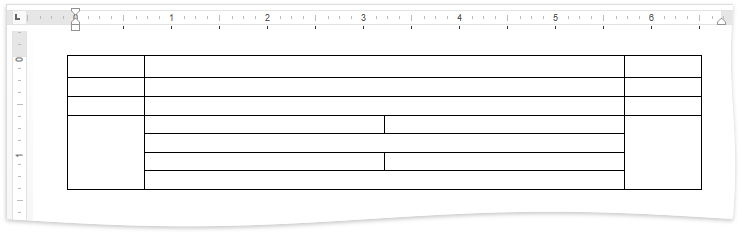
The code snippet demonstrates how to modify the cells, so the table will appear as on the image below.
Note
A complete sample project is available at https://github.com/DevExpress-Examples/tables-simple-example-t472346.
Dim table As Table = document.Tables(0)
table.BeginUpdate()

'Split cell into 8
table(3, 1).Split(4, 2)

'Merge cells
table.MergeCells(table(4, 1), table(4, 2))
table.MergeCells(table(6, 1), table(6, 2))
table.EndUpdate()
Fill the Table with Data
To fill table cells with data, use one of the methods listed below. To retrieve the range the target cell occupies, use the TableCell.Range property.
| Member | Description |
|---|---|
| SubDocument.InsertSingleLineText | Inserts a text string to the specified position. |
| SubDocument.InsertText | Inserts text to the given position within the document. |
| TableCollection.Create | Inserts a table to the specified position within the document. |
| ShapeCollection.InsertPicture | Inserts a floating picture to a given document position. |
| DocumentImageCollection.Insert | Inserts an inline image to the specified position. |
| ShapeCollection.InsertTextBox | Inserts a text box to the given position. |
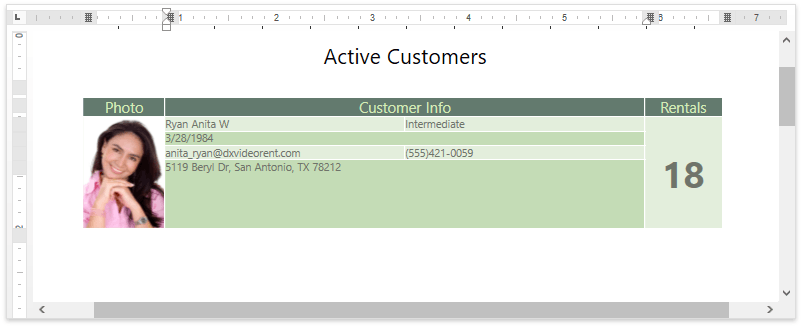
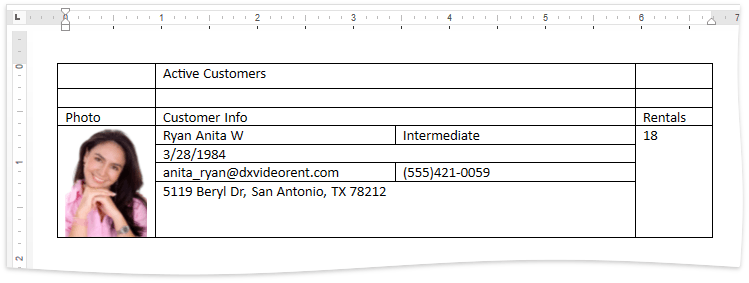
The following code example inserts the text and an image to the table cells as shown on the image above.
Note
A complete sample project is available at https://github.com/DevExpress-Examples/tables-simple-example-t472346.
Dim table As Table = document.Tables(0)

'Insert the header data
document.InsertSingleLineText(table.Rows(0).Cells(1).Range.Start, "Active Customers")
document.InsertSingleLineText(table(2, 0).Range.Start, "Photo")
document.InsertSingleLineText(table(2, 1).Range.Start, "Customer Info")
document.InsertSingleLineText(table(2, 2).Range.Start, "Rentals")

'Insert the customer photo
document.Images.Insert(table(3, 0).Range.Start, DocumentImageSource.FromFile("photo.png"))

'Insert the customer info
document.InsertText(table(3, 1).Range.Start, "Ryan Anita W")
document.InsertText(table(3, 2).Range.Start, "Intermediate")
document.InsertText(table(4, 1).Range.Start, "3/28/1984")
document.InsertText(table(5, 1).Range.Start, "anita_ryan@dxvideorent.com")
document.InsertText(table(5, 2).Range.Start, "(555)421-0059")
document.InsertText(table(6, 1).Range.Start, "5119 Beryl Dr, San Antonio, TX 78212")

document.InsertSingleLineText(table(3, 3).Range.Start, "18")
Format the Cell Content
The table content can me formatted as a regular text. For further information, refer to the Text Formatting topic.
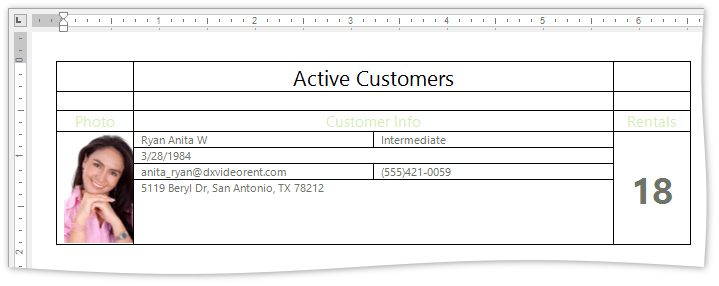
In this example, the table data is formatted as shown on the image below.
Change the Table Appearance
Change the Appearance of Certain Table Elements
To customize the table appearance as on the image above, change the specific cell’s background and border color. The properties listed below let you solve this task.
| Member | Description |
|---|---|
| TableCell.BackgroundColor | Sets the background color of the given cell. |
| TableCellBorder.LineColor | Sets the color of the given cell border. |
| Table.TableBackgroundColor | Sets the color of the empty space between cells. |
| Table.ForEachCell | Helps you to perform the specific actions for each table cell. |
| TableCellProcessorDelegate | The delegate to a method that performs necessary actions. |
| Document.DefaultTableProperties | Provides access to the default table properties. |
The code snippet below changes the third row’s background color and disables the border visibility of the first two rows.
Note
A complete sample project is available at https://github.com/DevExpress-Examples/tables-simple-example-t472346.
    Dim table As Table = document.Tables(0)
    table.BeginUpdate()

    'Call the ChangeCellBorderColor method for every cell in the first two rows
    For i As Integer = 0 To 1
        For j As Integer = 0 To (table.Rows(i).Cells.Count) - 1
            ChangeCellBorderColor(table(i, j))
        Next j
    Next i
    'Specify the background color for the third row
    Dim targetRow As TableRow = table.Rows(2)
    targetRow.Cells(0).BackgroundColor = Color.FromArgb(99, 122, 110)
    targetRow.Cells(1).BackgroundColor = Color.FromArgb(99, 122, 110)
    targetRow.Cells(2).BackgroundColor = Color.FromArgb(99, 122, 110)
    table.EndUpdate()
Public Shared Sub ChangeCellBorderColor(ByVal cell As TableCell)
    'Specify the border style and the background color for the header cells
    cell.Borders.Bottom.LineStyle = TableBorderLineStyle.None
    cell.Borders.Left.LineStyle = TableBorderLineStyle.None
    cell.Borders.Right.LineStyle = TableBorderLineStyle.None
    cell.Borders.Top.LineStyle = TableBorderLineStyle.None
    cell.BackgroundColor = Color.Transparent
End Sub
Create and Apply a Table Style
Customize all the table elements at once using the table style. Since the RichEditControl doesn’t have any predefined table styles, create a custom one using the following members.
Member | Description |
|---|---|
Creates new TableStyle instance. | |
Provides access to the TableStyleCollection collection. | |
Adds a new item to the document tables collection. Note that without adding a table style to the collection, you won’t be able to apply it. | |
Specifies the style of the current table. | |
Provides access to the conditional styles of the current document. | |
Creates a new TableConditionalStyle instance. | |
Specifies the default table style. |
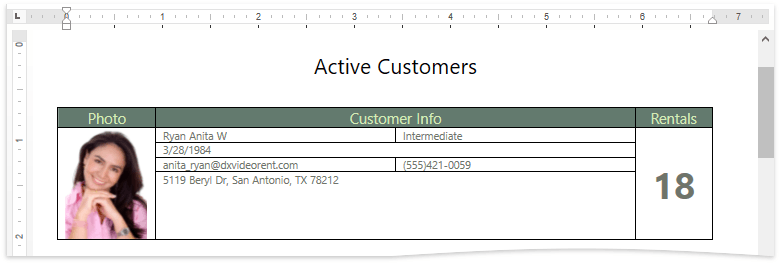
The following code creates a new table style, sets the desired style options, including settings for specific table elements (odd rows and the bottom right cell), and applies it to the table.
Note
A complete sample project is available at https://github.com/DevExpress-Examples/tables-simple-example-t472346.
document.BeginUpdate()
'Create a new table style
Dim tStyleMain As TableStyle = document.TableStyles.CreateNew()

'Specify style options
tStyleMain.TableBorders.InsideHorizontalBorder.LineStyle = TableBorderLineStyle.Single
tStyleMain.TableBorders.InsideHorizontalBorder.LineColor = Color.White

tStyleMain.TableBorders.InsideVerticalBorder.LineStyle = TableBorderLineStyle.Single
tStyleMain.TableBorders.InsideVerticalBorder.LineColor = Color.White
tStyleMain.CellBackgroundColor = Color.FromArgb(227, 238, 220)
tStyleMain.Name = "MyTableStyle"

'Add the style to the document collection
document.TableStyles.Add(tStyleMain)

'Create conditional styles (styles for specific table elements)
Dim myNewStyleForOddRows As TableConditionalStyle = tStyleMain.ConditionalStyleProperties.CreateConditionalStyle(ConditionalTableStyleFormattingTypes.OddRowBanding)
myNewStyleForOddRows.CellBackgroundColor = Color.FromArgb(196, 220, 182)

Dim myNewStyleForBottomRightCell As TableConditionalStyle = tStyleMain.ConditionalStyleProperties.CreateConditionalStyle(ConditionalTableStyleFormattingTypes.BottomRightCell)
myNewStyleForBottomRightCell.CellBackgroundColor = Color.FromArgb(188, 214, 201)
document.EndUpdate()

document.BeginUpdate()

' Apply a previously defined style to the table
document.Tables(0).Style = tStyleMain
document.EndUpdate()
The image below illustrates the table after the created table style is applied.
Delete the Table Elements
Delete the cell, row or the entire table
To delete any specific table element, use the API from the following table.
| Member | Description |
|---|---|
| TableCell.Delete | Deletes the desired cell from the table. The cell that is next to the deleted one is moved to the left. |
| TableRow.Delete | Deletes the desired row from the table. |
| TableCollection.Remove | Deletes the entire table from the document. |
The following code snippet deletes the first row and the second cell from the second row.
Note
A complete sample project is available at https://github.com/DevExpress-Examples/tables-simple-example-t472346.
Dim tbl As Table = document.Tables(0)
tbl.BeginUpdate()

'Delete a cell
tbl.Cell(1, 1).Delete()

'Delete a row
tbl.Rows(0).Delete()
tbl.EndUpdate()

'Delete the entire table
'document.Tables.Remove(tbl);
Delete the column
Table columns cannot be directly deleted, as there is no instance that represents this table element.
To remove the desired column, delete the cells with the corresponding index from every table row using the Table.ForEachRow method. The code sample below shows the way to solve this task.
Note
A complete sample project is available at https://github.com/DevExpress-Examples/tables-simple-example-t472346.
'Declare a method that deletes the second cell in every table row
Public Shared Sub DeleteCells(ByVal row As TableRow, ByVal i As Integer)
    row.Cells(1).Delete()
End Sub
    'Call the declared method using ForEachRow method and the corresponding delegate
    tbl.ForEachRow(New TableRowProcessorDelegate(AddressOf DeleteCells))
Manage Tables in the User Interface
An end user can insert a table by clicking the Table button on the Insert Ribbon tab. The invoked menu allows end users to select the number of rows and columns for the table.
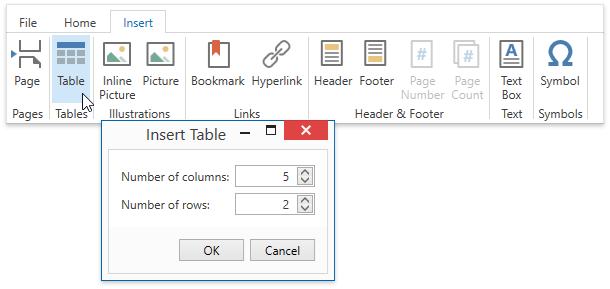
The maximum number of rows in the RichEditControl table is 32767, the maximum number of columns is 63. If an end user enters the number of rows or columns that exceed the limit, an error icon appears, as shown below.

The Table Tools contextual tab allows end users to modify the tables (insert or delete the specific table elements, merge or split cells), specify the layout options, apply the table style or set the borders and shading options.
To learn how to provide the application with the Ribbon interface, refer to the Lesson 5 - Create Separate Ribbon Pages for a Rich Text Editor topic.
Additionally, end users can change table settings and the table layout using the table dialogs.