Appointment Labels and Statuses
- 4 minutes to read
Note
You are viewing documentation for the legacy WPF Scheduler control. If you’re starting a new project, we strongly recommend that you use a new control declared in the DevExpress.Xpf.Scheduling namespace. If you decide to upgrade an existing project in order to switch to the updated scheduler control, see the Migration Guidelines document.
This document describes the appointment marks (labels and statuses), which can be used by end-users to graphically identify the appointments in their schedules. By default, the label and status collections contain items that are similar to the corresponding marks in Microsoft® Outlook®, and can be used to bring the Outlook style to your scheduling application. However, you are also able to create your own custom labels and statuses. This document provides some examples on how to do this.
Appointment Labels
An appointment’s label is one of an appointment’s basic visual characteristics. It is used for at-a-glance appointment identification. The appointment’s label is displayed in the scheduler as a background color, which is used to fill the client region of the rectangle that represents the appointment.
The following picture illustrates what appointments with different labels look like.

An individual label is represented by the AppointmentLabel object. The label’s display name and color can be accessed via its UserInterfaceObject.DisplayName and AppointmentLabel.Color properties, and all the labels are stored in the AppointmentStorage.Labels collection.
By default, the Labels collection is filled with the following labels.
| Color | Display Name | LabelId |
|---|---|---|
 |
None | 0 |
 |
Important | 1 |
 |
Business | 2 |
 |
Personal | 3 |
 |
Vacation | 4 |
 |
Must Attend | 5 |
 |
Travel Required | 6 |
 |
Needs Preparation | 7 |
 |
Birthday | 8 |
 |
Anniversary | 9 |
 |
Phone Call | 10 |
You can edit the Labels collection and customize existing labels, remove them or add your own. This can be done both at design time and runtime.
The code snippet below illustrates how to mark an appointment with a custom label and status created at runtime.
Note
A complete sample project is available at https://github.com/DevExpress-Examples/wpf-schedulercontrol-api-t442105.
scheduler.Storage.AppointmentStorage.Clear();

string[] IssueList = { "Consultation", "Treatment", "X-Ray" };
Color[] IssueColorList = { Colors.Ivory, Colors.Pink, Colors.Plum };
string[] PaymentStatuses = { "Paid", "Unpaid" };
Color[] PaymentColorStatuses = { Colors.Green, Colors.Red };


IAppointmentLabelStorage labelStorage = scheduler.Storage.AppointmentStorage.Labels;
labelStorage.Clear();
int count = IssueList.Length;
for (int i = 0; i < count; i++)
{
    IAppointmentLabel label = labelStorage.CreateNewLabel(i, IssueList[i]);
    label.SetColor(IssueColorList[i]);
    labelStorage.Add(label);
}
IAppointmentStatusStorage statusStorage = scheduler.Storage.AppointmentStorage.Statuses;
statusStorage.Clear();
count = PaymentStatuses.Length;
for (int i = 0; i < count; i++)
{
    IAppointmentStatus status = statusStorage.CreateNewStatus(i, PaymentStatuses[i], PaymentStatuses[i]);
    status.SetBrush(new SolidColorBrush(PaymentColorStatuses[i]));
    statusStorage.Add(status);
}

// Create a new appointment.
Appointment apt = scheduler.Storage.CreateAppointment(AppointmentType.Normal);
apt.Subject = "Test";
apt.Start = DateTime.Now;
apt.End = DateTime.Now.AddHours(2);
apt.ResourceId = scheduler.Storage.ResourceStorage[0].Id;
apt.LabelKey = labelStorage.GetByIndex(2).Id;
scheduler.Storage.AppointmentStorage.Add(apt);
Note
Instead of using labels, you can paint an appointment background by applying custom templates to appointments.
Appointment Statuses
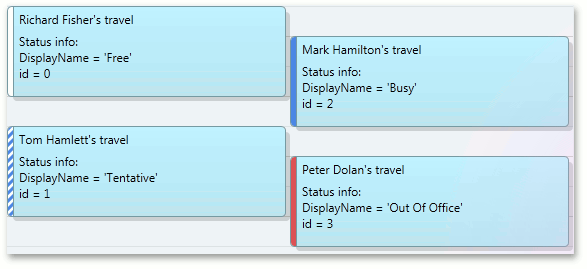
The appointment’s availability status is one of an appointment’s visual characteristics (marks). It is used for at-a-glance appointment identification. The availability status is indicated in the scheduler as a strip displayed on an appointment rectangle’s left side. The strip is colored according to the status type, as illustrated in the following picture.
Note
Availability statuses are only visible under the Day View or Work-Week View.
An individual status is represented by the AppointmentStatus object. The status’s display name and fill color can be specified via its UserInterfaceObject.DisplayName and AppointmentStatus.Brush properties. The statuses are stored in the AppointmentStorage.Statuses collection.
By default, the Statuses collection contains the following items.
| Standard Color | Standard Display Name |
|---|---|
 |
Free |
 |
Tentative |
 |
Busy |
 |
Out Of Office |
 |
Working Elsewhere |
The default values for the Statuses collection items are the same as availability statuses in Microsoft® Outlook®. However, you are able to edit this collection and customize the existing statuses, remove them, or add your own custom statuses. This can be done both at design time and runtime.
For example, to add items to the collection of appointment statuses at design time, add the following code to the XAML markup.
<dxsch:AppointmentStorage>
    <dxsch:AppointmentStorage.Statuses>
        <dxsch:AppointmentStatus Color="YellowGreen" DisplayName="Reserved" MenuCaption="Reserved"/>
        <dxsch:AppointmentStatus Color="Green" DisplayName="Confirmed" MenuCaption="Confirmed"/>
    </dxsch:AppointmentStorage.Statuses>
</dxsch:AppointmentStorage>
To mark an appointment with the specified availability status at runtime, use the Appointment.StatusId property.