How to: Bind a Scheduler to MS Access Database (Part 2) (legacy)
- 5 minutes to read
Note
You are viewing documentation for the legacy WPF Scheduler control. If you’re starting a new project, we strongly recommend that you use a new control declared in the DevExpress.Xpf.Scheduling namespace. If you decide to upgrade an existing project in order to switch to the updated scheduler control, see the Migration Guidelines document.
In real-world scheduling applications, an appointment is seldom processed “as is”, and is usually assigned to different resources. The developer decides what is a resource, and provides resource data to a scheduling application. This document contains an example of task scheduling, and illustrates the concept of resources for appointments.
An Educational Center.
Resources: Every teacher who works at this center.
Appointment: A time interval when any one of the teachers is delivering a lecture.
Events are usually linked with objects. For example, if we represent lessons as events, they are linked with teachers as objects. Thus, some teachers (objects) conduct different lessons (events). In Scheduler terms, the objects to which appointments are linked are called Resources. (See Resources for more information.) The following image demonstrates a visual representation of a resource.
This topic describes how to add resources to a scheduling application, and how to link these resources to appointments. In this example, we will use the Cars table of the CarsDB database as the resource for the scheduler.
This lesson consists of the following sections.
Create Data Objects
- Open the WPF Application containing the SchedulerControl that was created in How to: Bind a Scheduler to MS Access Database (Part 1) (legacy) document.
- This SchedulerControl should already be bound to the CarScheduling table of the CarsDB database (by default, the CarsDB.mdb file that is placed in C:\Users\Public\Documents\DXperience 19.1 Demos\Data). To bind the scheduler to the Cars table of the same database, this table must be added to the CarsDBDataSet schema. To do this, open the CarsDBDataSet.xsd designer by double-clicking the corresponding item in the Solution Explorer.
- When the designer is opened, expand the Server Explorer pane, which shows all data connections that are currently available in Visual Studio. To do this, select the Server Explorer item in the View menu, or press CTRL+ALT+S.
In the list of available Data Connections, expand the CarsDB.mdb node, select the ID, Model and Picture fields of the Cars table, and drop them onto the designer. This will add the Cars table with the specified fields to CarsDBDataSet.
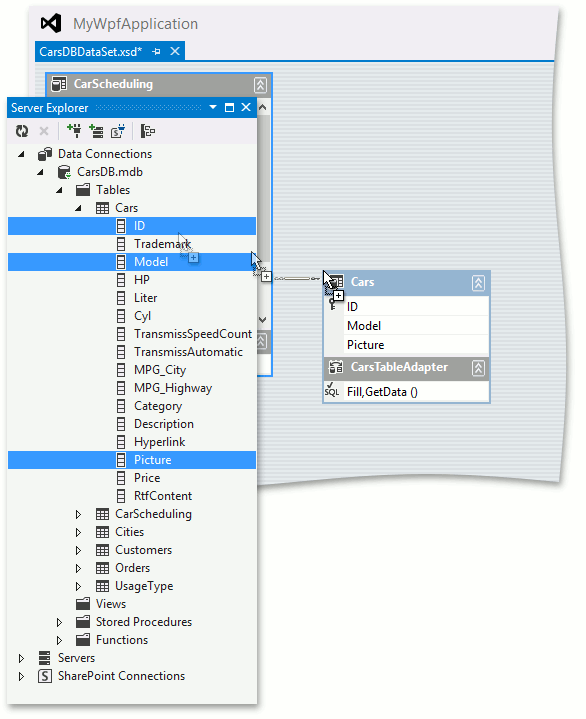
- When the Cars table is added to the dataset schema, the one-to-many relationship (a single row in the first table can be related to one or more rows in the second table, while a row in the second table can only be related to one row in the first table) between the Cars table and CarScheduling table is automatically created by Visual Studio. To apply these changes, click Save in the Standard toolbar in Visual Studio, or press CTRL+S.
Next, as you did in the previous lesson for appointments, you will need to bind a scheduler to resource data and specify standard mappings for resource properties.
Bind the Scheduler to Data
All resource data is stored in the Cars data table. This data should be provided to the ResourceStorage object, which is returned by the SchedulerStorage.ResourceStorage property. To bind the storage to data, set the DataSource property to the Cars data table. It is also necessary to populate the DataTable object with data from the database using the Fill method of the CarsTableAdapter object.
Add the following code to the Main Window implementation.
// Bind the scheduler storage to resource data.
this.CarSchedulingControl.Storage.ResourceStorage.DataSource = dataSet.Cars;

// Load data into the 'CarsDBDataSet.Cars' table.
CarsDBDataSetTableAdapters.CarsTableAdapter carsAdapter = new CarsDBDataSetTableAdapters.CarsTableAdapter();
carsAdapter.Fill(dataSet.Cars);
Next, you will map all required data fields for scheduler resources.
Specify Mappings
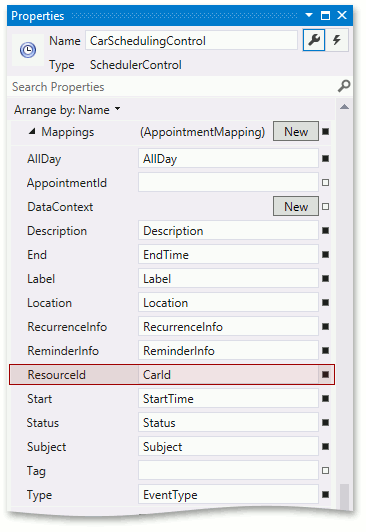
Set the Storage.AppointmentStorage.Mappings.ResourceId property value to CarId. This property specifies a unique identifier of the appointment’s associated resource.
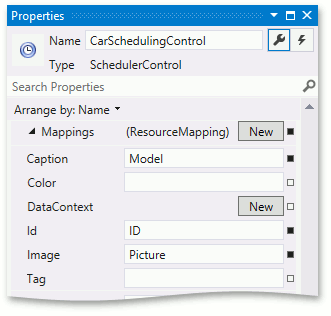
Next, set Storage.ResourceStorage mappings (Caption, Id and Image) as illustrated in the image below.
As a result, you should have the following XAML. (If your XAML does not look like the following, overwrite it.)
<dxsch:SchedulerStorage.AppointmentStorage>
<!--Replace the following part if it is incorrect-->
    <dxsch:SchedulerStorage.ResourceStorage>
        <dxsch:ResourceStorage>
            <dxsch:ResourceStorage.Mappings>
                <dxsch:ResourceMapping
                    Caption="Model"
                    Id="ID"
                    Image="Picture"/>
            </dxsch:ResourceStorage.Mappings>
        </dxsch:ResourceStorage>
    </dxsch:SchedulerStorage.ResourceStorage>
    <dxsch:AppointmentStorage
        DataSource="CarScheduling">
        <dxsch:AppointmentStorage.Mappings>
            <dxsch:AppointmentMapping>
                AllDay="AllDay"
                Description="Description"
                End="EndTime"
                Label="Label"
                Location="Location"
                ReminderInfo="ReminderInfo"
                Start="StartTime"
                Status="Status"
                Subject="Subject"
                Type="EventType"
                ResourceId="CarId"
                RecurrenceInfo="RecurrenceInfo"/>
        </dxsch:AppointmentStorage.Mappings>
    </dxsch:AppointmentStorage>
<!--______________________________-->
</dxsch:SchedulerStorage.AppointmentStorage>
Customize the Scheduler to display events grouped by car.
Customize the Scheduler
Group Appointments by Resources
To group the scheduler data by resource, set the GroupType property value to Resource:

Set the Number of Resources Displayed
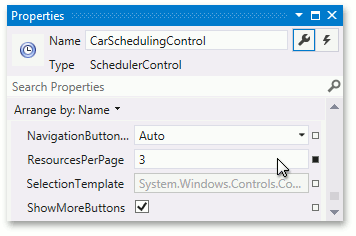
In our example, there are many resources in the ResourceStorage, making the scheduler area appear cluttered. To avoid this, use the SchedulerViewBase.ResourcesPerPage property to specify the number of resources shown on the screen at a time.
To do this, set the WeekView.ResourcesPerPage property value to 3:
Finally, your XAML should appear as follows. (If it does not look like the code below, then overwrite it.)
<Window
        xmlns="http://schemas.microsoft.com/winfx/2006/xaml/presentation"
        xmlns:x="http://schemas.microsoft.com/winfx/2006/xaml"
        xmlns:dxsch="http://schemas.devexpress.com/winfx/2008/xaml/scheduler" x:Class="MyWpfApplication.MainWindow"
        Title="MainWindow" Height="350" Width="525">
    <Grid>
        <dxsch:SchedulerControl
            Name = "CarSchedulingControl"
            ActiveViewType="Week"
            Start="2010-07-15"
            GroupType="Resource">
            <dxsch:SchedulerControl.WeekView>
                <dxsch:WeekView ResourcesPerPage="3">
                    <dxsch:WeekView.AppointmentDisplayOptions>
                        <dxsch:SchedulerWeekViewAppointmentDisplayOptions/>
                    </dxsch:WeekView.AppointmentDisplayOptions>
                </dxsch:WeekView>
            </dxsch:SchedulerControl.WeekView>
            <dxsch:SchedulerControl.Storage>
                <dxsch:SchedulerStorage>
                    <dxsch:SchedulerStorage.ResourceStorage>
                        <dxsch:ResourceStorage>
                            <dxsch:ResourceStorage.Mappings>
                                <dxsch:ResourceMapping
                                    Caption="Model"
                                    Id="ID"
                                    Image="Picture"/>
                            </dxsch:ResourceStorage.Mappings>
                        </dxsch:ResourceStorage>
                    </dxsch:SchedulerStorage.ResourceStorage>
                    <dxsch:SchedulerStorage.AppointmentStorage>
                        <dxsch:AppointmentStorage
                            DataSource="CarScheduling">
                            <dxsch:AppointmentStorage.Mappings>
                                <dxsch:AppointmentMapping
                                    AllDay="AllDay"
                                    Description="Description"
                                    End="EndTime"
                                    Label="Label"
                                    Location="Location"
                                    ReminderInfo="ReminderInfo"
                                    Start="StartTime"
                                    Status="Status"
                                    Subject="Subject"
                                    Type="EventType"
                                    ResourceId="CarId"
                                    RecurrenceInfo="RecurrenceInfo"/>
                            </dxsch:AppointmentStorage.Mappings>
                        </dxsch:AppointmentStorage>
                    </dxsch:SchedulerStorage.AppointmentStorage>
                </dxsch:SchedulerStorage>
            </dxsch:SchedulerControl.Storage>
        </dxsch:SchedulerControl>
    </Grid>
</Window>
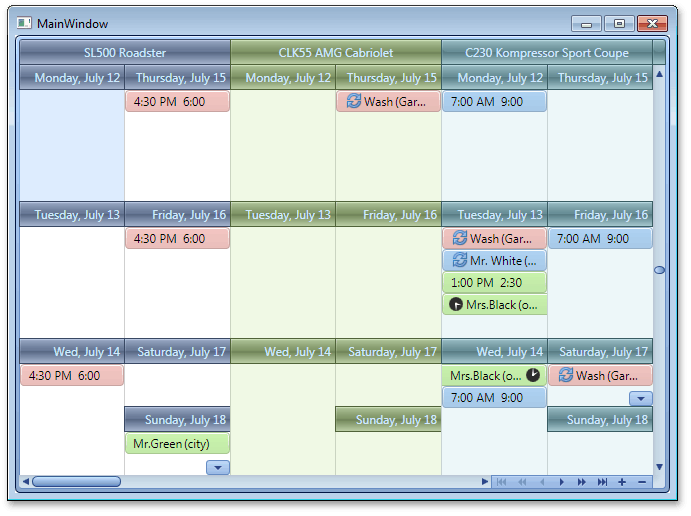
Result
Run the project. The following image shows the application at runtime:
See Also
Tip
A complete sample project is available in the DevExpress Code Examples database at http://www.devexpress.com/example=E2495.