How to create a simple layout of dock panes
- 4 minutes to read
In this walkthrough, we’ll create a simple layout of dock panes, shown in the following image.
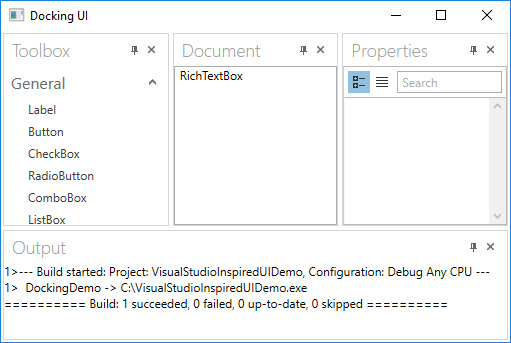
This example shows how to define the layout of dock panes in XAML. We’ll create five dock panes:
- Toolbox represents a regular dock pane, docked to the left.
- Properties is an auto-hidden dock pane.
- Messages is a floating dock pane.
- Document 1 and Document 2 are two tab pages, representing the main region of the application.
Walkthrough
- Create a new WPF Application and open the Window1.xaml file in the Designer.
Add a DockLayoutManager component to the window. This can be performed by dragging the DockLayoutManager component from the Toolbox.
The DockLayoutManager represents a container for dock panes. This is the component you work with to add the docking functionality to your application.
Set the DockLayoutManager.Margin property to 12. This will make the DockLayoutManager occupy the entire window with an empty space around it.
Your XAML may look like the following. If it doesn’t, you can overwrite your code with the following:
<Window x:Class="SimpleDockingApplication.Window1"
    xmlns="http://schemas.microsoft.com/winfx/2006/xaml/presentation"
    xmlns:x="http://schemas.microsoft.com/winfx/2006/xaml"
    Title="Window1" Height="390" Width="600" xmlns:dxdo="http://schemas.devexpress.com/winfx/2008/xaml/docking">
    <Grid>
        <dxdo:DockLayoutManager Margin="12" Name="DockLayoutManager1" />
    </Grid>
</Window>
You can overwrite your Window1.xaml file with this code without dragging a DockLayoutManager component to the window. However, in this instance, you need to manually add the following libraries to the References section of your project: DevExpress.Data, DevExpress.Xpf.Bars, DevExpress.Xpf.Core, DevExpress.Xpf.Docking and DevExpress.Xpf.Layout.Core.
First, to add the docking functionality to the application, add a root LayoutGroup object to the DockLayoutManager. Overwrite the content of the Window1.xaml file with the following XAML markup:
<Window x:Class="SimpleDockingApplication.Window1"
    xmlns="http://schemas.microsoft.com/winfx/2006/xaml/presentation"
    xmlns:x="http://schemas.microsoft.com/winfx/2006/xaml"
    Title="Window1" Height="390" Width="600" xmlns:dxdo="http://schemas.devexpress.com/winfx/2008/xaml/docking">
    <Grid>
        <dxdo:DockLayoutManager Margin="12" Name="DockLayoutManager1">
            <dxdo:LayoutGroup Orientation="Horizontal">

            </dxdo:LayoutGroup>
        </dxdo:DockLayoutManager>
    </Grid>
</Window>
The root LayoutGroup represents the root container for dock panes and dock pane groups (regular, tabbed or document groups). Note that auto-hidden and floating panes will not be added to the root LayoutGroup. They will be added to the DockLayoutManager’s corresponding collections.
Setting the LayoutGroup.Orientation property to Horizontal ensures that the LayoutGroup’s children will be arranged horizontally.
Add a Toolbox dock pane, which will be docked at the left edge of the root LayoutGroup.
Dock panes are represented by the LayoutPanel class, so add a LayoutPanel object to the root LayoutGroup, as shown below:
<Window x:Class="SimpleDockingApplication.Window1"
    xmlns="http://schemas.microsoft.com/winfx/2006/xaml/presentation"
    xmlns:x="http://schemas.microsoft.com/winfx/2006/xaml"
    Title="Window1" Height="390" Width="600" xmlns:dxdo="http://schemas.devexpress.com/winfx/2008/xaml/docking">
    <Grid>
        <dxdo:DockLayoutManager Margin="12" Name="DockLayoutManager1">
            <dxdo:LayoutGroup Orientation="Horizontal">
                <dxdo:LayoutPanel x:Name="paneToolbox" Caption="Toolbox" ItemWidth="150">
                    <!--Add custom controls to the pane here-->
                </dxdo:LayoutPanel>
            </dxdo:LayoutGroup>
        </dxdo:DockLayoutManager>
    </Grid>
</Window>
Add a container to the root LayoutGroup, which will occupy its central section. The container will display the Document 1 and Document 2 tab pages.
To emulate the Visual Studio document tabbed interface using DXDocking, add a DocumentGroup object to the root LayoutGroup. The DocumentGroup’s children (DocumentPanel objects) are represented as tab pages.
Use the following code to add a DocumentGroup with two DocumentPanel objects:
<Window x:Class="SimpleDockingApplication.Window1"
    xmlns="http://schemas.microsoft.com/winfx/2006/xaml/presentation"
    xmlns:x="http://schemas.microsoft.com/winfx/2006/xaml"
    Title="Window1" Height="390" Width="600" xmlns:dxdo="http://schemas.devexpress.com/winfx/2008/xaml/docking">
    <Grid>
        <dxdo:DockLayoutManager Margin="12" Name="DockLayoutManager1">
            <dxdo:LayoutGroup Orientation="Horizontal">
                <dxdo:LayoutPanel x:Name="paneToolbox" Caption="Toolbox" ItemWidth="150">
                    <!--Add custom controls to the pane here-->
                </dxdo:LayoutPanel>
                <dxdo:DocumentGroup>
                    <dxdo:DocumentPanel x:Name="paneDocument1" Caption="Document 1">
                        <RichTextBox/>
                    </dxdo:DocumentPanel>
                    <dxdo:DocumentPanel x:Name="paneDocument2" Caption="Document 2">
                        <RichTextBox/>
                    </dxdo:DocumentPanel>
                </dxdo:DocumentGroup>
            </dxdo:LayoutGroup>
        </dxdo:DockLayoutManager>
    </Grid>
</Window>
As you see, each DocumentPanel page displays a RichTextBox control.
Add a Properties auto-hidden dock pane.
To create an auto-hidden panel, first add an AutoHideGroup object to the DockLayoutManager.AutoHideGroups collection. Then, add a new LayoutPanel object to this group. Insert the following code in your Window1.xaml file before the
</dxdo:DockLayoutManager>line:<dxdo:DockLayoutManager.AutoHideGroups> <dxdo:AutoHideGroup DockType="Right"> <dxdo:LayoutPanel x:Name="paneProperties" Caption="Properties"> </dxdo:LayoutPanel> </dxdo:AutoHideGroup> </dxdo:DockLayoutManager.AutoHideGroups>Note
It’s not possible to add dock pane groups to an AutoHideGroup. You can add only regular LayoutPanel objects to the AutoHideGroup.
Add a Messages floating dock pane.
To create a floating dock pane, first add a FloatGroup object to the DockLayoutManager.FloatGroups collection. Then, add a new LayoutPanel object to this group. Insert the following code in your Window1.xaml file before the
</dxdo:DockLayoutManager>line:<dxdo:DockLayoutManager.FloatGroups> <dxdo:FloatGroup FloatSize="200,200" FloatLocation="200,100"> <dxdo:LayoutPanel x:Name="paneMessages" Caption="Messages"> <RichTextBox/> </dxdo:LayoutPanel> </dxdo:FloatGroup> </dxdo:DockLayoutManager.FloatGroups>You can also add regular and tabbed groups of LayoutPanel objects to a FloatGroup.
- Now, you can run the application and see the result.
Complete Code
<Window x:Class="SimpleDockingApplication.Window1" xmlns="http://schemas.microsoft.com/winfx/2006/xaml/presentation" xmlns:x="http://schemas.microsoft.com/winfx/2006/xaml" Title="Window1" Height="390" Width="600" xmlns:dxdo="http://schemas.devexpress.com/winfx/2008/xaml/docking">
<Grid>
<dxdo:DockLayoutManager Margin="12" Name="dockManager1">
<dxdo:LayoutGroup Orientation="Horizontal">
<dxdo:LayoutPanel x:Name="paneToolbox" Caption="Toolbox" ItemWidth="150">
<!--Add custom controls to the pane here-->
</dxdo:LayoutPanel>
<dxdo:DocumentGroup>
<dxdo:DocumentPanel x:Name="paneDocument1" Caption="Document 1">
<RichTextBox />
</dxdo:DocumentPanel>
<dxdo:DocumentPanel x:Name="paneDocument2" Caption="Document 2">
<RichTextBox />
</dxdo:DocumentPanel>
</dxdo:DocumentGroup>
</dxdo:LayoutGroup>
<!--Create an auto-hidden pane-->
<dxdo:DockLayoutManager.AutoHideGroups>
    <dxdo:AutoHideGroup DockType="Right">
        <dxdo:LayoutPanel x:Name="paneProperties"  Caption="Properties">
        </dxdo:LayoutPanel>
    </dxdo:AutoHideGroup>
</dxdo:DockLayoutManager.AutoHideGroups>
<!--Create a floating pane-->
<dxdo:DockLayoutManager.FloatGroups>
<dxdo:FloatGroup FloatSize="200,200" FloatLocation="200,100">
<dxdo:LayoutPanel x:Name="paneMessages" Caption="Messages">
<RichTextBox />
</dxdo:LayoutPanel>
</dxdo:FloatGroup>
</dxdo:DockLayoutManager.FloatGroups>
</dxdo:DockLayoutManager>
</Grid>
</Window>